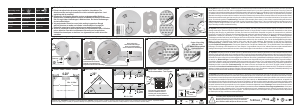
CAUTION: Do not attempt to remove the Alarm without first re
-
leasing the tamper clip as shown in Figure 1.
8. Connect the mains power to the Smoke Alarm circuit. Check
the operation of the Alarm as outlined below .
INTERCONNECTING Ei SMOKE ALARMS &
HEAT ALARMS
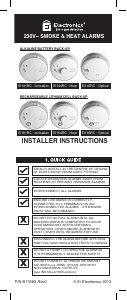
Note: A maximum of twelve Ei 150 / 151TL / 154TL / 155H /
156TLH / 130 / 131 / 134 / 136 Smoke Alarms or Heat Alarms
may be interconnected along with an
Ei 158 pattress with relay
(see Accessories below).
(If you want to connect more than twelve alarms contact your
distributor).
Systems using more than 3 or 4 alarms must be very carefully
planned to ensure nuisance alarms are not excessive. e.g. from
cooking or weekly testing.
·
Smoke Alarm Locator Switch (
Ei 159) should be incorpo
-
rated into the system and be readily accessible to all oc
-
cupants so that the source of an alarm can be quickly
identified.
· All alarms must be cleaned and maintained regularly.
· A qualified person must be on call to quickly remove any
faulty alarms (i.e. units with red light flashing), which are
causing all the alarms to sound.
WARNING: Do not connect these Alarms to any other type
of
Ei Alarm, or to any other model produced by another
manufacturer, apart from those listed above. Doing this may
damage the Alarms and could result in a shock or fire hazard.
The interconnect wire (minimum 0.75mm cable) must be
treated as if it was live. It should be insulated and sheathed.
A maximum of 250 metres (820 ft) of wire can be used (maxi
-
mum resistance between detectors 50 ohms).
These Smoke Alarms should be interconnected only within the
confines of a single family living unit. If they are connected be
-
tween different units there may be excessive nuisance alarms.
Everybody may not be aware that they are being tested or that it
is a nuisance alarm caused by cooking etc.
CHECKING THE OPERATION OF THE
ALARMS
INSPECTION & TESTING PROCEDURE
After installation check all the Alarms
(i) Check that the green mains indicator light is on. (If it is off
check circuit breakers, fuses and wiring etc.) Check the red light
behind the button or on the cover flashes every 40 seconds.
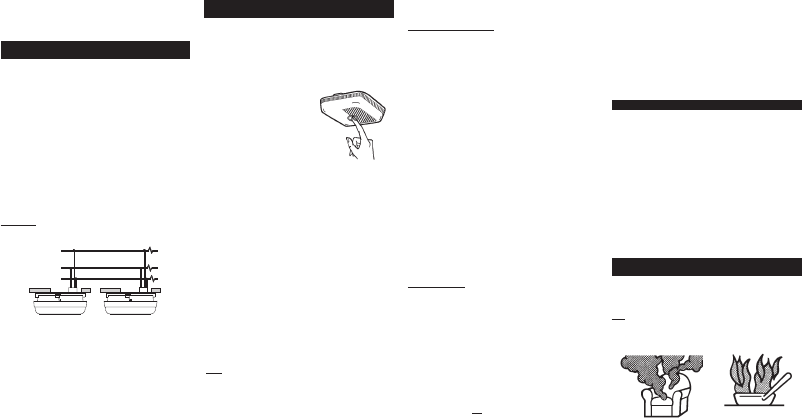
(ii) Press the test button (see figure 8) for up to 10 seconds to en
-
sure the sensor chamber, electron
-
ics and sounder are working. A red
light behind the test button or on
the cover, will flash while horn is
sounding. The alarm will stop when
the button is released. Pressing
the test button simulates the effect
of smoke or heat during a real fire
and is the best way to ensure the
Alarm is operating correctly.
WARNING: DO NOT TEST WITH
FLAME.
This can set fire to the Alarm and damage the house.
We do not recommend testing with smoke or heat as the results
can be misleading unless special apparatus is used.
Pressing and releasing the test / hush button or an optical alarm
(Ei156TLH or Ei155H) puts it into hush mode. The smoke sensi-
tivity is reduced and the red light flashes every 10 seconds (in-
stead of every 40 seconds). The optical alarm automatically
resets to normal sensitivity after 10 minutes. (If an alarm is going
to be checked with smoke in a suitable apparatus, the test / hush
button must not be pressed beforehand as this makes the unit
sensitive for 10 minutes.)
(iii) Check for any sign of contamination such as cobwebs or
dust and clean the alarm as described in the “User Instructions”
leaflet.
Interconnected alarms
Test the first unit by pressing the button. All the detectors should
alarm within about 5 seconds of the first horn sounding and the
red light on the first unit only will flash about once a second.
Check all the other units similarly.
(Note
: Ionisation and Heat Alarms signal to other intercon
-
nected alarms about 4 seconds after their own horn sounds. Op
-
tical alarms signal within about a second).
Checking Rechargeable Cells
(Models Ei 151TL, Ei 154TL & Ei 156TLH only)
1. When the unit is beeping:
The Alarm automatically monitors the cells every 40 seconds to
ensure that they are satisfactory. If a problem is identified it will
give a short beep every 40 seconds. If the unit is giving beeps
then check the following:
(i) Check that the green mains power light is on. If it is off the
Alarm has been powered from the battery and the beeps indi
-
cate it is depleted. Re-connect the mains, check fuse, circuit
breakers and wiring. If in doubt contact a qualified electrician.
The beeps should cease within 2 hours as the battery charges
up.
(ii) Check that the hush button has not been pressed inadver
-
tently (
Ei 151TL only). This also causes beeps every 40 sec
-
onds for up to 15 minutes. Press the test button to cancel hush
mode beeps.
(iii) The cells may be depleted. The beeps should cease within 2
hours as the cells charge up. Fully charged, the cells will provide
up to 6 months back-up without mains power.
(iv) On the Optical Smoke Alarms only (
Ei 155H & Ei 156TLH)
if the unit beeps and the red light does not flash at the same time
it indicates a problem with the smoke chamber - see Cleaning
the Smoke Alarm in the “User Instructions” leaflet.
If all of the above possible causes of beeps have been ruled out
but the beeping has still persisted for over 2 hours with the green
light on - the rechargeable cells may be defective. The Alarm
must be returned to the manufacturer for repair or replacement
(see section Getting Your Smoke Alarm Serviced - in the “User
Instructions” leaflet).
2.
Manual Testing:
The functioning of the rechargeable cells (applicable to models
Ei 151TL, Ei 154TL & Ei 156TLH only) can be checked as fol
-
lows:
(i) Ensure that the alarm has been connected to the mains,
green light on, for a least 2 days for the battery to charge.
(ii) Turn off the mains power at the distribution board and check
that the green indicator light is extinguished. Do not remove the
plug from the rear as this will disconnect the cells.
(iii) Press the test button and ensure the horn sounds loudly for
10 seconds.
(iv) Release the test button and watch it carefully for one minute:
·
The red light behind the test button or on the cover will
flash at least once.
·
The unit must not
give a beep which indicates the cells
are low.
(v) Turn on the mains supply at the distribution board only if the
unit passes all the above tests.
Note: If the mains is disconnected and the cells are almost de
-
pleted the unit will beep every 40 seconds for at least 72 hours.
This is to remind the user to reconnect the mains supply.
The unit will operate from the mains alone, even with a fully de
-
pleted or a defective battery, though it may not give sufficient
warning of fire if the mains supply is disconnected for any reason.
If there are any problems get a qualified electrician to inspect the
house wiring and connections to the alarms. If there are still prob
-
lems the unit must be returned for examination (see section on
Getting Your Smoke Alarm Serviced - in the “User Instructions”
leaflet.
ACCESSORIES
(a) Surface Mounting Kits Ei157 & Ei158:
The Smoke Alarm can be surface mounted without the need to
form a cavity for the plug and supply wires by using the Ei157 Kit.
This is particularly useful with concrete surfaces, with retro-fitting
and surface wiring.
The Ei158 Kit is similar but also includes a relay rated 250V AC / 5
amps. This is useful for remote signalling and turning on lights.
(b) Smoke Alarm Locator Ei159:
The Smoke Alarm locator is recommended for systems with three
or more Smoke / Heat Alarms as it helps quickly identify the unit in
alarm and reduces the impact of nuisance alarms.
When three or more units are interconnected with alarms sound-
ing, pressing the Smoke Alarm Locator button will silence all units
for 10 minutes, except those sensing fire. It is easily installed be-
tween the interconnect and neutral wires.
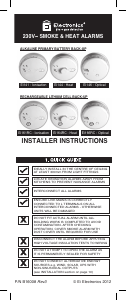
What is the best Smoke Alarm - Optical or
IonIonisation ?
Both types respond in all standard fires but each type may respond
faster to particular fires as shown. Ei Electronics manufactures
complementary Smoke Alarms, Optical Smoke Alarm (Ei156TLH
& Ei155H) and Ionisation Smoke Alarm (Ei151TL & Ei150). For
dual
protection install each type.
10
11
12
13
PAGE 10,11,12&13
B12931
REV-2
BROWN - LIVE
BLUE - NEUTRAL
WHITE - INTERCONNECT
Figure 7
Figure 8
Optical Sensor
Best for slow smouldering fires
- large smoke particles
Best for fast flaming fires
- small smoke particles
Ionisation Sensor


Delta i konversationen om denna produkt
Här kan du dela vad du tycker om Ei Electronics Ei156TLH Brandvarnare. Om du har en fråga, läs först noggrant igenom manualen. Att begära en manual kan göras genom att använda vårt kontaktformulär.