sound of the radio. The radio should be set to a reasonably loud
conversation level. If you can’t hear it over your radio the
chances are that it wouldn’t wake a person.
If a Smoke Alarm is too far away for it to wake a person, it is best
to link it to another Smoke Alarm or Heat Alarm near the bed
-
room. The following alarms Ei 151TL / 154TL / 156TLH / 155H /
150 can be interconnected - when one alarm senses smoke, all
interconnected alarms respond (see below for further details).
LOCATIONS TO AVOID
Don’t place Smoke Alarms in any of the following areas:
·
Bathrooms, kitchens, shower rooms, garages or other
rooms where the smoke alarm may be triggered by steam,
condensation, normal smoke or fumes. Keep at least 6 me
-
tres (20 feet) away from sources of smoke - wall mounting if
necessary.
Don’t place Heat Alarms in any of the following areas:
·
Bathrooms, shower rooms or other room where the unit
may be triggered by steam or condensation.
Don’t place Smoke or Heat Alarms in any of the following areas:
·
Places where the normal temperature can exceed 40° C
(104° F) or be below 4° C (39° F) e.g. attics, furnace rooms
etc. Directly above ovens or kettles, as the heat/steam
could cause nuisance alarms.
· Near a decorative object, door, light fitting, window
molding etc., that may prevent smoke or heat from entering
the Alarm.
· Surfaces that are normally warmer or colder than the rest
of the room (for example attic hatches, uninsulated exterior
walls etc). Temperature differences might stop smoke or
heat from reaching the unit.
·
Next to or directly above heaters or air conditioning
vents, windows, wall vents etc. that can change the direc
-
tion of airflow.
·
In very high or awkward areas (e.g. over stair shafts) where
it may be difficult to reach the alarm (for testing or hushing).
·
Locate away from very dusty or dirty areas as dust build-up
in the chamber can impair performance. It can also block the
insect screen mesh and prevent smoke from entering the
smoke detector chamber.
·
Locate the unit at least 1 metre (3 feet) from dimmer con
-
trolled lights and wiring - some dimmers can cause inter
-
ference.
·
Locate unit at least 1.5m (5 feet) and route wiring at least 1m
(3 feet) away for fluorescent light fittings as electrical
“noise” and/or flickering may effect the unit. Do not wire into
the same circuit as fluorescent lights or dimmers.
·
Do not locate in insect infested areas. Small insects get
-
ting into the smoke detector chamber can cause intermittent
alarms. Insects and contamination on the Heat Alarm sen
-
sor can increase its response time.
The location must comply with applicable building regulations.
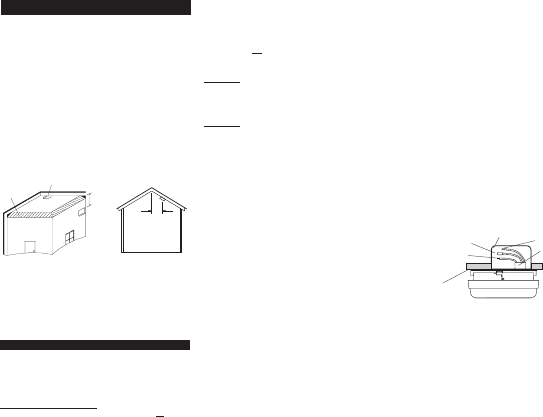
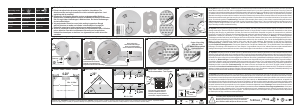
Ceiling Mounting
Hot smoke rises and spreads out, so a central ceiling position is
the preferred location. The air is “dead” and does not move in
corners, therefore Smoke & Heat Alarms must be mounted
away from corners. Place the unit at least 300mm (12 inches)
from any light fitting or decorative object which might obstruct
smoke / heat entering the Smoke Alarm. Keep at least 300mm
(12 inches) away from walls. See figure 4.
On a sloping Ceiling
In areas with sloping or peaked ceilings install your Smoke
Alarm 90 cm (3 feet) from the highest point measured horizon
-
tally (see figure 5), because “dead air” at the apex may prevent
smoke from reaching the unit.
Wall Mounting
When a ceiling position is not practical (for example on a ceiling
having exposed beams or joists, or built-in radiant heating) put
the top edge of your Smoke Alarm between 150 and 300mm (6
and 12 inches) below the ceiling. Keep at least 300mm (12
inches) from room corners. (see figure 4).
Wall mounting is not recommended for Heat Alarms.
INSTALLING SMOKE & HEAT ALARMS
The Alarm is designed to be permanently mounted on to a stan
-
dard or rectangular junction box and connected to the 230 VAC,
50Hz mains supply. It requires a current of 40mA. The Alarm
must not be exposed to dripping or splashing. There are impor
-
tant markings on the underside of the alarm.
IMPORTANT PRECAUTION: Do not install the actual
alarm itself in new or renovated buildings until all
work is
completed (including floor coverings) and the building has
been fully cleaned. The wiring can be installed when appro
-
priate. (Excessive dust and debris from building work can
contaminate the smoke chamber or heat sensor and cause
problems, it will also invalidate the guarantee). If it must be
installed, cover it completely, particularly around the
edges, with a dust cover (e.g. with the elasticated cover
supplied or a plastic bag), until all cleaning is finished.
The Alarm must not
be connected when the house wiring insula
-
tion is being checked with high voltages i.e. don’t use a megger
on the alarm.
WARNING:
Mains operated Alarms should be installed and in
-
terconnected by a qualified electrician in accordance with the
Regulations for Electrical Installations published by the Institu
-
tion of Electrical Engineers (UK). Failure to install this Alarm cor
-
rectly may expose the user to shock or fire hazards.
WARNING:
The Alarm must be continuously powered 24 hours
a day so it is important that it is not on a circuit that can be turned
off by a switch.
Note: BS 5839-Part 6:1995 gives the following recommendations regarding
the mains supply to be used in different situations. A grade D system consists
of one or more mains powered Smoke Alarms, each with an integral standby
supply. (The Ei 151TL, Ei 156TLH Smoke Alarms and Ei 154TL Heat Alarms
with rechargeable lithium back-up cells can be used in a grade D system). A
grade E system consists of one or more mains powered Smoke Alarms with
no standby supply. (The Ei 150, Ei 155H Smoke Alarms & Ei 154TL Heat
Alarms can be used in a grade E system).
The power supply for Alarms in a grade D system should be derived from the
public electricity supply to the dwelling. The mains supply to the Alarms
should take the form of either:
(a) an independent circuit at the dwelling’s main distribution board, in which
case no other electrical equipment should be connected to this circuit (other
than a dedicated monitoring device installed to indicate failure of the mains
supply to the Alarms); or
(b) a separately electrically protected, regularly used local lighting circuit.
The power supply for Alarms in a grade E system should be derived from the
public electricity supply to the dwelling. The mains supply to the Alarm(s)
should comprise a single independent circuit at the dwelling’s main distribu
-
tion board. No other electrical equipment should be connected to this circuit
(other than a dedicated monitoring device installed to indicate failure of the
mains supply to the Alarms).
If Alarms are being interconnected, all Alarms should be connected to a single
circuit.
INSTALLATION
1. Select a location complying with the above advice.
2. Disconnect the AC mains supply from the circuit that is going
to be used.
3. Install a junction box where the alarm is to be placed. If the
mounting plate is going to be screwed directly on to the junction
box ensure the orientation of the box will leave the Smoke Alarm
squarely aligned to the rectangular walls. We recommend the
use of 6243Y mains cable - use the third core for the intercon
-
nect line. Do not use an earth wire for the interconnect line.
4. Remove the mounting plate from the Smoke Alarm by releas
-
ing the tamper-proofing catch with a small screwdriver as shown
in Figure 1 and sliding the Smoke Alarm from the plate.
5. The wires in the plug supplied are colour coded as follows:
Brown : Live
Blue : Neutral
White : Interconnect
The Brown wire must be connected to the terminal/wire which is
marked with the letter L or coloured Red or Brown.
The Blue wire must be connected to the terminal/wire which is
marked with the letter N or coloured Black or Blue.
Failure to do this will damage interconnected alarms.
The extra insulation on the white wire must not be removed un
-
less the Alarms are being interconnected. To interconnect the
Alarms connect all the White wires together as shown in Fig
-
ure 7.
N.B. The Alarm is not to be earthed so no connection is to be
made to terminals or wires marked with the letter E, the symbol
or coloured Green or Green and Yellow.
(There are two blue wires in the plug which are joined together.
This is to disconnect the battery when the plug is removed on the
Ei 151TL, Ei 154TL & Ei 156TLH models).
6. When correctly terminated, route the plug and wires through
the rectangular slot in the mounting plate. Screw the mounting
plate to the junction box in the orientation required to have the
rectangular Smoke Alarm aligned squarely with the walls. En
-
sure that there is a clear space behind the rectangular hole in the
mounting plate. This will allow the plug which protrudes from the
Smoke Alarm to move freely as it is slid into position.
Ensure the gasket seals around the edge of the junction box /
hole in the ceiling. This is to prevent air draughts affecting the
smoke / heat entering the alarm. If the orifice is too large it
should be sealed with a silicone rubber or equivalent.
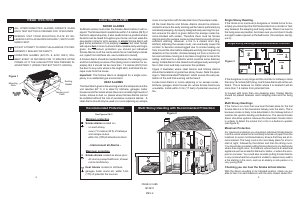
7. Push the plug firmly on to the socket in the back of the Alarm
being careful to orientate the polarized plug correctly. Slide the
Alarm on to the mounting bracket until the tamper-proof clip
clicks into place.
PAGE 6,7,8&9
B12931
REV-2
7
6
8
9
POSITIONING SMOKE & HEAT ALARMS
Figure 6
PUSH FIT
CONNECTOR
BLUE - NEUTRAL
WHITE - INTERCONNECT
(INSULATED)
BROWN - LIVE
230 VAC
Sealing
Gasket
JUNCTION
BOX
Figure 5Figure 4
DEAD AIR
SPACES
NEVER WITHIN
300mm OF ANY
ROOM CORNER
IDEAL IN CENTRE
OF CEILING
150 TO 300mm
(6 TO 12")
900mm
(3 ft)


Delta i konversationen om denna produkt
Här kan du dela vad du tycker om Ei Electronics Ei156TLH Brandvarnare. Om du har en fråga, läs först noggrant igenom manualen. Att begära en manual kan göras genom att använda vårt kontaktformulär.