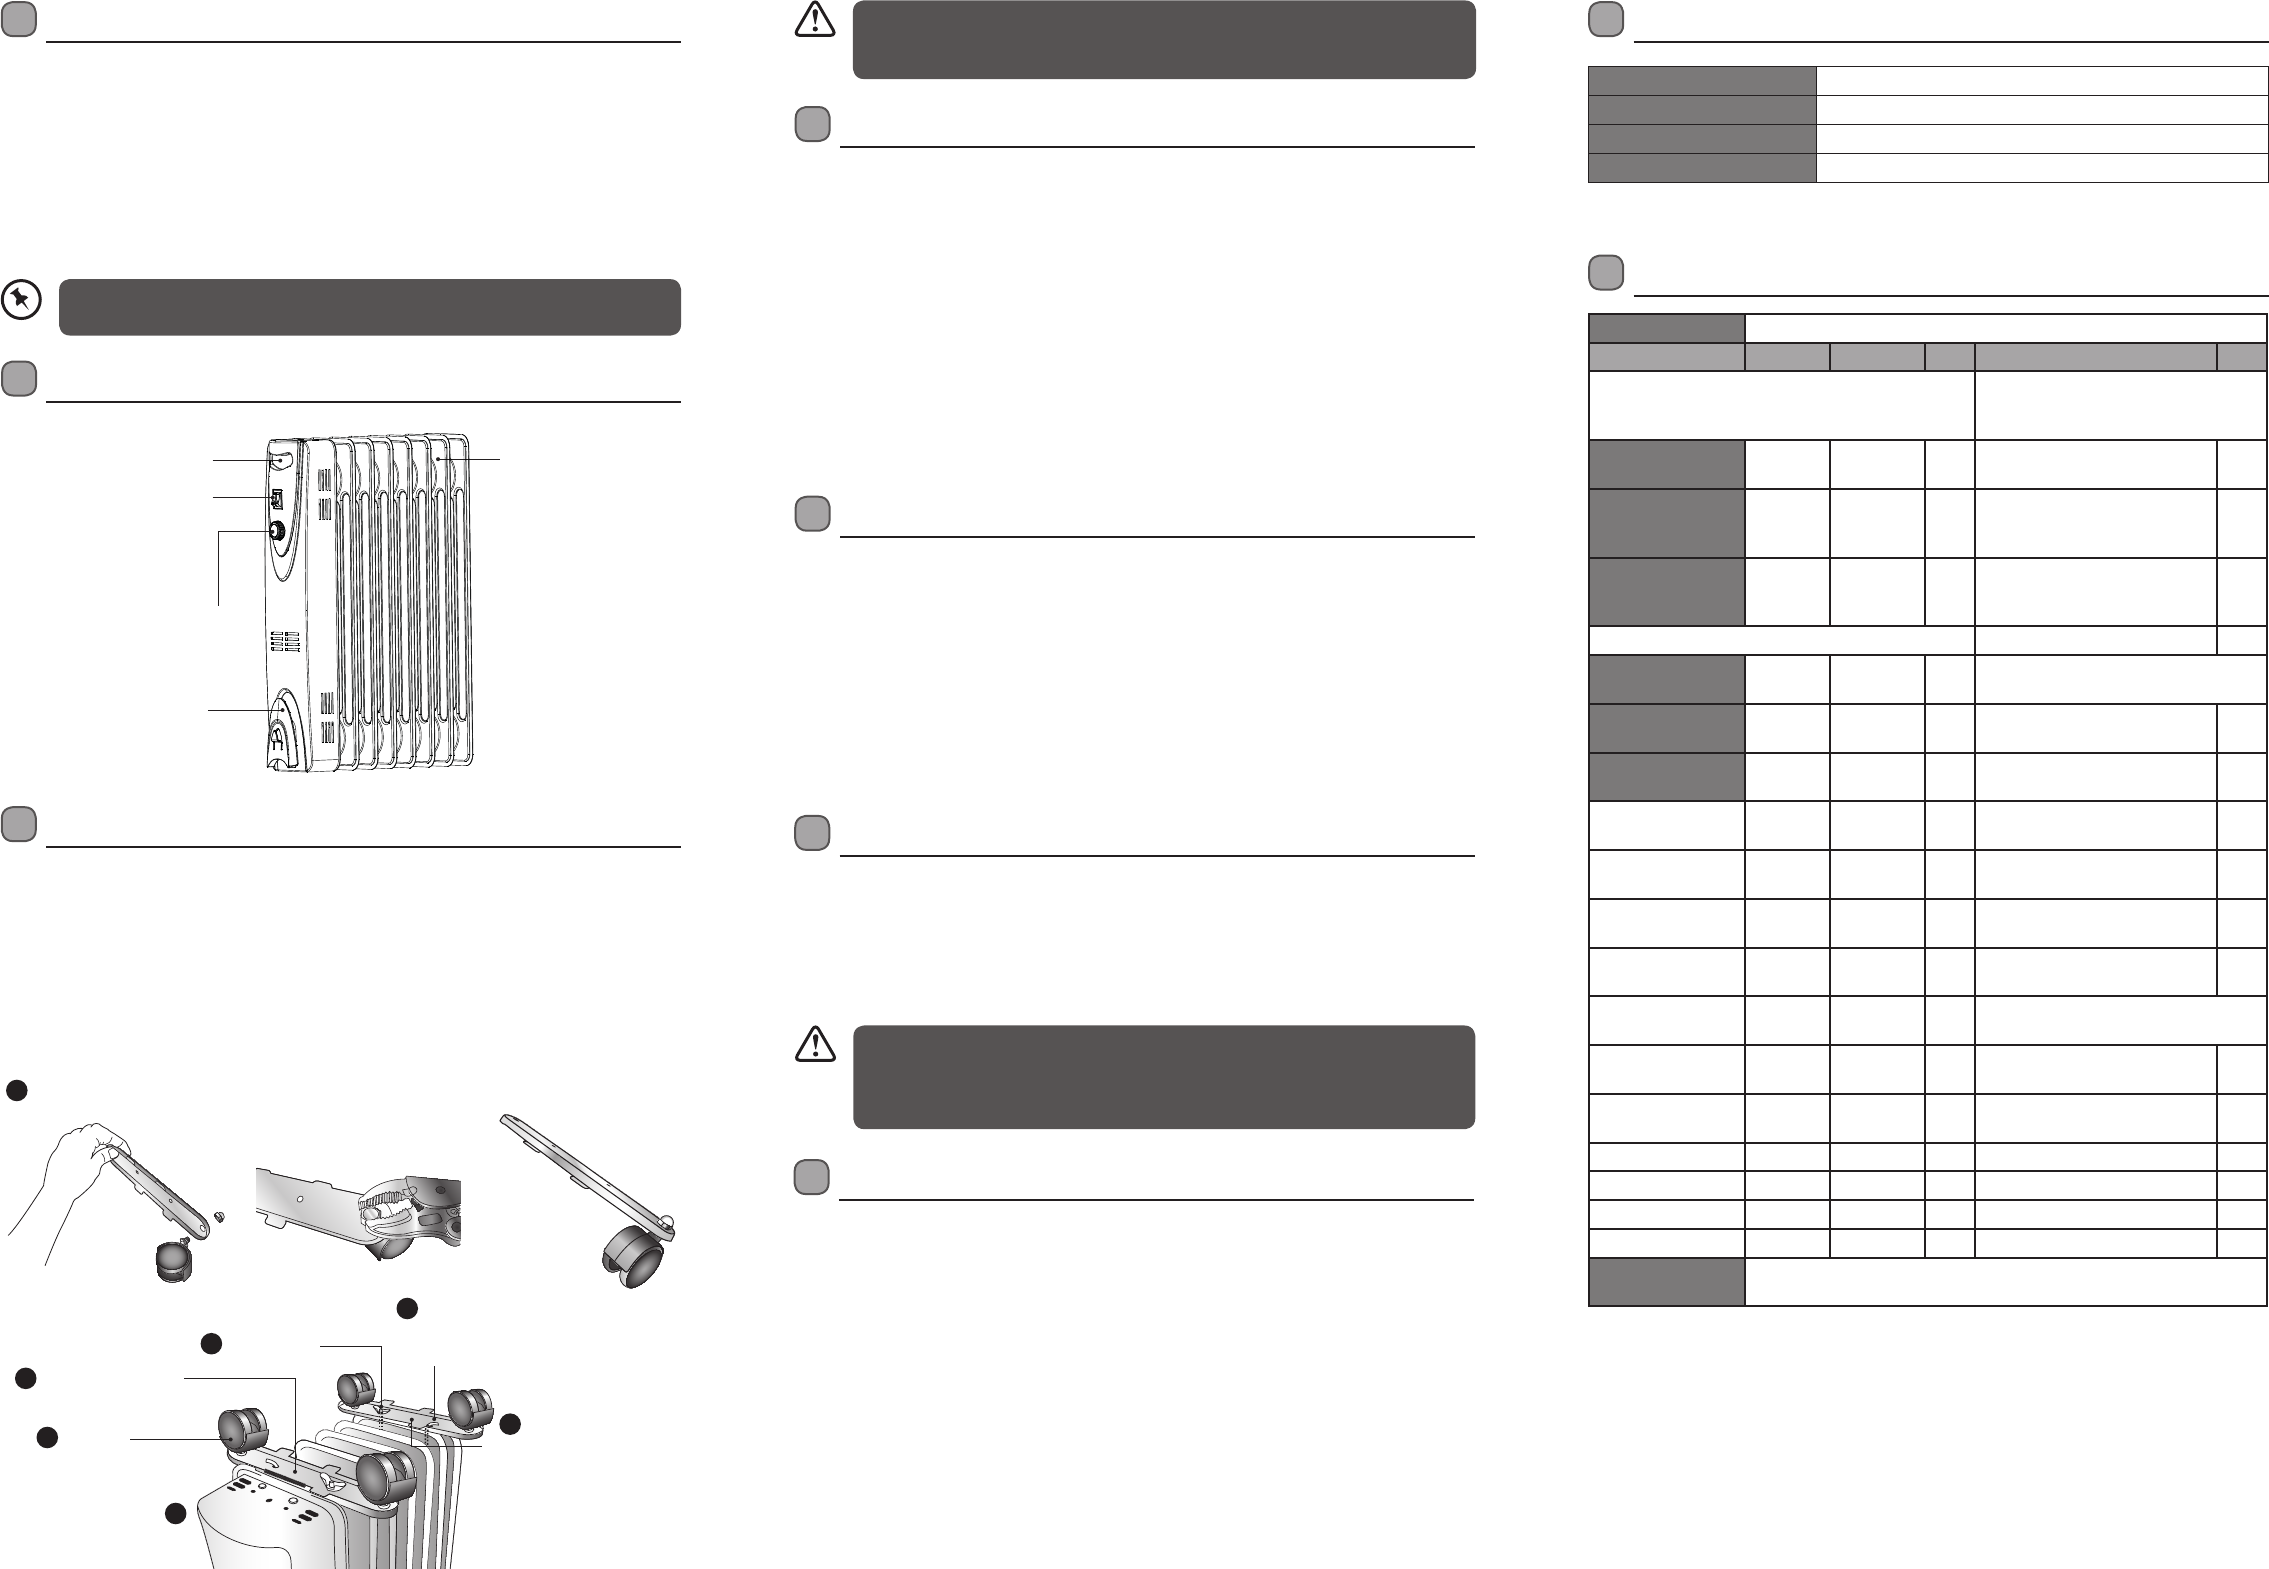
Product Overview
Unpacking
Remove all items from the packaging. Retain the packaging. If you dispose of it please do so
according to local regulations.
The following items are included:
• Main Unit
• Wheels x 4
• Supporting plates x 2
• “U” shaped screws x 2
• Buttery nuts x 2
Operation
Position the heater upright on the oor away from curtains, furniture or wall coverings before
plugging into the mains socket.
• Press the Power Switches to the “I” (low) or “II” (medium) position, or to both “I” and “II”
positions (high).
• Turn the Thermostat Control clockwise to raise the temperature or anti-clockwise to lower
the temperature. It is recommended to select the highest setting to get the unit to pre-heat.
It will take approximately 15 minutes for the heater to fully heat up.
• When the room reaches the desired temperature, turn the Thermostat Control slowly anti-
clockwise until the indicator goes o. Your unit will automatically set an on-and-o cycle to
maintain the current room temperature according to the thermostat setting.
• To turn o the heater, press the Power Switches to the “0” (O ) position. The power
indicator light will turn o.
• Unplug the unit from the mains socket when it is left unattended or not in use.
Cleaning & Storage
• Your heater should be cleaned regularly to prevent dirt and dust from building up which will
aect its performance.
• Always unplug the mains cable from the mains socket and allow the heater to cool down
before cleaning.
• Wipe the unit with a soft damp (not wet) cloth.
• Coil up the mains cable onto the cord storage. Store the heater in a cool dry place.
Hints & Tips
My heater does not work when I turn it on:
• Check that your heater is plugged in and the power is turned on.
• Check if the thermostat setting is too low.
• If the heater still does not work, do not try to repair the heater yourself. Please leave all
maintenance work to qualied personnel.
If your heater’s power is automatically cut o, follow the steps
below:
1. Unplug your heater and allow it to cool down.
2. Inspect your heater.
3. Plug in the heater and switch it on again. If it cuts o again, move the heater to a better
ventilated location.
4. If there is any sign of physical damage (e.g. melting, or burning of the case), do not attempt
to use your heater. Please leave all maintenance work to qualied personnel.
• If items are missing or damaged, please contact Partmaster (UK only).
• Tel: 0344 800 3456 for assistance.
• Ensure you unplug your heater from the mains socket and wait for the heater to
cool down completely before cleaning.
• Do not immerse the unit in water. Do not use any cleaning chemicals such as
detergents and abrasives.
Safety Protective Device
The unit has two levels of over-heat protection.
• Automatic thermal cut-o
Switches o the heater in the event of overheating or malfunction and resets once the
temperature resumes to normal level.
• Thermal fuse
In the event that the automatic thermal cut-o fails to resume the heater to normal level, the
thermal fuse will be activated. This is a non-resettable protective switch which will require
the unit to be returned to an Approved Service Agent for replacement.
If overheating or malfunction continues, return the unit to an Approved Service Agent for
examination.
Specications
Model L15OFR15
Power Supply 230V~ 50Hz
Power Consumption 1500W
Number of Fins 7
Features and specications are subject to change without prior notice.
1
Do not plug your heater into a mains socket while you are assembling the product.
1. Install the 4 wheels onto the 2 supporting plates by using a spanner.
2. Turn the unit upside down.
3. Wrap the “U” shaped screw in between the 1st and 2nd radiator ns.
4. Hook the wheels and supporting plate into the screw.
5. Insert the buttery nut and screw it tightly on.
6. Wrap the “U” shaped screw in between the 6th and 7th radiator ns. Repeat step 4-5.
7. Check that the wheels are not loose before each use.
• It is hazardous if you turn on the heater when it is upside down.
• Before use, remember to double check that the heater is standing upright on a
rm and level surface.
Cord Storage
Carry Handle Radiator Fins
Thermostat Control
Power Switch (I/II/0)
(with indicator)
2
3
4
In between the 1
st
& 2
nd
radiator ns
In between the 6
th
& 7
th
radiator ns
Buttery nut
Wheels
Supporting plate
“U” shaped screw
5
4
6
Assembly
Model L15OFR15
Item Symbol Value Unit Item Unit
Heat output Type of heat input, for electric
storage local heaters only (select
one)
Nominal heat
output
P
nom
0.91 kW Manual heat charge control
with integrated thermostat
no
Minimum
heat output
(indicative)
P
min
0 kW Manual heat charge control
with room and/or outdoor
temperature feedback
no
Maximum
continuous heat
output
P
max,c
0.91 kW Electronic heat charge control
with room and/or outdoor
temperature feedback
no
Auxiliary electricity consumption Fan assisted heat output no
At nominal heat
output
el
max
N/A kW Type of heat output/room
temperature control (select one)
At minimum heat
output
el
min
N/A kW Single stage heat output and
no room temperature control
no
In standby mode el
SB
N/A kW Two or more manual stages, no
room temperature control
no
With mechanic thermostat
room temperature control
yes
With electronic room
temperature control
no
Electronic room temperature
control plus day timer
no
Electronic room temperature
control plus week timer
no
Other control options (multiple
selections possible)
Room temperature control,
with presence detection
no
Room temperature control,
with open window detection
no
With distance control option no
With adaptive start control no
With working time limitation no
With black bulb sensor no
Contact details DSG Retail Ltd. (co. no. 504877)
1 Portal Way, London, W3 6RS, UK
Product Fiche
L15OFR15_IB_RC_180531_grace.indd 4-6 31/5/18 3:31 pm


Delta i konversationen om denna produkt
Här kan du dela vad du tycker om Logik L15OFR15 Värmefläkt. Om du har en fråga, läs först noggrant igenom manualen. Att begära en manual kan göras genom att använda vårt kontaktformulär.