IB-L22TFHW25-250630V1
Thank you for purchasing your new product.
We recommend that you spend some time reading this instruction manual in order that
you fully understand all the operational features it oers.
Read all the safety instructions carefully before use and keep this instruction manual for
future reference.
2 in 1 Tower Fan & Heater
Instruction Manual
L22TFHW25
• This product is only suitable for well-insulated spaces or occasional use.
• Before using this appliance, read all safety instructions carefully rst in the Safety
Warnings booklet and keep them for future reference.
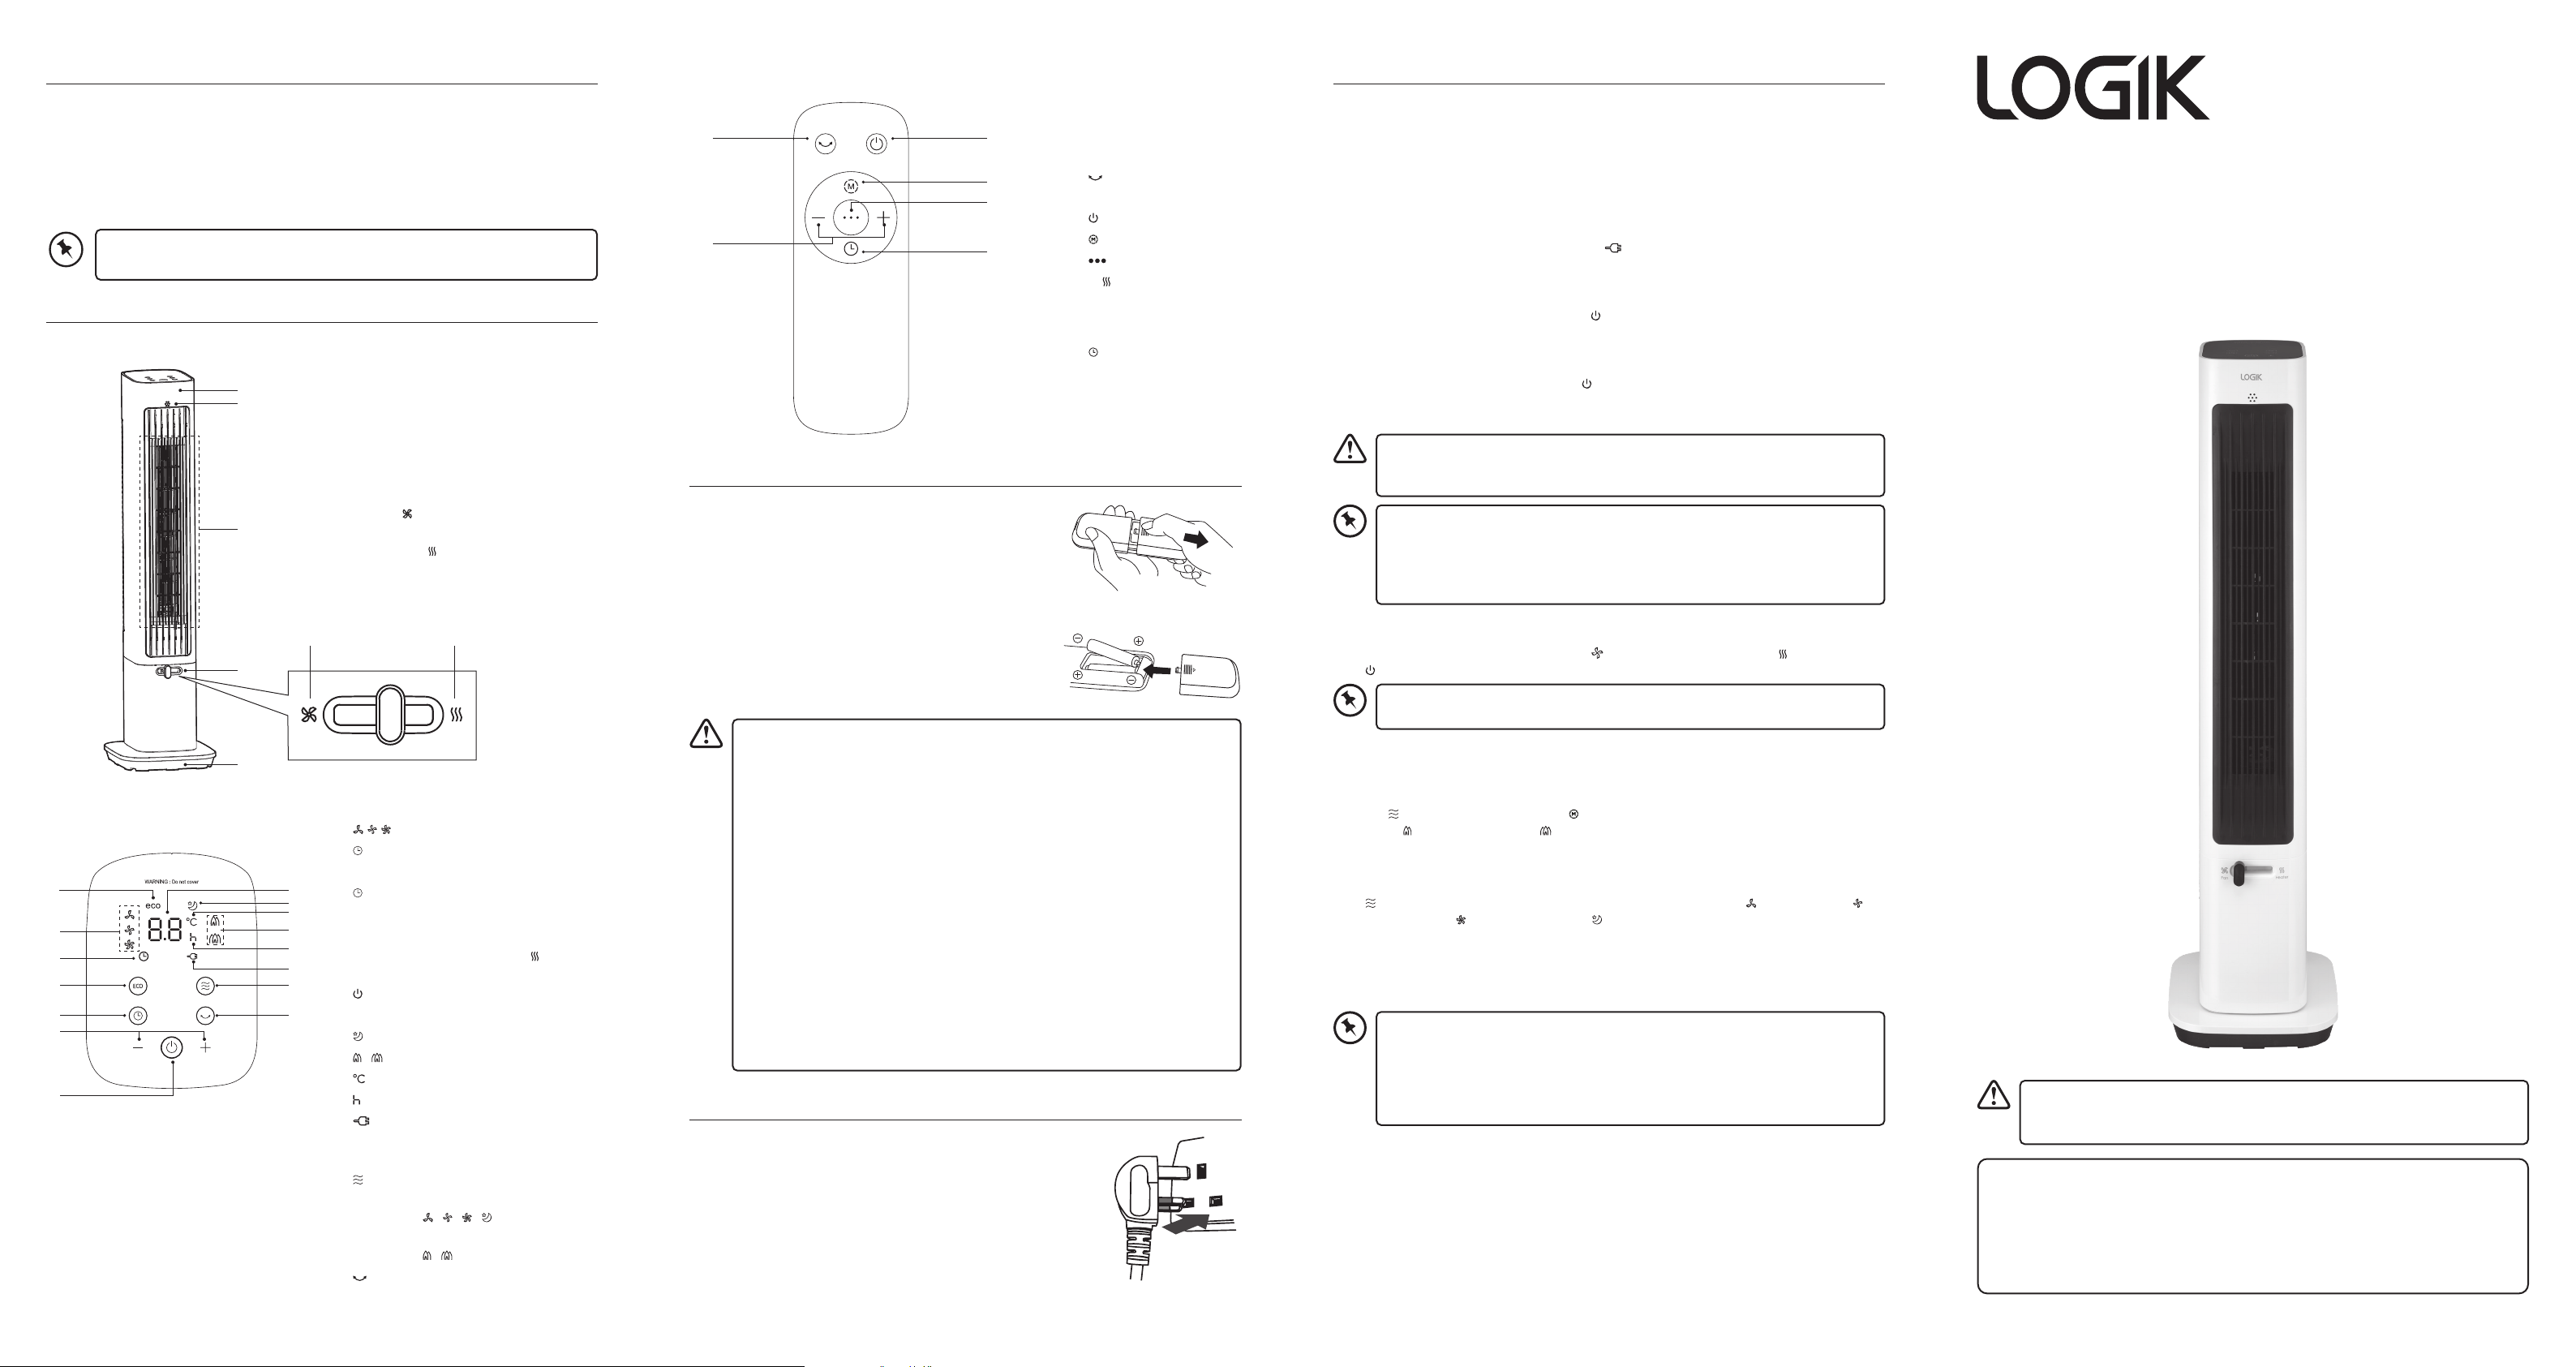
Product Overview
Main Unit
Unpacking
Remove all items from the packaging. Retain the packaging. If you dispose of it please do so
according to local regulations.
The following items are included:
• Main Unit
• Remote Control (batteries included)
• Instruction Manual & Safety Warnings
• If items are missing or damaged, please contact Partmaster (UK only).
• Tel: 0344 800 3456 for assistance.
1. Control Panel
2. Sensor
3. Air Outlet
4. Fan / Heater Switch
• Slide to left to switch the unit into
Fan mode.
• Slide to right to switch the unit
into
Heater mode.
5. Base
Remote Control
1. Swing Button
2. +/– Button
3.
On/O Button
4.
MODE Button
5.
Eco Mode Button
In
Heater mode, press
to enter eco mode. The
temperature will be set in
26°C.
6.
Timer Button
3
4
6
5
1
2
Battery Replacement for the Remote Control
1. Slide to open the battery compartment cover of the remote
control.
2. Insert two AAA size batteries. Make sure to match the (+)
and ( - ) ends of the batteries with the (+) and ( - ) ends
indicated in the battery compartment.
3. Close the battery compartment cover.
Handling the Batteries
• Improper or incorrect use of batteries may cause corrosion or battery leakage,
which could cause re, personal injury or damage to property.
• Only use the battery type indicated in this manual.
• When the batteries are exhausted, the remote control will not function. Replace
both batteries at the same time with new ones.
• Do not install new batteries with used ones and do not mix dierent types of
batteries.
• Do not dispose of used batteries as domestic waste. Dispose of them in accordance
with local regulations.
Handling the Remote Control
• Do not drop or cause impact to the remote control.
• Do not spill water or any liquid on the remote control.
• Do not place the remote control on a wet object.
• Do not place the remote control under direct sunlight or near sources of excessive
heat.
• Remove the battery from the remote control when not in use for a long period of
time, as it could cause corrosion or battery leakage and may result in physical injury
and/or property damage including re.
1
2
3
4
5
Fan
Heater
Fan mode Heater mode
Control Panel
3
4
5
6
7
2
1 8
9
10
11
12
13
15
14
1. eco Mode Indicator
2.
/ / Fan Speed Indicator
3.
Timer On Indicator
4. ECO Button
5.
Timer Button
Press to set your o timer.
6. +/– Button
Press to set the temperature in
Heater
mode, or adjust timer setting.
7.
On/O Button
8. Digit Display
9.
Sleep Mode Indicator
10.
/ Heating Power Indicator
11.
Temperature Indicator
12.
Set Timer (hour) Indicator
13.
Power Indicator
Light up after the unit is plugged into the
mains socket.
14.
MODE Button
• In Fan mode, press repeatedly to switch
between
/ / / mode.
• In Heater mode, press repeatedly to switch
between
/ heating power level.
15.
Swing Button
Press to switch the oscillation on/o.
Connecting to the mains socket
Connect the mains plug with the mains socket.
General Operation
1. Position the unit upright on the oor away from curtains, furniture or wall coverings before
plugging your heater into the mains socket.
2. Connect the unit to the mains socket. Be sure the mains plug ts tightly in the mains socket.
A loose t will cause overheating and damage the mains plug.
Powering ON/OFF
Switch the unit in Standby mode
After the unit is connected to mains power, the
Power Indicator will light up and you will
hear “beep” once. The unit is now in Standby mode.
Switch On the unit
While the unit is in Standby mode, press the
On/O Button on the unit or remote control to
switch on the unit. The unit will prompt a “beep” tone.
Switch O the unit
• While the unit is in ON mode, press the
On/O Button on the unit or remote control to
switch the unit into Standby mode. The unit will prompt a “beep” tone.
• To switch the unit o completely, remove the mains plug from the mains socket.
It is normal for the heater to emit some smell and fumes when it is turned on for the
rst time or when turned on after not being used for a long period of time. This smell
will disappear when the heater has been turned on for a short while.
• To prevent from overheating, when the unit is switched o, the fan motor will
continue to run for about 15 seconds before shutting o. The display will show the
countdown timer.
• Every time when the heater is switched on again, it will enter the last used mode.
• The unit will switch o itself after continuous operation for 15 hours.
Select between Heater and Fan mode
Slide the Fan / Heater Switch to left to enter Fan mode, or to right to enter Heater mode.
Press On/O Button to switch on the unit.
The display will automatically switch o after being idle for about 60 seconds. Press
any button to activate the display again.
Power Settings
Heater mode
• Press
MODE Button on the unit or MODE Button on the remote control for power
setting ( Low Heating Power/ High Heating Power).
• Press ECO Button on the unit to enter eco mode. The temperature will be set in 26°C.
Fan mode
Press
MODE Button on the unit repeatedly to set the unit in between Low Fan Speed
Medium Fan Speed, High Fan Speed and Sleep mode.
Temperature Settings
Heater mode
In eco mode, press the +/– button to set the temperature from 5°C to 35°C.
• If the set temperature is higher than the room temperature, the heater will continue
to heat until the room temperature reaches the set temperature. Once the room
temperature reaches the set temperature, the unit will stop heating.
• The time of heat resuming will be dependent upon the ambient temperature and
temperature sensor of the appliance. Once the temperature is lower than the set
temperature, the unit will restart the heating.


Delta i konversationen om denna produkt
Här kan du dela vad du tycker om Logik L22TFHW25 Värmefläkt. Om du har en fråga, läs först noggrant igenom manualen. Att begära en manual kan göras genom att använda vårt kontaktformulär.