GB/IE GB/IE GB/IE
GB/IE
GB/IE
LED Bike Light Set
Introduction
Congratulations on the purchase of your new
device. In doing so you have chosen a
top-quality product. The instructions for use
are to be considered as part of this product. It contains
important safety, assembly and disposal information.
Before using the product, please familiarise yourself
with all the safety information and instructions for use.
The product must only be used as described and for
the specified fields of application. If you pass the prod-
uct on to anyone else, please be sure to also include all
documentation.
Intended use
This product is suitable for lighting the roadway whilst
cycling. The LED Bicycle Light Set is approved as exclu-
sive lighting for all bicycles. Light distribution must not
be impaired by other bicycle parts or luggage. The
product is intended for outdoor use. Any use other than
the aforementioned or any product modification is pro-
hibited and can result in injuries and product damage.
The manufacturer is not liable for damages resulting
from improper use. This product is not intended for
commercial use.
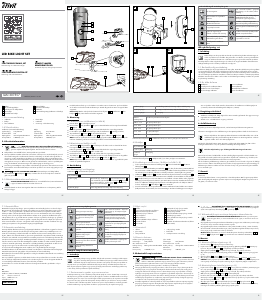
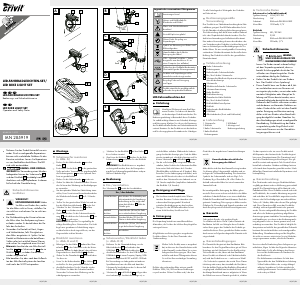
Parts Description
1
Headlight bracket
2
Reducer rubber
3
Headlight bracket retaining screw
4
Headlight on/off switch
5
Headlight battery/rechargeable battery control light
6
Headlight
7
Headlight angle adjustment screw
8
Headlight lock
9
Tail light bracket
10
Tail light lock
11
Tail light bracket rubber tab
12
Tail light on/off switch
13
Tail light battery control lamp
14
Tail light
15
Tail light retaining screw
16
Tail light battery cover
17
USB cable
18
Charging socket
Scope of delivery
1 Headlight
1 Tail light
1 Headlight bracket
1 Tail light bracket
2 Batteries AAA
Reducer rubbers
1 USB cable
1 Instructions for assembly and use
Technical Data
Headlight
Model designation: XC-195A / LI-1
Rated output: 1 W
Protection type: IP44 according to
DIN EN 60529
Rechargeable Li-ion battery: 1300 mAh, 3.7 V
Tail light
Model designation: XC-117D / D-LED 3
Rated output: 0.2W
Protection type: IP44 according to
DIN EN 60529
Batteries: 2 x 1.5 V AAA LR03
Note: Only use rechargeable 1.2 V batteries or
comparable 1.5 V alkaline batteries for the rear light.
Safety instructions
DANGER TO LIFE
AND RISK OF ACCIDENT FOR IN-
FANTS AND CHILDREN! Never leave
children unsupervised with the packing material
due to the suffocation hazard posed by swallowing
parts thereof. Children frequently underestimate the
dangers.
eller psykisk förmåga eller som saknar tillräcklig er-
farenhet resp. kunskap. Detta gäller inte om de står
under uppsikt av en person som är ansvarig för de-
ras säkerhet. Observera att garantin inte omfattar
skador, som beror på felaktig hantering, icke beak-
tande av bruksanvisningen eller otillåtet ingrepp av
obehörig person.
Ta under inga omständigheter isär produkten. Icke
fackmässiga reparationer kan leda till att använda-
ren utsätts för allvarliga risker. Låt endast kvalifice-
rad personal utföra reparationer. Lysdioderna är
inte utbytbara.
RISK FÖR LIVSFARA OCH
OLYCKOR! Vid användning av en felaktig lad-
dare kan strålkastaren
6
skadas, överhettas eller
till och med explodera. I detta fall gäller inte
garantin.
Säkerhetsinformation om
batterier / batteripack
SE UPP! EXPLOSIONSRISK! Ladda
aldrig batterierna!
Ta bort batterierna ur produkten om den inte skall
användas under en längre tid.
Beakta rätt polaritet när du sätter i batterier! Denna
visas i batterifacket.
Rengör batteri- och apparatkontakter vid behov
innan du sätter i batterier.
Ta alltid ur gamla eller förbrukade batterier omgå-
ende ur produkten. Risken finns att batterisyra
läcker ut!
Byt alltid alla batterier samtidigt.
Använd inga alkalibatterier tillsammans med ett
laddningsbart batteripack.
Kombinera inte nya och gamla batterier.
Kasta inte batterier / batteripack i hushållsavfallet!
Alla konsumenter är skyldiga enligt lag att se till att
avfallshantering av batterierna sker på rätt sätt.
SE UPP! EXPLOSIONSRISK! Håll
batterier / batteripack utom räckhåll för
barn, kasta inte batterier / batteripack i
öppen eld, kortslut dem ej och ta inte isär dem.
Vid icke beaktande av dessa anvisningar kan bat-
terierna urladdas utöver sin slutspänning. Risk för
läckage föreligger.
Om batterierna har läckt bör du genast avlägsna
dem för att undvika skador på utrustningen!
Undvik kontakt med hud, ögon och slemhinnor, om
vätska runnit ut ur batterier / batteripack. Spola
omedelbart av de ställen som kommit i kontakt med
batterisyra. Använd rikligt med rent vatten och
uppsök läkare omgående.
Försök aldrig ladda icke laddningsbara batterier.
Explosionsrisk!
Hänvisning: Tänds den röda kontrollampan för
batteripack/batterier
5
13
i strålkastaren
6
eller
i bakljuset
14
, måste batterierna bytas resp. batteri-
packen laddas omedelbart.
Beakta att lamporna inte längre motsvarar StVZO
(ungefär tyska vägtrafikförordningen) när batteriin-
dikatorn tänds.
Montering
Montering av strålkastare
(se bild A)
Skruva ut fästskruven
3
ur fästet
1
.
Placera fästet
1
på önskad plats på styret. Vid
behov använd reducerstycken (gummi)
2
, för att
säkerställa en optimal passform.
Skruva in fästskruven
3
igen.
Dra därvid åt skruven med handen. För att undvika
skador bör inga verktyg användas.
För att ställa in den optimala vinkeln mot färdrikt-
ningen, lossar du justerskruven för inställning av
vinkeln
7
ca 2-3 varv med en stjärnskruvmejsel.
Ställ in önskad vinkel och dra åt justerskruven för
inställning av vinkeln
7
igen.
Skjut strålkastaren
6
på fästet
1
tills den klickar
fast hörbart.
För att lossa trycker du på strålkastarens spärr
8
och skjuter strålkastaren
6
framåt från fästet
1
.
Montering av bakljus
(se bild B och C)
Sätt fast fästet
9
på sadelstolpen eller bak på ra-
men med hjälp av gummifliken
11
. Se därvid till att
det inte befinner sig några föremål framför baklju-
set
14
.
LED-cykelbelysning, set
Inledning
Grattis till köpet av din nya utrustning. Du
har valt en produkt av hög kvalitet. Bruksan-
visningen är en del av produkten. Den
innehåller viktig information om säkerhet, montering
och avfallshantering. Läs säkerhetsinformationen och
bruksanvisningen noga innan du använder produkten.
Använd endast produkten i enlighet med beskrivningen
och för angivna ändamål. Överlämna även samtliga
handlingar om du överlåter produkten till en tredje part.
Ändamålsenlig användning
Produkten är lämplig för att lysa upp körbanan när
man cyklar. Detta LED cykelbelysning set har godkänts
som ensam belysning för alla cyklar. Ljusfördelningen
får inte hindras av andra komponenter på cykeln eller
bagage. Produkten är avsedd för användning utomhus.
En annan användning än den som beskrivits eller en
förändring av produkten är inte tillåten och kan föror-
saka personskador och skador på produkten. Tillverka-
ren ansvarar inte för skador som förorsakas av icke
fackmässig användning. Denna produkt är ej lämplig
för yrkesmässig användning.
Beskrivning av delarna
1
Fäste strålkastare
2
Reducerstycken (gummi)
3
Fästskruv strålkastarfäste
4
Till- / Från-knapp strålkastare
5
Batteripack- / batteri-kontrollampa strålkastare
6
Strålkastare
7
Justeringsskruv för vinkeln på strålkastare
8
Spärr till strålkastare
9
Fäste bakljus
10
Spärr till bakljus
11
Gummiflik fäste bakljus
12
Till- / Från-knapp bakljus
13
Batteri-kontrollampa bakljus
14
Bakljus
15
Fästskruv till bakljusets fäste
16
Batterifackets lock bakljus
17
USB-kabel
18
Batteri-laddningsuttag
Leveransomfattning
1 strålkastare
1 bakljus
1 fäste strålkastare
1 fäste bakljus
2 batterier AAA
reducerstycken (gummi)
1 USB-kabel
1 monterings- och bruksanvisning
Tekniska specifikationer
Strålkastare
Typ-beteckning: XC-195A / LI-1
Nominell effekt: 1 W
Kapslingsklass: IP44 enligt DIN EN 60529
Li-jon-batteri: 1300 mAh, 3,7 V
Bakljus
Typ-beteckning: XC-117D / D-LED 3
Nominell effekt: 0,2 W
Kapslingsklass: IP44 enligt DIN EN 60529
Batterier: 2 x 1,5 V AAA LR03
Hänvisning: Använd uteslutande batteripack med
1,2 V eller jämförbara alkaline batterier med 1,5 V för
bakljuset.
Säkerhetsinformation
RISK FÖR LIVS-
FARA OCH OLYCKOR FÖR SMÅ-
BARN OCH BARN! Lämna aldrig
barn utan uppsikt med förpackningsmaterialet. Risk
för kvävning på grund av sväljbara små förpack-
ningsdelar. Barn underskattar gärna riskerna.
Håll produkten utom räckhåll för barn. Denna
produkt är ingen leksak!
Denna produkt är inte avsedd att användas av per-
soner (inklusive barn) med nedsatt fysisk, sensorisk
GB
KLB GmbH
Diekbree 8
48157 Münster, Germany
Tel: +49 2 51 132 37 57
E-Mail: gb@klb-service.eu
www.klb-service.eu
IAN 275453
IE
KLB GmbH
Diekbree 8
48157 Münster, Germany
Tel: +49 2 51 132 37 57
E-Mail: ie@klb-service.eu
www.klb-service.eu
IAN 275453
Environmental damage due to
incorrect battery/rechargeable
battery disposal!
Never dispose of batteries/rechargeable batteries in your
household waste. They may contain toxic heavy metals
and are subject to hazardous waste regulations. The
chemical symbols of the heavy metals are: Cd = cadmium,
Hg = mercury, Pb = lead. Therefore, dispose of used
batteries/rechargeable batteries through your local
collection site.
Improper battery disposal destroys valuable resources
and the hazardous substances in the batteries may pose
a significant danger to the health and environment.
Separate collection/disposal of old batteries prevents
dangers to the health and environment, and valuable
resources regained by recycling.
Warranty
Dear customer,
This device is covered by a 3-year warranty from the
date of purchase. In the event of product defects, you
have legal rights against the retailer of this product.
Your statutory rights are not limited in any way by our
warranty detailed below.
Warranty terms
The warranty period begins on the date of purchase.
Please retain the original receipt safely. This documen-
tation is required as the proof of purchase. Should a
defect in material or manufacture occur within three
years from the date of purchase of this product, we will
repair or replace - at our choice - it free of charge. This
warranty is conditional on the defective device and the
receipt of purchase being presented within the three
year warranty period, and that there is a brief written
description of the nature of the defect and of the date it
arose. If the defect is covered by our warranty, you will
receive the repaired product or a replacement. A repair
or exchange of the device does not extend a new war-
ranty period. The warranty period will not be extended
by repairs made under warranty. This also applies to
replaced and repaired parts. Any damage or defects
present at the time of purchase must be reported imme-
diately after unpacking. Repairs made after the expira-
tion of the warranty period are subject to payment.
Extent of warranty
The device was manufactured to strict quality guide-
lines and diligently inspected prior to shipment. The
warranty applies to defects in material or manufacture.
This warranty does not apply to product parts subject
to regular wear and therefore considered wear parts or
damage to fragile parts, e.g. switches, rechargeable
batteries, or made from glass. This warranty becomes
void if the device has been damaged or improperly
used or maintained. Proper use of the product requires
strictly observing all instructions for use. Purposes and
practices which the operating instructions warn of or
advise against must be avoided without fail. This prod-
uct is only intended for private, non-commercial use.
Any incorrect or improper use of the device, use of
force and changes not performed by our authorized
service branch will void the warranty. Please follow the
instructions below to ensure your claim is processed
quickly:
· Please have your receipt and the product number
ready as your proof of purchase.
· Please refer to the type plate or the cover sheet of
these instructions for the product number.
· In the event of malfunctions or other defects,
please first contact the following service depart-
ment by phone or e-mail.
· A product determined defective may then be
returned to the specified service address free of
charge, including the proof of purchase (receipt)
and information about the defect and when it
occurred.
Please note, the service department must be
notified before returning the product!
This and many other manuals, product videos and
software are available for download at
www.lidl-service.com.
Tighten and hook in the rubber tab
11
.
Loosen the retaining screw
15
on the bracket
9
and adjust to the desired angle.
Then tighten the screw. Tighten the screw hand
tight. To prevent damage, do not use tools for this
step.
Slide the tail light
14
into the bracket
9
until you
hear it lock into place.
To release the tail light
14
, pull down on the tail
light lock
10
and slide off the tail light
14
.
Inserting batteries into the tail
light (see Fig. D)
Slide the battery cover
16
off to the back.
Insert the batteries into the tail light (2 x AAA
1.5 V). Ensure the correct polarity.
Then reassemble the light.
Operation
Switching on / off
The headlight
6
has three brightnesses.
On/Off switch
press once Power mode (40 Lux) for
riding in unlit areas
press twice Standard mode (20 Lux)
for riding in lit areas
press three times Eco mode (10 Lux) for
riding in well lit areas
press four times off
Charging the headlight (see Fig. E)
Remove the rubber cover from the battery charging
socket
18
and connect the USB cable
17
to the
battery charging socket
18
.
Then connect the USB plug of the USB cable
17
to
a computer/laptop/standard USB charger with
5 V DC and 500–1000 mA. Using chargers with
different specifications can damage the
rechargeable battery, thus the headlight. Doing so
will void the warranty.
The headlight
6
has a battery indicator. If the
indicator lights up red, the rechargeable batteries
are drained. The indicator will light up green whilst
charging. When the rechargeable batteries are
ready to be used again, the indicator will extin-
guish and you can use the headlight
6
.
For the included rechargeable batteries to operate
at full power, please do not charge the battery for less
than 10 hours the first time. Please do not stop charg-
ing sooner, even if the LED is already extinguished.
After this, a charging time of approx. 3.5 hours is
recommended for rechargeable batteries with
1300 mAh.
Cleaning and Care
Never fully immerse the lights. Do not use corrosive
or abrasive cleaning agents. Doing so will damage
the lights.
Clean the LED bicycle light set with a slightly damp,
lint-free cloth.
Disposal
The packaging is made of environmentally
friendly materials, which may be disposed of
through your local recycling facilities.
Contact your local refuse disposal authority for more
details on how to dispose of your worn-out product.
To help protect the environment, please
dispose of the product properly, not without
household waste, when it has reached the
end of its useful life. Please contact your local
authority for information on collection points
and their opening hours.
Defective or used batteries/rechargeable batteries must
be recycled according to 2006 / 66 / EC and its
amendments. Return batteries/rechargeable batteries
and / or the appliance using the recycling facilities
provided.
Always keep the product away from children. This
product is not a toy!
This product is not intended to be used by persons
(including children) with impaired physical, sensory
or mental capacity, or lacking experience or knowl-
edge unless supervised by a person responsible for
their safety. Please note, damages caused by incor-
rect handling, non-compliance with the operating
instructions or interference with the device by
unauthorised individuals are excluded.
Never take the product apart. Improper repairs
may result in considerable danger to the user.
Repairs should only be carried out by specialist
personnel. The LED lights are not replaceable.
RISK OF LOSS OF LIFE AND
ACCIDENT! Using the incorrect charger may
cause the headlight
6
to be damaged, overheat
or even explode. Doing so will void the warranty.
Safety advice concerning
batteries/rechargeable
batteries
CAUTION! EXPLOSION HAZARD!
Never recharge the batteries!
Remove batteries during extended periods of non-use.
When inserting the battery ensure the polarity is
correct! This is shown in the battery compartment.
If necessary, clean the battery and device contacts
before inserting the battery.
Remove spent batteries immediately from the
device. There is an increased risk of leaks!
Always replace all the batteries at the same time.
Do not mix alkaline batteries and rechargeable
batteries.
Never mix old and new batteries.
Do not dispose of battery/rechargeable batteries
in household waste!
Every consumer is legally obliged to dispose of
batteries/rechargeable batteries in the proper
manner!
CAUTION! EXPLOSION HAZARD!
Keep battery/rechargeable batteries
away from children, do not throw batter-
ies/rechargeable batteries into fire, do not short-
circuit and do not take apart.
Failure to observe this notice may result in deep dis-
charging the batteries. This poses a risk of leaking.
If the batteries have leaked inside the product,
please remove them immediately to prevent prod-
uct damage!
Avoid contact with the skin, eyes and mucous mem-
branes if fluid has leaked from the batteries / re-
chargeable battery. In the event of contact with
battery acid, thoroughly flush the affected area with
clean water and seek immediate medical attention.
Never recharge single-use batteries! Explosion
hazard!
Note: If the red rechargeable battery/battery
control light
5
13
on the headlight
6
or the tail
light
14
lights up, please replace the batteries or
recharge the rechargeable batteries immediately.
Please note, once the battery indicator lights up,
the lights no longer comply with the Road Traffic Act.
Installation
Installing the headlight (see Fig. A)
Unscrew the retaining screw
3
from the bracket
1
.
Position the bracket
1
in the desired location on
the handlebar. If necessary, use the reducer
rubbers
2
to ensure an optimal fit.
Reinstall the retaining screw
3
.
Tighten the screw hand tight. To prevent damage,
do not use tools for this step.
To adjust to the optimal angle to the direction of
travel, loosen the angle adjustment screw
7
2–3 turns using a cross-tip screwdriver.
Adjust to the desired angle and tighten the angle
adjustment screw
7
.
Slide the headlight
6
into the bracket
1
until you
hear it lock into place.
To release, press the headlight lock
8
and slide
the headlight
6
forward out of the bracket
1
.
Installing the tail light
(see Fig. B and C)
Secure the bracket
9
to the seat post or the rear
cross-bar using the rubber tab
11
. Be sure there
are no objects in front of the tail light
14
.
A B
D
C
ESC
F1
~
`
!
1
F2
TAB
E
3
11
6
1 9 102
4 5
12 13
14
16
7
17
8
18
15
LED BIKE LIGHT SET
SE SE
LED-FAHRRADLEUCHTEN-SET
Bedienungs- und Sicherheitshinweise
LED BIKE LIGHT SET
Operation and Safety Notes
Model-No. 14123
IAN 275453
LED-CYKELBEL YSNING, SET
Bruksanvisning och säkerhetsanvisningar


Delta i konversationen om denna produkt
Här kan du dela vad du tycker om Crivit IAN 275453 Cykellampa. Om du har en fråga, läs först noggrant igenom manualen. Att begära en manual kan göras genom att använda vårt kontaktformulär.