
3
Please read this user manual carefully before operating the
product.
Please keep this user manual for reference.
Important
1
Thông số kỹ thuật
Caution
*
Technical specifications may be changed without prior notice.
Technical Specifications
Fan Size
6.3 m/s 89.8” 24 V DC
Power Supply
36W
Power
Wind speed Fan Speed Gears
1. For safety, turn off the fan and unplug the fan’s power cord from the AC
outlet before cleaning or moving the fan.
2. Only use the fan with a power source of the voltage indicated on the warning
label. Before connecting the fan to a power source, ensure it is only
connected to a matching power source.
3. Do not stick your fingers or other objects into the fan.
4. Do not attempt to repair the fan yourself. Always take the fan to an
authorized warranty center for repairs.
5. Do not immerse the fan in water or other liquids.
6. Do not use it outdoors or near windows; rain may pose an electrical hazard.
7. If the power cord is damaged, take it to an authorized warranty center to
have it replaced to avoid danger.
8. Do not use the following substances to clean the fan: Gasoline, thinner, or
benzene.
9. Use a mild - detergent soap, soak it into a damp cloth or sponge to wipe and
clean plastic components.
10. Only use it for household purposes; not for any commercial use.
11. This device is not intended for people (including children) with physical or
mental impairments, lack of experience and knowledge. Unless they are
supervised or instructed on how to use it by a person responsible for their
safety. Children need to be supervised to ensure they do not play with the
device.
12. Do not operate the Fan without the Fan Blade, or if the Fan Blade is damaged
or bent.
2
1. Insert the adapter into the 220 - 240V, 50Hz AC power socket, and plug one end
into the fan's power port.
2. Press the speed button to adjust the speed, with a total of 8 speeds; Press the
swing button to turn swing on/off; Press the mode button to adjust the wind mode:
Normal Wind → Sleep Wind → Baby & Maternity Wind → Smart Wind; Press the
storm button to turn storm mode on/off; Press the ion cluster button to turn ion
cluster mode on/off; Press the timer button to adjust the timing duration.
Operation Instructions
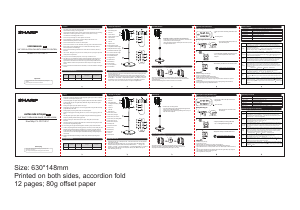
Label each component
1. Front Net
2. Aromatherapy Box
3. Rear Net
4. Control Panel
5. Power Adapter Socket
6. Vertical Pole 1
7. Vertical Pole 2
8. Chassis
9. Digital screen
10. Turbo Indicator Light
11. Sleep Wind Indicator Light
12. Baby Wind Indicator Light
13. Smart Wind Indicator Light
14. Ion Cluster Indicator Light
15. Timer Indicator Light
16. On/Standby Button
17. Swing Button
18. Speed Button
19. Mode Button
20. Turbo Button
21. Ion Group Button
22. Timer Button
1
2
6
7
8
3
4
5
9
10
11
12
16
16
19
20 21
22
17
17
18
18
13
14
15
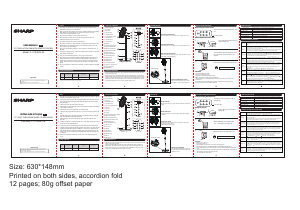
Assembly method
Adding Aromatherapy
Installation of the Vertical Pole and Chassis
• Rotate the head and the chassis clockwise to connect the two
vertical poles (as shown in the figure).
• After connecting the bottom vertical pole to the chassis, rotate
and tighten the nut to fix it.
Aromatherapy Box
Aromatherapy Cotton Sheet
• Rotate the aromatherapy box counterclockwise to remove it from the machine.
• Take out the aromatherapy cotton sheet, add essential oil, and put it back into the
aromatherapy box.
• Rotate the aromatherapy box clockwise to attach it to the machine.
3
Xin hãy đọc sách hướng dẫn sử dụng này cẩn thận trước
khi thao tác sản phẩm.
Hãy cất giữ sách hướng dẫn sử dụng này để tham khảo về
Quan trọng
1
Thông số kỹ thuật
*
Thông số kỹ thuật có thể được thay đổi mà không thông báo trước.
Thông số kỹ thuật
Kích thước
quạt
6.3 m/s 89.8” 24 V DC
Nguồn điện
36W
Công suất Tốc độ gió Tốc độ quạt
Chú ý
2
1. Đắm đầu nối tiếp vào ổ cắm điện AC 220 - 240V, tần số 50Hz và cắm một đầu vào
cổng nguồn của quạt.
2. Nhấn nút tốc độ để điều chỉnh tốc độ, có tổng cộng 8 cấp tốc độ; Nhấn nút đảo
để bật/tắt chức năng đảo; Nhấn nút chế độ để điều chỉnh ch ế độ gió: Gió
Thường → Gió Ngủ → Gió Trẻ Em & Mẹ Bầu → Gió Thông Minh; Nhấn n út turbo để
bật/tắt chế độ turbo; Nhấn nút ion để bật/tắt chế độ tụ ion; Nhấn nút hẹn giờ để
điều chỉnh thời gian hẹn giờ.
Chú thích các bộ phận
1
2
6
7
8
3
4
5
1. Lưới Trước
2. Hộp Thơm
3. Lưới Sau
4. Bảng Điều Khiển
5. Jack Nguồn Mở Rộng
6. Cột Dọc 1
7. Cột Dọc 2
8. Chân đế
9. Màn Hình Số
10. Đèn Chỉ Thị Turbo
11. Đèn Chỉ Thị Gió Ngủ
12. Đèn Chỉ Thị Gió Trẻ Em
13. Đèn Chỉ Thị Gió Thông Minh
14. Đèn Chỉ Thị Tụ Ion
15. Đèn Chỉ Thị Hẹn Giờ
16. Nút Bật/Chờ
17. Nút đảo Trái/Phải
18. Nút Tốc Độ
19. Nút Chế Độ
20. Nút Turbo
21. Nút Ion
22. Nút Hẹn Giờ
9
10
11
12
16
16
19
20 21
22
17
17
18
18
13
14
15
Cách lắp ráp
Thêm Thơm Môi Trường
Hộp Thơm
Tấm Cotton Thơm
• Xoay hộp thơm theo hướng ngược kim đồng hồ để tháo nó ra khỏi máy.
• Lấy tấm cotton thơm ra, thêm dầu tinh khiết, sau đó đặt lại vào hộp thơm.
• Xoay hộp thơm theo hướng kim đồng hồ để gắn nó vào máy.
Hướng dẫn thao tác
4
4
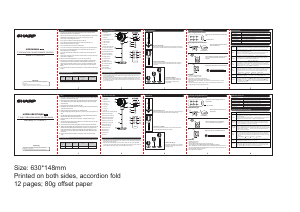
Remote control instructions
Before using the remote control
Battery Replacement Instructions
• Insert the battery (CR2025), and please ensure
the "+" pole faces upward as shown in the
diagram.
• Please pull out the insulating sheet before first
use.
• Press and hold the buckle position to
open the battery slot.
Please recycle used batteries.
• Fit the battery slot back into the remote control.
Buckle position
Insulating sheet
CAUTION
• DO NOT recharge this battery;
• Keep out of children's reach;
• If ingested, seek immediate medical help;
• When operating fan, POINT remote at DISPLAY;
• Remote frequency may OVERLAP. Keep away from other electronics to prevent
malfunction;
• Power buttons/remote DON'T fully cut power. Unplug during extended disuse;
• During prolonged storage, REMOVE batteries.
1
2
3
Hướng dẫn sử dụng điều khiển từ xa
Trước khi sử dụng điều khiển từ xa
Hướng dẫn thay pin
• Đặt pin (CR2025) và vui lòng đảm bảo
cực “+” hướng lên như trong sơ đồ.
• Vui lòng kéo ra tấm cách điện trước khi sử
dụng lần đầu.
• Nhấn và giữ vị trí móc khóa để mở
khe cắm pin.
Vui lòng tái chế pin đã sử dụng.
• Đặt lại khe cắm pin vào điều khiển từ xa.
Vị trí móc khóa
Tấm cách điện
CẢNH BÁO
1
2
3
1. Đảm bảo an toàn, hãy tắt quạt và tháo dây điện nguồn quạt ra khỏi ổ điện AC
trước khi vệ sinh hay di chuyển quạt.
2. Chỉ sử dụng quạt với nguồn điện cùng điện áp được dán trên nhãn cảnh báo.
Trước khi kết nối quạt với nguồn điện, đảm bảo rằng chỉ kết nối với nguồn
điện tương ứng.
3. Không chèn ngón tay hoặc vật khác vào quạt.
4. Không được tự ý sửa chữa quạt. Luôn mang quạt đến trung tâm bảo hành ủy
quyền để được sửa chữa.
5. Không ngâm quạt trong nước hoặc các chất lỏng khác.
6. Không sử dụng ngoài trời hoặc gần cửa sổ, mưa rơi có thể gây nguy hiểm về
điện.
7. Nếu dây điện nguồn bị hư, phải mang đến trung tâm bảo hành ủy quyền để
được thay thế dây mới để tránh nguy hiểm.
8. Không sử dụng các chất sau để vệ sinh quạt : Xăng dầu , thinner hoặc
benzene.
9. Sử dụng xà phòng có chất tẩy nhẹ thấm vào vải ướt hoặc miếng xốp lau chùi
để vệ sinh các bộ phận bằng nhựa.
10. Chỉ sử dụng cho hộ gia đình, không dành cho bất kỳ mục đích kinh doanh.
11. Thiết bị này không dành cho những người (kể cả trẻ em) có sức khỏe yếu, vấn
đề thần kinh, thiếu kinh nghiệm và kiến thức. Trừ khi họ có người giám sát
hoặc hướng dẫn cách sử dụng bởi những người chịu trách nhiệm về sự an
toàn của họ. Trẻ em cần được giám sát để đảm bảo rằng chúng không chơi
với thiết bị.
12. Không vận hành Quạt mà không có Cánh Quạt, Cánh Quạt bị hỏng hoặc
cong.
• KHÔNG sạc lại pin này;
• Để xa tầm tay trẻ em;
• Nếu nuốt phải, cần tìm kiếm sự trợ giúp y tế ngay lập tức;
• Khi vận hành quạt, hãy HƯỚNG điều khiển về phía MÀN HÌNH HIỂN THỊ;
• Tần số điều khiển từ xa có thể BỊ TRÙNG. Để xa các thiết bị điện tử khác để tránh sự
cố;
• Các nút nguồn/điều khiển từ xa KHÔNG ngắt hoàn toàn nguồn điện. Hãy rút phích
cắm khi không sử dụng trong thời gian dài;
• Khi cất giữ lâu dài, THÁO pin ra.
Cài đặt Cột Dọc và Khung Chassis
• Xoay đầu và khung chassis theo hướng kim đồng hồ để kết
nối hai cột dọc (nhu hình minh họa).
• Sau khi kết nối cột dọc dưới cùng với khung chassis, xoay và
chặt chẽ nút để cố định nó.
9.8” CIRCULATION FAN WITH REMOTE CONTROL
USER MANUAL
Model: PJ-CD114V-C
EN
9.8” QUẠT TUẦN HOÀN SHARP CÓ ĐIỀU KHIỂN
HƯỚNG DẪN SỬ DỤNG
Kiểu Máy: PJ-CD114V-C
VI
5
5
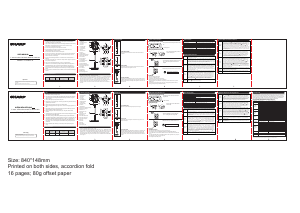
Button Functions
Operation Modes of Functions
Chức năng của các nút
Chế độ hoạt động của các chức năng
Standby Button
Controls the power - on and standby of the main unit.
Ion Group Button
Turns on or off the ion group function.
Turn on or off the left - right swing function.
Adjusts the mode function of the fan.
Turns on or off the timer function, with a range of 1 - 6h.
Swing Button
Mode Button
Timer Button
Turns on or off the turbo modeTurbo Button
Adjusts the wind speed gears, with a range of 1-8 gears.
Gear Button
In the standby state, press the “ ” button on the remote control or the body, the buzzer
beeps once, the fan starts to run, and the gear is 1st gear. The indicator light above the
corresponding gear lights up.
In the power - on state, press the “ ” button on the remote control or the body, the buzzer
beeps for a long time “beep~”, and the fan enters the standby state.
When powered on for the first time, the buzzer will emit a "beep" sound, all indicator lights
will turn on for 1 second and then go off, and the device will enter the standby state.
Power on
On /
Standby
Gear
Adjustment
When the fan is in the running state, press the “ ” button on the remote control or the
fuselage. The buzzer will beep once, and the gear will be cycled and switched in the
following way. The corresponding indicator light will turn on. When adjusting from gear 8
to gear 1, the buzzer will beep twice.
1→2→3→...→8→1→2.....
Swing
Function
When the fan is running, press the “ ” button on the fan body or the remote control. The
buzzer will beep once, and the left - right swing function will be turned on. Press the button
again, the buzzer will beep twice, and the left - right swing function will be turned off.
Automatic left-right oscillation (approx. 90°), manual up-down oscillation (90°).
Mode
Switching
When the fan is powered on, it defaults to the normal wind mode, and the speed level is
displayed. When the fan is running, press the “M” button on the body or the remote
control, and the buzzer will emit a “beep”. The modes will be cycled and switched in the
following order. When switching from smart wind mode to normal wind mode, the buzzer
will emit two “beeps”.
Normal wind → Sleep wind → Baby wind → AI Smart wind
When the fan is running, press the “ ” button on the remote control, the buzzer beeps
once, and the timer is cyclically selected as follows. The indicator light above the
corresponding icon lights up. 1h→2h→3h...→8h→0h(Cancel)→1h.....
Timer
Function
When the fan is running, press the “ ” button on the remote control. The buzzer will beep
once, and the storm mode will be activated, with the corresponding indicator light turning
on. Press the “ ” button again to exit the storm mode, and the buzzer will beep twice as a
prompt.
Storm
Mode
When the fan is running, press the “ " button on the remote control briefly, and the buzzer
will beep once “beep". The ion group function will be turned on, and the “ " indicator light
will light up. Press the “ " button on the remote control briefly again, and the buzzer will
beep twice “beep beep". The ion group function will be turned off, and the “ " indicator light
will go out.
Ion Group
Nút Chờ
Kiểm soát nguồn - bật và đặt máy chính ở chế độ chờ.
Nút Tụ Ion
Bật hoặc tắt chức năng tụ ion.
Bật hoặc tắt chức năng lắc trái - phải.
Điều chỉnh chức năng chế độ của quạt.
Bật hoặc tắt chức năng hẹn giờ, với phạm vi 1 - 6 giờ.
Nút Lắc Động
Nút Chế Độ
Nút Hẹn Giờ
Bật hoặc tắt chế độ turbo.Nút Turbo
Điều chỉnh các cấp tốc độ gió, với phạm vi từ 1 đến 8 cấp.
Nút Cấp Tốc Độ
Khi quạt đang hoạt động, nhấn ngắn nút “ ” trên điều khiển từ xa, và máy báo sẽ kêu một
lần “beep”. Chức năng tụ ion sẽ được bật, và đèn báo “ ” sẽ sáng lên. Nhấn lại ngắn nút “ ”
trên điều khiển từ xa, và máy báo sẽ kêu hai lần “beep beep”. Chức năng tụ ion sẽ được tắt,
và đèn báo “ ” sẽ tắt.
Tụ Ion
Khi quạt đang hoạt động, nhấn nút “ ” trên điều khiển từ xa. Máy báo sẽ kêu một lần, và
chế độ bão sẽ được kích hoạt, với đèn báo tương ứng sáng lên. Nhấn lại nút “ ” để thoát
chế độ bão, và máy báo sẽ kêu hai lần như một lời nhắc.
Chế Độ
Bão
Trong trạng thái chờ, nhấn nút “ ” trên điều khiển từ xa hoặc thân máy, buzzer kêu 1 lần,
quạt bắt đầu quay, và cấp tốc độ là cấp 1. Đèn báo phía trên cấp tương ứng sẽ sáng.
Trong trạng thái bật nguồn, nhấn lâu nút “ ” trên điều khiển từ xa hoặc thân máy, buzzer
kêu liên tục “beep~”, và quạt vào trạng thái chờ.
Khi bật nguồn lần đầu, buzzer sẽ phát âm thanh “beep”, tất cả đèn báo sẽ sáng trong 1
giây rồi tắt, và thiết bị sẽ vào trạng thái chờ.
Bật Nguồn
Bật / Chờ
Điều Chỉnh
Cấp Tốc
Độ
Khi quạt đang quay, nhấn nút “ ” trên điều khiển từ xa hoặc thân máy. Buzzer sẽ kêu 1
lần, và cấp tốc độ sẽ lặp và chuyển đổi theo cách sau. Đèn báo tương ứng sẽ sáng. Khi
điều chỉnh từ cấp 8 sang cấp 1, buzzer sẽ kêu 2 lần.
Chuỗi chuyển đổi: 1→2→3→…→8→1→2…
Chức Năng
Lắc Động
Khi quạt đang hoạt động, nhấn nút “ " trên thân quạt hoặc điều khiển từ xa. Máy báo sẽ
kêu một lần và chức năng lắc trái - phải sẽ bật. Nhấn lại nút đó, máy báo sẽ kêu hai lần và
chức năng lắc trái - phải sẽ tắt. Tự động xoay trái phải khoảng 90°, thủ động xoay lên
xuống 90°.
Chuyển
Chế Độ
Khi quạt bật nguồn, mặc định vào chế độ gió thông thường, và mức tốc độ sẽ hiển thị. Khi
quạt đang quay, nhấn nút “M” trên thân máy hoặc điều khiển từ xa, và buzzer sẽ phát âm
“beep”. Các chế độ sẽ lặp và chuyển đổi theo thứ tự sau. Khi chuyển từ chế độ gió thông
minh sang chế độ gió thông thường, buzzer sẽ phát 2 tiếng “beep”.
Gió thông thường → Gió ngủ → Gió trẻ em → AI Gió thông minh
Khi quạt đang quay, nhấn nút “ ” trên điều khiển từ xa, buzzer sẽ kêu 1 lần, và hẹn giờ sẽ
được chọn lặp như sau. Đèn báo phía trên biểu tượng tương ứng sẽ sáng.
Chuỗi chọn giờ: 1h→2h→3h→…→8h→0h (Hủy)→1h…
Chức Năng
Hẹn Giờ
Size: 630*148mm
Printed on both sides, accordion fold
12 pages; 80g offset paper

Delta i konversationen om denna produkt
Här kan du dela vad du tycker om Sharp PJ-CD114V-C Fläkt. Om du har en fråga, läs först noggrant igenom manualen. Att begära en manual kan göras genom att använda vårt kontaktformulär.