
IB-L35WMEF25-250603V1
Thank you for purchasing your new product.
We recommend that you spend some time reading this instruction manual in order that
you fully understand all the operational features it oers.
Read all the safety instructions carefully before use and keep this instruction manual for
future reference.
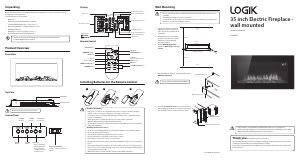
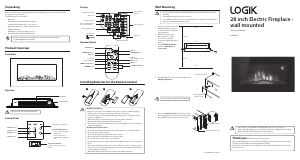
35 inch Electric Fireplace -
wall mounted
Instruction Manual
L35WMEF25
• This product is only suitable for well-insulated spaces or occasional use.
• Before using this appliance, read all safety instructions carefully rst in the Safety
Warnings booklet and keep them for future reference.
Product Overview
Front View
Control Panel
Top View
Unpacking
Remove all items from the packaging. Retain the packaging. If you dispose of it please do so
according to local regulations.
The following items are included:
• Main Unit
• Remote Control (2 AAA batteries included)
• L-Shape Wall Fixing Bracket × 1 & Screws × 2
• Glass Fixing Bracket × 1 & Glass Fixing Screw × 1
• Wall Fixing Bracket
• Wall Plugs × 7 and Long Fixing Screws × 7
• Instruction Manual and Safety Warnings
• If items are missing or damaged, please contact Partmaster (UK only).
• Tel: 0344 800 3456 for assistance.
2000W 1000W I/O
WARNING: DO NOT COVER
Installing Batteries for the Remote Control
Wall Mounting
Remote Control
Display
Air Outlet
Control Panel
Power On/O Switch
Toggle to switch on/o power
supply.
O/I Button
• Press to switch the
ame light On/O.
• Press and hold to
set dierent ame
brightness level.
1
2
3
Handling the Battery
• Improper or incorrect use of batteries may cause corrosion or battery leakage,
which could cause re, personal injury or damage to property.
• Install the battery correctly by following the polarity (+ and –) indications in the
battery compartment.
• When the battery is exhausted, the remote control will not function.
• Only use the battery type indicated in this manual.
• Do not dispose of the used battery as domestic waste. Dispose of it in accordance
with local regulations.
Handling the Remote Control
• Be aware of your ngernails when removing the battery cover and the battery.
• Do not drop the remote control.
• Do not allow anything to impact the remote control.
• Do not spill water or any liquid on the remote control.
• Do not place the remote control on a wet object.
• Do not place the remote control under direct sunlight or near sources of excessive
heat.
• Remove the battery from the remote control when not in use for a long period of
time, as corrosion or battery leakage may occur and result in physical injury, and/or
property damage, and/or re.
• When the battery is exhausted, the remote control will not function.
2000W
Indicator
1000W
Indicator
Flame Eect
On Indicator
2000W
Button
1000W
Button
• Do not connect the heater until properly xed to the wall and the instructions is
read fully.
• The minimum distances must be observed.
• For installation of the heater, care must be taken not to damage concealed cables.
• Please be careful while drilling the holes.
ON/OFF Button
OK Button
+/– Button
C (Cancel) Button
TIMER SET Button
TIMER ON/OFF Button
DIMMER Button
Button
DATE/TIME Button
IC Button
Press to switch on/o
AUTO mode.
Button
1000W/2000W Button
1. Keep top of the heater at least
1000 mm away from ceiling or
other objects for optimum heat
ventilation.
2. Mark the top ve screws xing
positions on wall in accordance
with the recommend xing
dimensions below.
3. Fix the Wall Fixing Bracket
with the 5 Wall Plugs and Long
Screws.
652 mm
596 mm
1020 mm
1000 mm
Wall Plug
Long
Screw
Ceiling
Wall Fixing Bracket
Floor
4. Carefully lift the heater up, and then slide into the
Wall Fixing Bracket.
Rear View of the unit
Wall Fixing Bracket
5. Place the Front Glass Panel over the front of the
heater aligning the hooks at each side of the glass
panel with the slots at each side of the heater.
Rear View of the unit
Front Glass Panel
Two people are required for installation.
Day of the week
Timer icon
Flame brightness level
Temperature display
Timer On/O indicator
Heating level
: 1000W
: 2000W
Auto mode
Time / Temperature (in
Timer setup) display
Standby indicator
IB-L35WMEF25-250804V2
Do not cover the air outlet of the unit.


Delta i konversationen om denna produkt
Här kan du dela vad du tycker om Logik L35WMEF25 Elektrisk öppen spis. Om du har en fråga, läs först noggrant igenom manualen. Att begära en manual kan göras genom att använda vårt kontaktformulär.