
Kom godt i gang
• Sæt USB-C-strømledningen i bagsiden af uret, og tilslut den anden ende
til den medfølgende strømadapter. Sæt derefter adapteren i en almindelig
stikkontakt.
Trådløs højttaler
• For at tænde eller slukke for den trådløse højttaler skal du trykke kort på
SPEAKER ON/OFF-knappen og holde den nede. Højttaleren afspiller en tone,
når den tændes eller slukkes.
• På din Bluetooth-aktiverede enhed skal du søge og oprette forbindelse til
enhedsnavnet: 71091CN.
• Bemærk: Den trådløse højttalerindikator blinker på skærmen, indtil den er
parret med en enhed. Hvis der ikke oprettes forbindelse inden for 3 minutter,
stopper uret med at vente på en enhed. Når den er tilsluttet, forbliver den
trådløse højttalerindikator tændt.
• Når din enhed er tilsluttet den trådløse højttaler, vil uret automatisk
synkronisere sin tid med din trådløse enhed.
• For at justere lydstyrken skal du trykke og slippe OP- eller NED-knapperne.
• For at springe eller gå tilbage en sang skal du holde OP- eller NED-knapperne
nede.
• Bemærk: Når den er tilsluttet den trådløse højttaler, kan 12/24-timers
tidsformatet ikke justeres.
Natlys og lysdæmper
• Knappen SNOOZE/NIGHT LIGHT giver dig mulighed for at styre natlyset. Der
er re niveauer af lysstyrke: 100 %, 75 %, 50 % og 25 %. Knappen fungerer i
følgende rækkefølge:
• Tryk én gang for at tænde lyset til 100 % lysstyrke.
• Tryk igen for at reducere lysstyrken til 75 %.
• Tryk igen for at reducere lysstyrken til 50 %.
• Tryk igen for at reducere lysstyrken til 25 %.
• Tryk igen for at slukke lyset.
Trådløs opladning
• Placer din telefon i midten af det trådløse opladningsområde.
Opladningsindikatoren vil lyse, mens din telefon oplader.
• Vigtige bemærkninger:
• Den trådløse opladningseffekt er 15 watt (MAX).
• For maksimal effektivitet skal du sørge for, at telefonen er justeret med midten
af opladningsområdet.
• Fjern metal- eller tykke tredjepartstelefoncovers inden opladning.
• Hold mindst 10 tommer (25 cm) mellem uret og medicinsk implanterede
enheder.
• Placer ikke uret i nærheden af ID eller bankkort for at undgå at beskadige
magnetstrimlen eller den indbyggede chip.
Indstilling af tid
• Hold knappen TIME SET nede i 3 sekunder. Timecifrene vil blinke.
BRUGSANVISNING VÆKKEUR/TRÅDLØS HØJTTALER
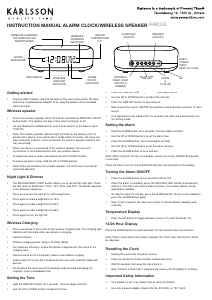
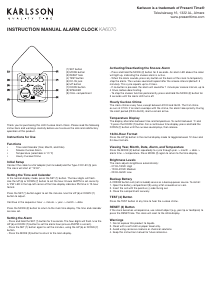
WIRELESS CHARGING
TOP SURFACE
(FOR SMARTPHONES)
WIRELESS
CHARGING
INDICATOR
INDOOR
TEMPERATURE
(°C/°F)
AM
PM
AM/ PM
INDICATORS
ALARM
(SET&ON/OFF)
TIME SETSNOOZE &
NIGHT LIGHT
(ON/OFF&DIMMER)
UP
SPEAKER
ON/OFF
DOWN
&
12/24 HOUR
USB C
POWER
INPUT
(MAX 12V-1.67A)
Printed in China
3) To adjust the volume, PRESS andrelease the UP or DOWN buttons.
Note: The clock will automatically connecttoapaired device if the device is
turned on, and within range.
2) On your bluetooth enabled device, search and connect to device name:
71091CN.
Note: The wireless speaker indicator light will flash on the display until it is
paired withadevice. The clock will automatically stop waiting foradevice to
connect after3minutes. When your device is connected the wireless speaker
indicator on the clock will stay illuminated.
Note: When your device
is connected to the wireless speaker, The clock will
automatically synchronize the time with your wireless device. The time will
update shortly after the device is connected.
1) To turn the wireless speaker ON or OFF. Press and hold the SPEAKER ON /
OFF briefly. The speaker will playamusic tone when turning on or o.
Wireless Speaker
4) To skip or go backasong, HOLD the UP or DOWN buttons.
Note: When your device is connected to the wireless speaker, the 12/24
Hour time format can not be adjusted.
- Press Once to turn the light ON-100%.
- Press Again to reduce the light brightness to 75%.
- Press Again to reduce the light brightness to 50%.
- Press Again to reduce the light brightness to 25%.
- Press Again to turn the light OFF.
The SNOOZE/NIGHT LIGHT button allows you to turn ON, Adjust Brightness
and turn OFF the night light. There are4levels of brightness (100%-75% -
50%-25%) The button controls the lightinthefollowing sequence:
Night Light&Dimmer
Plug the USBCpower cord into the back of the clock, and the other end into
the included power adapter. Plug the adapter intoastandard electrical
outlet. The display will turn on. The clock is now ready to be set.
Getting Started
Important: Use only a 5V-3A, 9V-2.22A, or 12V-1.67A power adapter or USB
power source.
Note:
- Wireless charging power rating is 15 Watt (MAX).
- May not work with all 3rd party phone cases. Metal cases should be
removed before wireless charging.
- For maximumchargingeciency, the phone must be aligned with the
center of the charging area.
Important:
- Do NOT place too close to ID and banking cards. The wireless charger
may damage the magnetic strip or embedded chip.
- Keep at least 10” / 25cm between the clock and medical implanted
devices. The wireless charger may cause disruption to the medical device.
- Keep away from children. This is not a toy.
Place your phone on the center the of the wireless charging area. The
charging light indicator will illuminate on the frontoftheclock whileyour
phoneischar
ging.
Wireless Charging
Note: When the alarm is activated, the ALARM ON indicator will
illuminate on the display.
Press the ALARM button to turn the alarm ON or OFF.
Alarm On / O
Note: When setting the alarm, The alarm indicator on the display will flash
so you can be sure you are setting the alarm. If no adjustments are made
within 10 seconds,theclock will automaticallyexit the setting mode.
IMPORTANT: When using the 12hr time display format, Be sure to set the
alarm hour to the desired wake up time: AM or PM. Check for the AM or PM
indicator light on the display.
1) Hold the ALARM button fo r3seconds. The HOUR digits will flash. Use
the UP or DOWN buttons as needed to set the desired alarm hour.
2) Press the ALARM button once. The MINUTE digits will flash. Use the UP or
DOWN buttonsasneeded to set the desired alarmtime.
3) Press the ALARM button oncetosaveandexit.
Setting the Alarm
TIP: To automatically set the time, connect your device to the wireless
speaker. Refer to the Wireless Speaker section of this user manual. The clock
will automatically synchronize the time with your wireless device. The time will
update shortly after the device is connected.
Note: When setting the clock, if no adjustments are made within 10 seconds,
the clock will automaticallyexit the setting mode.
Note: When using the 12hr time display format, be sure to set the time to the
correct AM or PM time period. Check for the AM or PM indicator on the display.
1) Hold the TIME SET button for3seconds. The HOUR digits will flash. Use
the UP or DOWN buttonsasneededtosetthecorrect hour.
2) Press the TIME SET button once. The MINUTE digits will flash. Use the UP
or DOWN buttonsasneededtosetthecorrect minutes.
3) Press the TIME SET button oncetosaveandexit.
Setting the Time
Note: If the alarmisnotturned o, the alarm will ringfor5minutes.
To stop the alarm, press the ALARM button. The alarm will stop, but will
remain on for the next day.PresstheALARM button again to turn the
alarm o. Check for the ALARM ON indicator on the display.
When the alarmissounding, press SNOOZE/LIGHT button. The alarm will
be silenced temporarily, but will resume sounding after5minutes. The snooze
can be repea
ted as many times as desired.
Using the Snooze
Temperature °C / °F
Press the UP button to select Celsius or Fahrenheit(°C/ °F).
Note: When your device is connected to the wireless speaker, the 12/24
Hour time format can not be adjusted.
Press the DOWN button to switch between 12 and 24 Hourtimeformat.
12 / 24 Hour Display
1) Unplug the clock from the electrical source/outlet.
2) Press any button 2 -3times (This will drain a ny residual electricity).
3) Wait 30 seconds, then plug the clock back into the electrical source /
outlet.
Note: If you are experiencing any problems with the display, setting or
other issues, preformaHARD RESET:
Reset
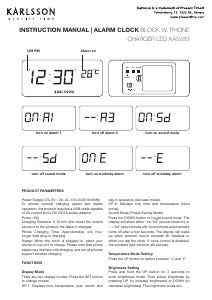
TIME DISPLAY WIRELESS
SPEAKER
INDICATOR
ALARM ON
INDICATOR
INSTRUCTION MANUAL
WIRELESS CHARGING
TOP SURFACE
(FOR SMARTPHONES)
WIRELESS
CHARGING
INDICATOR
INDOOR
TEMPERATURE
(°C/°F)
AM
PM
AM/ PM
INDICATORS
ALARM
(SET&ON/OFF)
TIME SETSNOOZE &
NIGHT LIGHT
(ON/OFF&DIMMER)
UP
SPEAKER
ON/OFF
DOWN
&
12/24 HOUR
USB C
POWER
INPUT
(MAX 12V-1.67A)
Printed in China
3) To adjust the volume, PRESS andrelease the UP or DOWN buttons.
Note: The clock will automatically connecttoapaired device if the device is
turned on, and within range.
2) On your bluetooth enabled device, search and connect to device name:
71091CN.
Note: The wireless speaker indicator light will flash on the display until it is
paired withadevice. The clock will automatically stop waiting foradevice to
connect after3minutes. When your device is connected the wireless speaker
indicator on the clock will stay illuminated.
Note: When your device
is connected to the wireless speaker, The clock will
automatically synchronize the time with your wireless device. The time will
update shortly after the device is connected.
1) To turn the wireless speaker ON or OFF. Press and hold the SPEAKER ON /
OFF briefly. The speaker will playamusic tone when turning on or o.
Wireless Speaker
4) To skip or go backasong, HOLD the UP or DOWN buttons.
Note: When your device is connected to the wireless speaker, the 12/24
Hour time format can not be adjusted.
- Press Once to turn the light ON-100%.
- Press Again to reduce the light brightness to 75%.
- Press Again to reduce the light brightness to 50%.
- Press Again to reduce the light brightness to 25%.
- Press Again to turn the light OFF.
The SNOOZE/NIGHT LIGHT button allows you to turn ON, Adjust Brightness
and turn OFF the night light. There are4levels of brightness (100%-75% -
50%-25%) The button controls the lightinthefollowing sequence:
Night Light&Dimmer
Plug the USBCpower cord into the back of the clock, and the other end into
the included power adapter. Plug the adapter intoastandard electrical
outlet. The display will turn on. The clock is now ready to be set.
Getting Started
Important: Use only a 5V-3A, 9V-2.22A, or 12V-1.67A power adapter or USB
power source.
Note:
- Wireless charging power rating is 15 Watt (MAX).
- May not work with all 3rd party phone cases. Metal cases should be
removed before wireless charging.
- For maximumchargingeciency, the phone must be aligned with the
center of the charging area.
Important:
- Do NOT place too close to ID and banking cards. The wireless charger
may damage the magnetic strip or embedded chip.
- Keep at least 10” / 25cm between the clock and medical implanted
devices. The wireless charger may cause disruption to the medical device.
- Keep away from children. This is not a toy.
Place your phone on the center the of the wireless charging area. The
charging light indicator will illuminate on the frontoftheclock whileyour
phoneischar
ging.
Wireless Charging
Note: When the alarm is activated, the ALARM ON indicator will
illuminate on the display.
Press the ALARM button to turn the alarm ON or OFF.
Alarm On / O
Note: When setting the alarm, The alarm indicator on the display will flash
so you can be sure you are setting the alarm. If no adjustments are made
within 10 seconds,theclock will automaticallyexit the setting mode.
IMPORTANT: When using the 12hr time display format, Be sure to set the
alarm hour to the desired wake up time: AM or PM. Check for the AM or PM
indicator light on the display.
1) Hold the ALARM button fo r3seconds. The HOUR digits will flash. Use
the UP or DOWN buttons as needed to set the desired alarm hour.
2) Press the ALARM button once. The MINUTE digits will flash. Use the UP or
DOWN buttonsasneeded to set the desired alarmtime.
3) Press the ALARM button oncetosaveandexit.
Setting the Alarm
TIP: To automatically set the time, connect your device to the wireless
speaker. Refer to the Wireless Speaker section of this user manual. The clock
will automatically synchronize the time with your wireless device. The time will
update shortly after the device is connected.
Note: When setting the clock, if no adjustments are made within 10 seconds,
the clock will automaticallyexit the setting mode.
Note: When using the 12hr time display format, be sure to set the time to the
correct AM or PM time period. Check for the AM or PM indicator on the display.
1) Hold the TIME SET button for3seconds. The HOUR digits will flash. Use
the UP or DOWN buttonsasneededtosetthecorrect hour.
2) Press the TIME SET button once. The MINUTE digits will flash. Use the UP
or DOWN buttonsasneededtosetthecorrect minutes.
3) Press the TIME SET button oncetosaveandexit.
Setting the Time
Note: If the alarmisnotturned o, the alarm will ringfor5minutes.
To stop the alarm, press the ALARM button. The alarm will stop, but will
remain on for the next day.PresstheALARM button again to turn the
alarm o. Check for the ALARM ON indicator on the display.
When the alarmissounding, press SNOOZE/LIGHT button. The alarm will
be silenced temporarily, but will resume sounding after5minutes. The snooze
can be repea
ted as many times as desired.
Using the Snooze
Temperature °C / °F
Press the UP button to select Celsius or Fahrenheit(°C/ °F).
Note: When your device is connected to the wireless speaker, the 12/24
Hour time format can not be adjusted.
Press the DOWN button to switch between 12 and 24 Hourtimeformat.
12 / 24 Hour Display
1) Unplug the clock from the electrical source/outlet.
2) Press any button 2 -3times (This will drain a ny residual electricity).
3) Wait 30 seconds, then plug the clock back into the electrical source /
outlet.
Note: If you are experiencing any problems with the display, setting or
other issues, preformaHARD RESET:
Reset
TIME DISPLAY WIRELESS
SPEAKER
INDICATOR
ALARM ON
INDICATOR
INSTRUCTION MANUAL
KA6033
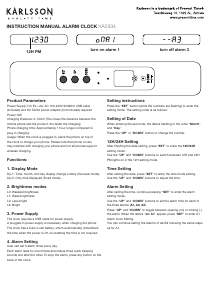
• Brug OP- eller NED-knapperne til at justere timetallet.
• Tryk på knappen TIME SET igen. Minutcifrene vil blinke.
• Brug OP- eller NED-knapperne til at justere minutterne.
• Tryk på knappen TIME SET for at gemme og afslutte.
• Bemærk: Sørg for, at den korrekte AM/PM-tidsperiode er valgt, når du bruger
12-timers formatet.
• Hvis der ikke foretages nogen justeringer inden for 10 sekunder, forlader uret
automatisk indstillingstilstanden.
Indstilling af alarm
• Hold ALARM-knappen nede i 3 sekunder. Timecifrene vil blinke.
• Brug OP- eller NED-knapperne til at indstille alarmtiden.
• Tryk på ALARM-knappen. Minutcifrene vil blinke.
• Brug OP- eller NED-knapperne til at indstille alarmminutterne.
• Tryk på ALARM-knappen for at gemme og afslutte.
Bemærk: Når du bruger 12-timers tidsvisning, skal du sørge for, at den korrekte AM/
PM-tidsperiode er valgt.
Når alarmen er aktiv, vil ALARM ON-indikatoren lyse på displayet.
Slå alarmen TIL/FRA
• Tryk på knappen ALARM for at slå alarmen TIL eller FRA.
• Når alarmen lyder, skal du trykke på SNOOZE/LIGHT-knappen for midlertidigt
at slå den fra. Alarmen genoptages efter 5 minutter. Snooze-funktionen kan
gentages efter behov.
• Tryk på ALARM-knappen for at stoppe alarmen for dagen. For at slukke helt, tryk
på ALARM-knappen igen.
• Bemærk: Hvis den ikke er slået fra, vil alarmen ringe i 5 minutter, før den stopper
automatisk.
Temperatur display
• Tryk på OP-knappen for at skifte mellem Celsius (°C) og Fahrenheit (°F).
12/24 timers visning
Tryk på NED-knappen for at skifte mellem 12-timers og 24-timers tidsformater.
Bemærk: Når den er tilsluttet den trådløse højttaler, kan 12/24-timers tidsformatet
ikke justeres.
Nulstilling af uret
• Tag uret ud af strømkilden.
• Tryk på en vilkårlig knap 2-3 gange for at dræne resterende elektricitet.
• Vent 30 sekunder, og sæt derefter uret i igen.
• Bemærk: Udfør en hård nulstilling, hvis du oplever problemer med skærmen eller
indstillingerne.
Vigtige sikkerhedsoplysninger
• Dette produkt er ikke et legetøj. Opbevar det utilgængeligt for børn.
• Brug kun en strømadapter, der er klassiceret til 5V-3A, 9V-2,22A eller 12V-1,67A.
USB-C
MAGT
INPUT
(MAX 12V-1,67A)
OPNED
&
12-24
TID INDSTIL-
LET
SNOOZE &
NATSLYS
(ON/OFF &
DIMMER)
ALARM
TIL/FRA
INDIKATOR
WIRELØS
HØJTTALER
INDIKATOR
TIDSVISNING
AM/PM
INDIKATORER
TRÅDLØS OPLAD-
NINGSOVERFLADE TIL
SMARTPHONES
TRÅDLØS
OPLADNING
INDIKATOR
INDENDØRSTEMPERA-
TUR°/F°
ALARM INDSTILLET
(ON/OFF)
HØJTTALER
(ON/OFF)


Delta i konversationen om denna produkt
Här kan du dela vad du tycker om Karlsson KA6033BK Väckarklocka. Om du har en fråga, läs först noggrant igenom manualen. Att begära en manual kan göras genom att använda vårt kontaktformulär.