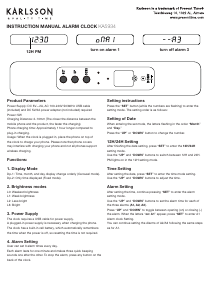
Product Parameters
Power Supply: DC 5V—2A, AC 100-240V 50/60Hz USB cable
(included) and DC 5V/2A power adapter (not included) required
Power: 5W
Charging Distance: 2-10mm (The closer the distance between the
mobile phone and the product, the faster the charging)
Phone charging time: Approximately 1 hour longer compared to
plug-in charging.
Usage: When the clock is plugged in, place the phone on top of
the clock to charge your phone. Please note that phone covers
may interfere with charging your phone and not all phones support
wireless charging.
Functions:
1. Display Mode
Dp-1: Time, month, and day display change orderly (Carousel mode).
Dp-2: Only time displayed (Fixed mode).
2. Brightness modes
L0: Weakest brightness
L1: Weak brightness
L2: Less bright
L3: Bright
3. Power Supply
The clock requires a USB cable for power supply.
A plugged-in power supply is necessary when charging the phone.
The clock has a built-in cell battery, which automatically remembers
the time when the power is off, so resetting the time is not required.
4. Alarm Setting
User can set 3 alarm times every day.
Each alarm lasts for one minute and makes three quick beeping
sounds one after the other. To stop the alarm, press any button on the
back of the clock.
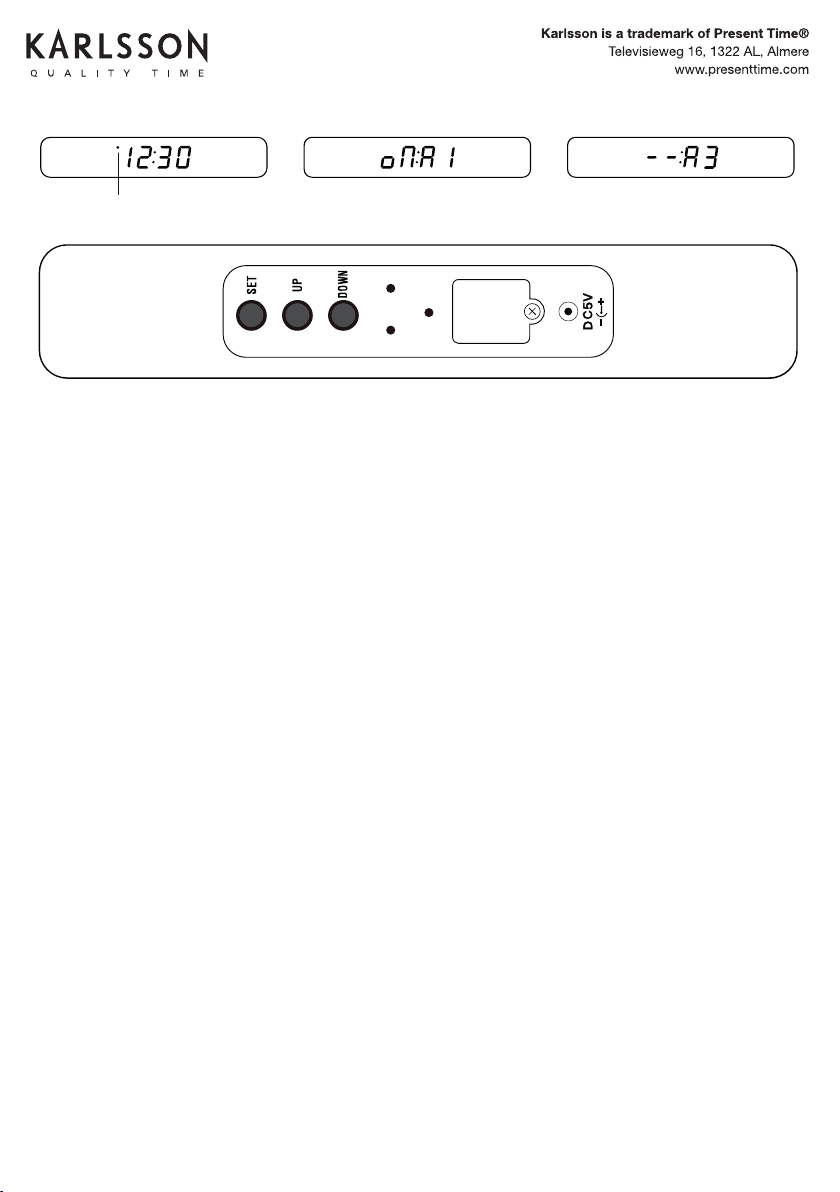
Setting instructions
Press the “SET” button (while the numbers are ashing) to enter the
setting mode. The setting order is as follows:
Setting of Date
When entering the set mode, the letters ashing in the order “Month”
and “Day.”
Press the “UP” or “DOWN” button to change the number.
12H/24H Setting
After nishing the date setting, press “SET” to enter the 12H/24H
setting mode.
Use the “UP” and “DOWN” buttons to switch between 12H and 24H.
PM lights on in the 12H setting mode.
Time Setting
After setting the date, press “SET” to enter the time mode setting.
Use the “UP” and “DOWN” buttons to adjust the time.
Alarm Setting
After setting the time, continue pressing “SET” to enter the alarm
setting mode.
Use the “UP” and “DOWN” buttons to set the alarm time for each of
the three alarms (A1, A2, A3).
Press “UP” and “DOWN” to toggle between opening (on) or closing (-)
the alarm. When the letters “on: A1” appear, press “SET” to enter A1
Alarm clock Setting.
You can continue setting the Alarms of A2/A3 following the same steps
as for A1.
INSTRUCTION MANUAL
ALARM CLOCK FLAT W. PHONE CHARGER LED BAMBOO
KA5934
EN
Karlsson is a trademark of Present Time
Televisieweg 16, 1322 AL, Almere
www.karlsson-clocks.com
Product Parameters
Power Supply: DC 5V—2A, AC 100-240V 50/60Hz USB cable
(included) and DC 5V/2A power adapter (not included) required
Power: 5W
Charging Distance: 2-10mm (The closer the distance between the
mobile phone and the product, the faster the charging)
Phone charging time: Approximately 1 hour longer compared to
plug-in charging.
Usage: When the clock is plugged in, place the phone on top of
the clock to charge your phone. Please note that phone covers
may interfere with charging your phone and not all phones support
wireless charging.
Functions:
1. Display Mode
Dp-1: Time, month, and day display change orderly (Carousel mode).
Dp-2: Only time displayed (Fixed mode).
2. Brightness modes
L0: Weakest brightness
L1: Weak brightness
L2: Less bright
L3: Bright
3. Power Supply
The clock requires a USB cable for power supply.
A plugged-in power supply is necessary when charging the phone.
The clock has a built-in cell battery, which automatically remembers
the time when the power is off, so resetting the time is not required.
4. Alarm Setting
User can set 3 alarm times every day.
Each alarm lasts for one minute and makes three quick beeping
sounds one after the other. To stop the alarm, press any button on the
back of the clock.
Setting instructions
Press the “SET” button (while the numbers are ashing) to enter the
setting mode. The setting order is as follows:
Setting of Date
When entering the set mode, the letters ashing in the order “Month”
and “Day.”
Press the “UP” or “DOWN” button to change the number.
12H/24H Setting
After nishing the date setting, press “SET” to enter the 12H/24H
setting mode.
Use the “UP” and “DOWN” buttons to switch between 12H and 24H.
PM lights on in the 12H setting mode.
Time Setting
After setting the date, press “SET” to enter the time mode setting.
Use the “UP” and “DOWN” buttons to adjust the time.
Alarm Setting
After setting the time, continue pressing “SET” to enter the alarm
setting mode.
Use the “UP” and “DOWN” buttons to set the alarm time for each of
the three alarms (A1, A2, A3).
Press “UP” and “DOWN” to toggle between opening (on) or closing (-)
the alarm. When the letters “on: A1” appear, press “SET” to enter A1
Alarm clock Setting.
You can continue setting the Alarms of A2/A3 following the same steps
as for A1.
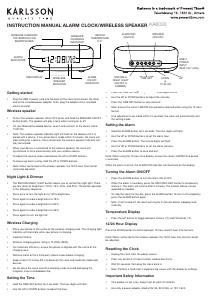
12H PM
turn on alarm 1 turn off alarm 3
INSTRUCTION MANUAL
ALARM CLOCK FLAT W. PHONE CHARGER LED BAMBOO
KA5934
EN
Karlsson is a trademark of Present Time
Televisieweg 16, 1322 AL, Almere
www.karlsson-clocks.com
Product Parameters
Power Supply: DC 5V—2A, AC 100-240V 50/60Hz USB cable
(included) and DC 5V/2A power adapter (not included) required
Power: 5W
Charging Distance: 2-10mm (The closer the distance between the
mobile phone and the product, the faster the charging)
Phone charging time: Approximately 1 hour longer compared to
plug-in charging.
Usage: When the clock is plugged in, place the phone on top of
the clock to charge your phone. Please note that phone covers
may interfere with charging your phone and not all phones support
wireless charging.
Functions:
1. Display Mode
Dp-1: Time, month, and day display change orderly (Carousel mode).
Dp-2: Only time displayed (Fixed mode).
2. Brightness modes
L0: Weakest brightness
L1: Weak brightness
L2: Less bright
L3: Bright
3. Power Supply
The clock requires a USB cable for power supply.
A plugged-in power supply is necessary when charging the phone.
The clock has a built-in cell battery, which automatically remembers
the time when the power is off, so resetting the time is not required.
4. Alarm Setting
User can set 3 alarm times every day.
Each alarm lasts for one minute and makes three quick beeping
sounds one after the other. To stop the alarm, press any button on the
back of the clock.
Setting instructions
Press the “SET” button (while the numbers are ashing) to enter the
setting mode. The setting order is as follows:
Setting of Date
When entering the set mode, the letters ashing in the order “Month”
and “Day.”
Press the “UP” or “DOWN” button to change the number.
12H/24H Setting
After nishing the date setting, press “SET” to enter the 12H/24H
setting mode.
Use the “UP” and “DOWN” buttons to switch between 12H and 24H.
PM lights on in the 12H setting mode.
Time Setting
After setting the date, press “SET” to enter the time mode setting.
Use the “UP” and “DOWN” buttons to adjust the time.
Alarm Setting
After setting the time, continue pressing “SET” to enter the alarm
setting mode.
Use the “UP” and “DOWN” buttons to set the alarm time for each of
the three alarms (A1, A2, A3).
Press “UP” and “DOWN” to toggle between opening (on) or closing (-)
the alarm. When the letters “on: A1” appear, press “SET” to enter A1
Alarm clock Setting.
You can continue setting the Alarms of A2/A3 following the same steps
as for A1.
12H PM
turn on alarm 1 turn off alarm 3
12H PM
turn on alarm 1 turn off alarm 3
INSTRUCTION MANUAL ALARM CLOCK KA5934


Delta i konversationen om denna produkt
Här kan du dela vad du tycker om Karlsson KA5934 Väckarklocka. Om du har en fråga, läs först noggrant igenom manualen. Att begära en manual kan göras genom att använda vårt kontaktformulär.