P.2 P.3
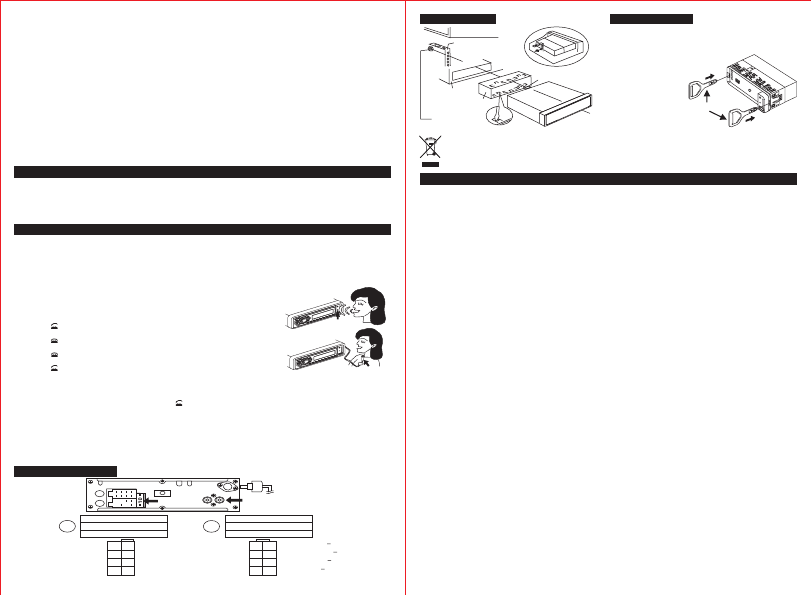
WIRE CONNECTION
ISO CONNECTOR
FROM CABLE SIDE
FOR 4 SPEAKERS
B
RIGHT REAR + RIGHT REAR
RIGHT FRONT + RIGHT FRONT
LEFT FRONT + LEFT FRONT
LEFT REAR + LEFT REAR
(GRAY) (GRAY/BLACK)
(PURPLE)
(PURPLE/BLACK)
(GREEN)
(GREEN/BLACK)
(WHITE) (WHITE/BLACK)
2
4
6
8
1
7
5
3
2
4
6
8
1
7
5
3
MEMORY
GROUND
IGNITION
(YELLOW)
(BLACK)
(RED)
POWER
ANTENNA
(BLUE)
POWER
FROM CABLE SIDE
A
ISO CONNECTOR
A
B
FUSE 10A
ANTENNA
RCA LINE OUT
16. RESET
The reset button is located on the front of main panel. This reset circuitry is provided to protect the unit's
microprocessor. Whenever the reset button is activated, all preset memories content will be erased. It should only
be activated under the below conditions: a) Initial installation after all wires are completed. b) Abnormal operation.
17. AUXILIARY INPUT
Press MODE button (8) until the “AUX” mode is shown on display. The unit is ready to play files from the external
audio device.
19. USB HOST
Press MODE button (8) until the “USB” mode is shown on display. The unit is ready to play files from the USB
device.
TRACK SEARCH
Press and hold “AMS” button more than 2 seconds, “TRK SCH” will be shown on the display. Release the button
and “TRK 0” will appear on the display for you to enter the first digit of the number. Rotate the volume button to
shift number 0-9 in a loop. Then, press it shortly to set the first digit. Repeat the same procedure for the rest of the
digits. Once all digits are entered, press the volume button more than 2 seconds to start playing the selected track.
If you set a wrong track number (it does not exist) then “NO TRACK” will be shown on the display.
PAIRING
a) Press “VOL/SEL” button (12) for a second until “TA SEEK” is shown on the display. Then, continuously pressing
the button again until the word “PAIRING” appears on display. Press “VOL/SEL” button (12) for a second, then the
word "PAIRING" starts flashing on the display. b) Turn your mobile phone's Bluetooth Function On and follow your
mobile phone's instructions for pairing. c) When searching for a new device, select “CAR HANDSFREE”, enter the
passcode “0000” and confirm. d) Once pairng is completed, “DC-” will show on display and ready to start mobile
phone handsfree operation through the built-in microphone or external microphone. e) If pairing cannot be
completed in 2 minutes, just repeat the procedure again from above until “DC-” showing on display.
A2DP (Advance Audio Distribution Profile)
A2DP is designed to transfer a 2-channel stereo audio stream, like music from an MP3 player, to a headset or car
radio. The mobile phone paired with the car radio must support the A2DP feature in order to stream music. Press
the “MODE” button (8) to select the “BT-PLAY” mode, use your mobile and play any MP3 songs and the songs will
automatically transfer from your mobile into car radio speaker.
BASIC TELEPHONE OPERATION
Display incoming number :
It will show the incoming telephone number if your mobile network is available.
Answer a call :
Press the “ ” button (11) to answer a call .
Reject a call :
Press the “ ” button (5) to reject a call.
Hang up :
Press the “ ” button (5) to hang up during dialing or talking.
Last Number Redial :
Press the “ ” button (11) for 2 seconds to redial the last number.
Transfer Call between Headset and Car Speaker :
During conversation, press the “SCAN” button (6) to switch a call between “Your own Bluetooth Headset” and “Car
Radio Speaker”.
Last Pairing Retrieve :
When next ignition is activated again, press the “ ” button (11) for more than 2 seconds until “DC-” showing on
display, then the unit is ready to start mobile phone handsfree operation.
Note: Please temporarily disconnect the external audio device via the auxiliary input when you receive a incoming
call. Otherwise, you may hear some noise during conversation.
20. MICROPHONE
If the unit connects with the mobile phone via Bluetooth, use this microphone to answer a call.
18. SD CARD SLOT
Press MODE button (8) until the “SD CARD” mode is shown on display. The unit is ready to play files from the
SD card.
15. STATION PRESET BUTTON (1-6)
a)Each station preset can be store in FM1, FM2 and FM3 (18FM). Press the button shortly recalls the station
frequency which was memorized. b)It can be memorized the frequency stations manually on specific preset stations
by holding the desired specific preset station in 2 seconds. c) Press the preset 2 to scan the first 10 seconds of all
the tracks during USB/SD mode. d) USB/SD mode
e) Press the preset 5/6 to search -10/+10 track during USB/SD mode.
Press the preset 4 to play the tracks in random order during .
MP3 OPERATION
BLUETOOTH OPERATION
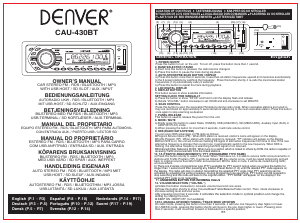
REMOVAL KEYS
INSTALLATION UNIT REMOVAL
1. Remove Front Panel and Frame.
2. Insert the removal keys into the slot and gently
to remove mounting case.
3. Keep removal keys in a safe
place for future removal
of unit.
Electric and electronic equipment contains materials, components and substances that can be hazardous to
your health and the environment, if the waste material (discarded electric and electronic equipment) is not
handled correctly. Electric and electronic equipment is marked with the crossed out trash can symbol, seen left.
This symbol signifies that electric and electronic equipment should not be disposed of with other household
waste, but should be disposed of separately. All cities have established collection points, where electric and
electronic equipment can either be submitted free of charge at recycling stations and other collection sites, or
be collected from the households. Additional information is available at the technical department of your city.
METAL
MOUNTING
STRIP
DASHBOARD
MOUNTING
CASE
CONSOLE
HEXAGON
NUT
HEXAGON
BOLT
ALLGEMEINE INBETRIEBNAHME
Deutsch
1. PWR (EIN-/AUSSCHALTEN)
Drücken Sie diese Taste, um das Gerät einzuschalten. Zum Ausschalten drücken Sie diese Taste länger
als 1 Sekunde.
3. AMS (AUTOM. SPEICHERN)/PRE-SCAN/RPT (WIEDERHOLEN)
a) Halten Sie diese Taste länger als 2 Sekunden gedrückt, um nach allen Senderfrequenzen aufsteigend zu
suchen und automatisch die Frequenzen von 6 voreingestellten Sendern zu speichern. Mit einem kurzen
Tastendruck werden die gespeicherten Senderfrequenzen (1-6) automatisch alle 5 Sekunden aufgerufen.
b) Wiederholen Sie während der Wiedergabe mit dieser Taste den Track.
4. DIGITALES LCD-DISPLAY
5. DISP (ANZEIGETASTE)
Diese Taste zeigt die verfügbaren Informationen an.
“”
UHRZEIT MANUELL EINSTELLEN
a) Drücken Sie die Taste zur Anzeige von XX'XX und halten Sie sie gedrückt, bis das Display blinkt.
b) Drehen Sie “VOL/SEL” nach rechts, um die STUNDEN und nach links, um die MINUTEN einzustellen.
7. BEDIENTEIL FREIGEBEN
Mit dieser Taste lösen Sie das Bedienteil vom Gerät.
6. SENDERSUCHE
Drücken Sie diese Taste im Radiomodus zum Suchen der verfügbaren UKW-Sender. Ein Sender bleibt
für ca. 5 Sekunden eingestellt, bevor das Gerät zum nächsten Sender umschaltet. Drücken Sie die Taste
erneut, um das Scannen zu unterbrechen.
8. MODUS / STUMM
a) Drücken Sie diese Taste zur Auswahl des Radio- (TUNER), USB- (USB-DRIV), SD- (MEM-CARD), AUX-
Eingangs- (AUX) oder A2DP- (BT-PLAY) Modus.
b) Halten Sie die Taste für 2 Sekunden gedrückt, um den Ton stummzuschalten.
2. BAND-AUSWAHL/PAUSE
a) Wechselt mit jedem Tastendruck das Frequenzband.
b) Hält mit einem Tastendruck die Trackwiedergabe vorübergehend an.
10.
a) Wählen Sie mit dieser Taste den TA-Modus: Wenn der TA-Modus eingeschaltet ist, können
Verkehrsmeldungen oder Sender mit Verkehrsnachrichten (TP) empfangen werden. Es funktioniert wie folgt:
lWenn die Lautstärke niedrig eingestellt ist, wird sie vorübergehend angehoben und kehrt nach der
Verkehrsmeldung zur ursprünglichen Lautstärke zurück.
lWenn das Radio stummgeschaltet wurde, wird die Stummschaltung während der Verkehrsmeldung
aufgehoben.
TA (VERKEHRSDURCHSAGEN) / PTY (PROGRAMMTYP)
b) Es sind 2 Arten von Programmtypen (PTY) für die PTY-Suche verfügbar, wenn Sie die Taste für 1 Sekunde
gedrückt halten und dann eine der Senderspeichertasten (1-6) drücken, bis der gewünschte PTY-Code
angezeigt wird. Das Radio sucht Sender, welche den gewählten PTY-Code übertragen. Die nächste PTY-
Suche wird auf gleiche Weise gestartet. Während der Programmtypsuche können Sie diese durch
9. RDS (RADIO DATA SYSTEM)
Sie können die Vorteile von RDS beim UKW-Radioempfang wie folgt genießen:
lProgrammdienstname (PS): Wenn ein RDS-Sender empfangen wird, erscheint der Sendername auf dem
Display.
lVerkehrsnachrichten (TP): Wenn ein Sender mit Verkehrsnachrichten empfangen wird, erscheint die
Anzeige “TP”auf dem Display.
lWenn RDS ist eingeschaltet, das Gerät wird auch weiterhin von Zeit zu Zeit das Signal auf alternative
Frequenzen überprüfen. Wenn eine neue alternative Frequenz stärker als die aktuelle ist, wird automatisch
zu der neuen Frequenz gewechselt. Wenn RDS blinkt, alternative Frequenzen sucht, aber es wurde kein
RDS-Signal empfangen.
lEinblendung anderer Sender (EON): Beim Einschalten eines Senders, der mit anderen über EON
verbunden ist, kann das Radio Verkehrsdurchsagen von angeschlossenen Sendern empfangen.
microphone
microphone

Delta i konversationen om denna produkt
Här kan du dela vad du tycker om Denver CAU-430BT Bilradio. Om du har en fråga, läs först noggrant igenom manualen. Att begära en manual kan göras genom att använda vårt kontaktformulär.
svara | Detta hjälpte (0) (Översatt av Google)