How To Toast Bread (cont)
Note: 1) Toasting colour for one slice is darker than that for two slices at the
same level (g. 1a).
2) If you have already toasted some bread, the toaster elements will be hot,
so when you put some more bread into the toaster it may become browner
more quickly than the rst slices that were toasted, even if the browning
controller is set to the same level.
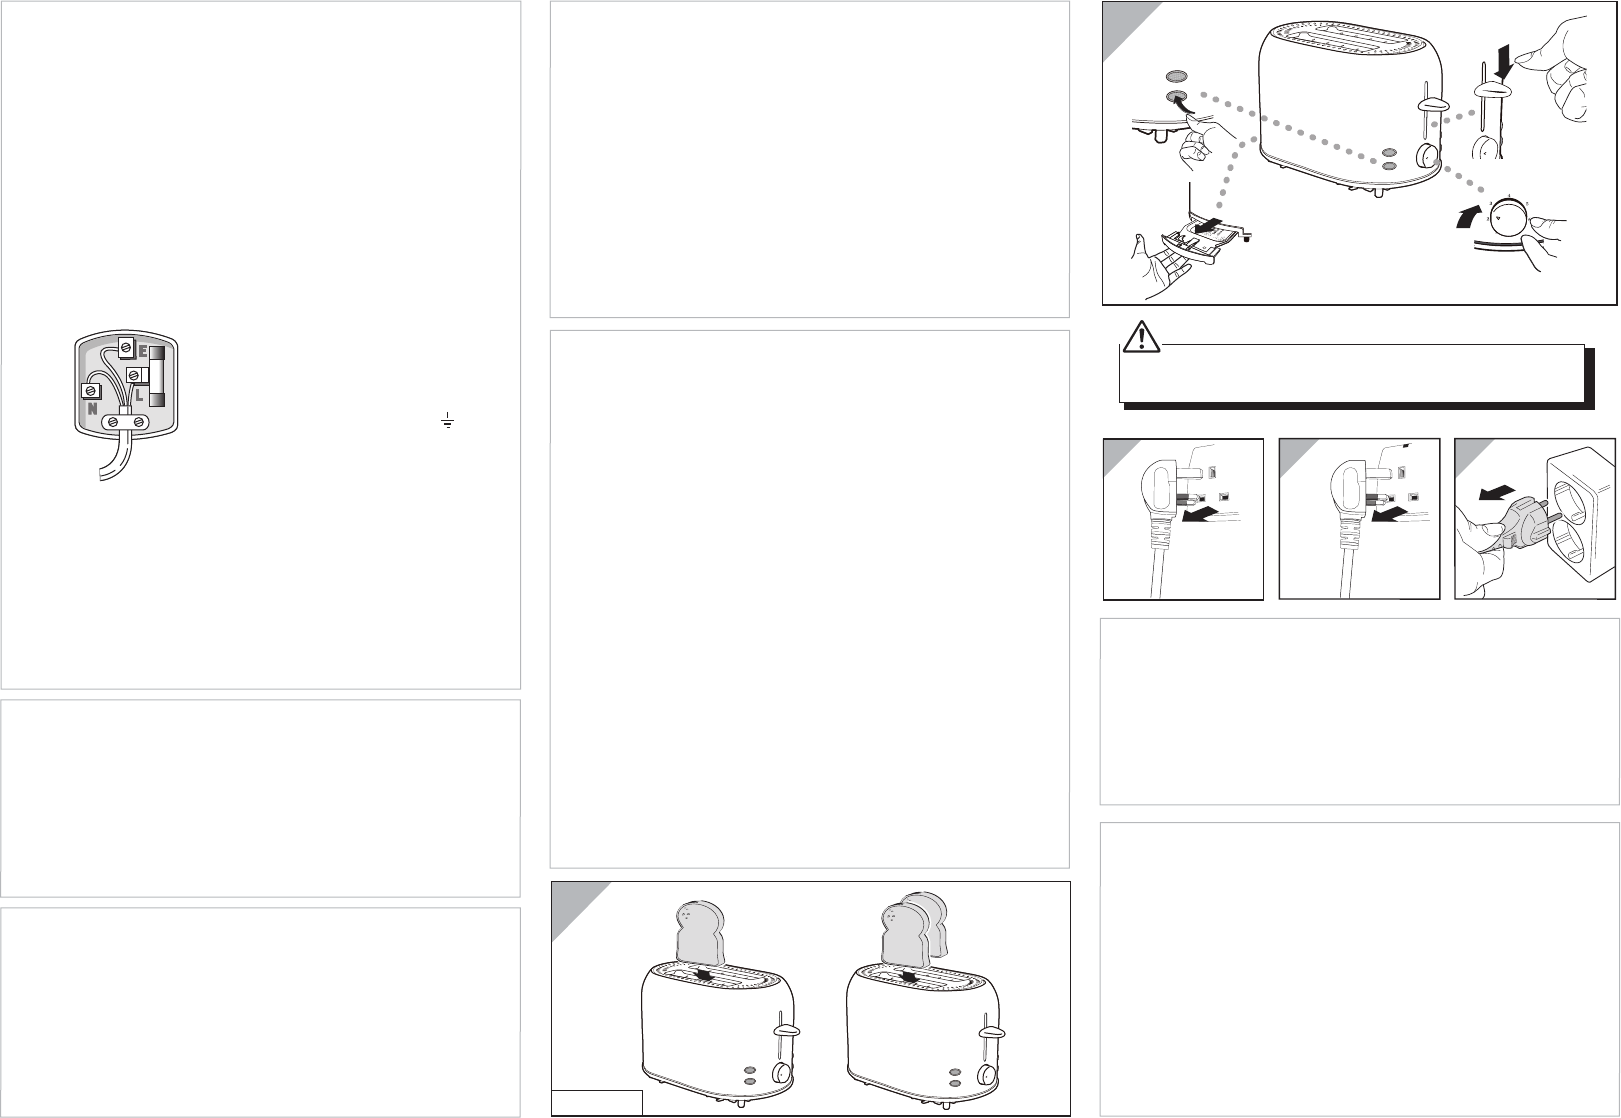
4. Press toasting lever down vertically until it is positioned in place (g. 1b). The
appliance will begin at once. Once the bread has been toasted to the preset
browning level, the toasting lever will be automatically pop up.
5. Lift the lever up vertically for the high lift feature, which allows you to easily remove
small pieces of bread.
Note: Only when the mains is switched on can toasting lever rest on the bottom of
the slot.
6. During the toasting process, you may observe the toasting colour. Press the
Cancel button to cancel the operation at any time if you are satised with the
colour.
GB - 2 GB - 3
How to Clear a Jam or Blockage of Bread
1. Remove the plug from the mains socket.
2. Allow the toaster to fully cool down.
3. Push and hold the toasting lever down.
4. Gently dislodge the blockage with a non-metallic object, for example the handle of
a wooden spoon.
Note: Please ensure that you don’t make contact with the heating elements, as you
may damage them.
5. Lift the toasting lever to remove the blockage.
1a
C02TBS09
Other Functions of Your Toaster
Reheat
If you want to reheat cold slices of bread, don’t adjust the browning controller. Insert
the toast, lower the toasting lever till it remains in a downward position. Press the
Reheat button and its indicator will illuminate. In this mode, the toasting time is fixed.
The toasting lever will automatically spring up when the reheating process has
finished.
Defrost
Insert the frozen bread. Set the browning controller to your desired colour. Press the
toasting lever down vertically until it remains in a downward position, then press
Defrost button and the indicator will illuminate. In this mode, the bread will be
toasted to your desired colour.
Tips: If toasting two slices of bread, they should be of a similar size, thickness and
freshness. Old bread slices contain less moisture, so make crisper toast. Old or thin
bread toasts faster than fresh or thick bread, and needs a lower setting.
Bagel
Split a bagel, put one half in each slot, with the cut surfaces outward. Set the
browning controller to smaller for plain bagels, sweet or fruit bagels. Press the
toasting lever down vertically until it is positioned in place. Press the Bagel button
and the indicator will be illuminate. Once the bagel has been toasted to the preset
colour, the toasting lever will automatically spring up and end the heating process.
Caution
1. If the toaster starts to smoke, press Cancel button to stop toasting immediately.
2. Remove all protective wrapping prior to placing bread slices in toaster.
3. Do not toast the bread with extremely runny ingredients such as butter.
4. The bread slot is only applicable for toasting regular bread slices. Do not toast
irregular sized bread.
You can interrupt the process of toasting by unplugging the toaster (g. 2)
or by pressing the cancel button (g. 1b).
Cleaning and Maintenance
Remove the plug from the mains socket and allow the unit to fully cool down before
cleaning.
To remove crumbs from the toaster:
First remove the mains plug from the mains socket (g. 3a or 3b).
Then slide the crumb tray out (g. 1b).
Empty the crumbs into the bin and clean the crumb tray.
Let the crumb tray dry throughly before reinserting it back into the toaster.
Return the crumb tray to the toaster before using your toaster again.
Do not use harsh cleaners or solvents as they may damage the casing.
The body of the unit should be cleaned using a cloth dampened with warm water
and detergent. Make sure you do not allow water to seep into the controls or heating
elements.
When not in use, the mains cable may be wound up under the bottom of the toaster.
How To Toast Bread
To prevent jamming do not use your toaster with torn slices of bread. Make sure
the size and thickness of the slices of bread t easily into the toast slots. Always
watch your toaster when in use. Never leave unattended.
1. Plug the mains cable into the mains socket.
Note: Make sure the crumb tray is completely positioned in place before using.
2. Put bread slices into the bread slots.
3. Set browning control knob to your desired colour. There are 7-setting levels:
“1” is the whitest and “7” is the darkest. Setting “4”will toast the bread to a golden
colour.
First Time Use
Unpack the unit and place it on a stable flat horizontal surface. Remove any inserted
card and poly bag. As there maybe manufacturing residue or oil remaining in the
toaster or heating element, an odor will usually be emitted during the first use. This
is normal and will not occur after being used for several times. For the first use it is
suggested to operate according to the below steps, except without bread. Allow the
toaster to cool down and before toasting the first slice.
Note: The toaster will not work, and the toasting lever cannot be locked down, until
the toaster is plugged in.
Electrical Information
Before using this appliance ensure that the voltage of your electricity supply is
suitable for that indicated on the rating plate of the appliance.
THIS APPLIANCE MUST BE EARTHED.
The ultimate disconnection from the power source is the mains plug. Always make
sure it is easily accessible to be unplugged in the event of an emergency.
This appliance is tted with a fused three pin mains plug to BS 1363 which will be
suitable for use in all houses tted with mains sockets to current specications.
If the tted mains plug is not suitable, remove the fuse and dispose of the mains plug
safely, immediately after removing it from the mains cable.
Fitting a new mains plug
If for any reason you need to t a new mains plug, the mains cable must be
connected as shown here. The wires in the mains cable tted to this appliance are
coloured in accordance with the following code:
If the colours of the wires in the mains
cable of this appliance do not correspond
with the coloured markings identifying
the terminals in your mains plug, proceed
as follows:
The wire which is coloured
• Green and Yellow: MUST be connected
to the terminal which is marked with
the letter E (Earth) or symbol or
coloured Green.
• Blue: MUST be connected to the
terminal which is marked with the letter
N (Neutral) or coloured Blue or Black.
• Brown MUST be connected to the
terminal which is marked with the letter
L (Live) or coloured Brown or Red.
Before retting the mains plug cover, check that there are no cut or stray strands of
wire inside the mains plug. Only BSI or ASTA approved 13 Amp BS1362 fuses should
be used. If you are in any way unsure which mains plug or fuse to use, always refer to
a qualied electrician.
Note: After replacing or changing a fuse on a moulded mains plug which has a fuse
cover, the cover must be retted to the mains plug, the appliance must not be used
without a fuse cover. If lost, replacement fuse covers can be obtained from an
electrical shop.
CONNECT GREEN AND YELLOW TO EARTH (E)
CONNECT
BLUE TO
NEUTRAL (N)
MAKE SURE THE OUTER
SHEATH OF THE MAINS
CABLE IS SECURELY HELD
BY THE CLAMP
CONNECT
BROWN TO
LIVE (L)
13 AMP FUSE
1b
3b
For EU
model
3a
For UK
model
2


Delta i konversationen om denna produkt
Här kan du dela vad du tycker om Carlton C02TBS09 Brödrost. Om du har en fråga, läs först noggrant igenom manualen. Att begära en manual kan göras genom att använda vårt kontaktformulär.