ASSEMBLY INSTRUCTIONS:
CARINA 8
Please read the General Information before starting and familiarise yourself
with each of the component parts. Please refer to the diagrams as you
proceed.
Your tent comprises the following parts: (As you unpack the component
parts make a mental note of how the tent was packed in the carry bag as this
will help you when you come to repack it.)
TAKE EXTRA CARE ON WINDY DAYS SO THAT THE TENT DOES
NOT BECOME DAMAGED.
COMPONENT PARTS
1. The ysheet, which is the PU coated shell of the tent that has an integral
sewn in groundsheet; other features include the pole sleeves, attached guy
ropes, windows etc.
2. Three inner tents or sleeping compartments each have an integral ground-
sheet & a “D” shaped door with secondary mesh insect proof ventilation
panel.
3. A pole carry bag that contains 4 breglass poles that are strung in sections
on elasticated shock cord; the mid section of each pole is colour coded to
match with coloured taping on its correct pole sleeve. Plus, steel poles, all
are in sections and are connected with spring linkages. All of them are colour
coded to aid with their assembly and to correspond with coloured taping on
each pole sleeve on the ysheet.
4. A peg bag that contains sufcient pegs to erect the tent.
5. An emergency Repair Kit that contains fabric cuttings, seam sealant, spare
pegs & guy rope, peg point elastic and an emergency pole repair sleeve.
AS THE ASSEMBLY PROCESS REQUIRES THE POLES AND OTHER
COMPONENT PARTS TO BE PUT UNDER TENSION, CARE MUST BE
TAKEN AT ALL TIMES TO PREVENT PERSONAL INJURY OR HARM
TO OTHERS.
ASSEMBLY INSTRUCTIONS
1.Having selected your site, unfold the ysheet ensuring the doors are zipped
closed and orientate it so that where possible they face away from the pre-
vailing wind.
2. Unpack the steel pole sections. Those with the spring linkages should be
gently slotted together to form 9 poles for the frame of the tent (comprising 3
curved roof poles plus 6 straight roof support poles).
3. The steel poles form the main frame of the tent and are in three parts, all are
colour coded to aid with their assembly. The roof pole should form a gentle
“C” shaped curve if assembled correctly; the shaped connections will help
ensure this happens, plus two straight poles which are the roof support poles
that have a shaped connection at one end and a spike at the other.
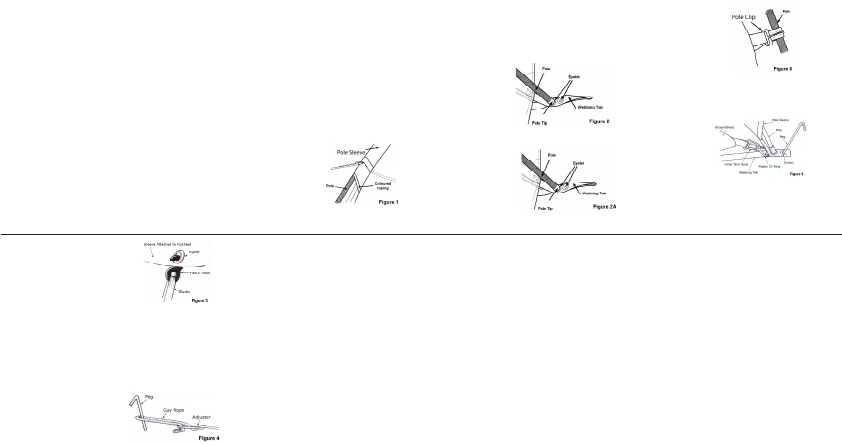
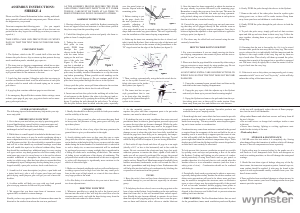
4. Taking the assembled curved
roof poles in turn, gently PUSH
them through the pole sleeves in the
ysheet that have the same colour
taping as the colour coding on these
roof poles. Where possible avoid
standing on the ysheet, as this will
damage it. (See gure 1).
Always push the poles, never pull
them otherwise the sections will come apart and the spring linkages will
break.
5. Connect all the roof support poles to their corresponding roof pole with
matching colour coding. The now complete poles should look a little like
the letter “U” in shape.
6. Unfold the breglass pole sections and gently slot them together to form
4 complete poles.
7. Taking these assembled breglass poles in turn, gently PUSH them through
the pole sleeves in the ysheet with the same colour taping as the mid section
of the pole. (See gure 1)
Always push the poles, never pull them otherwise the sections will come
apart and the elastic shock cord will
break.
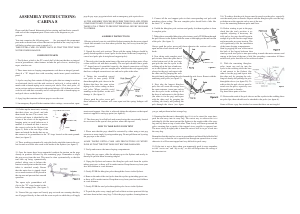
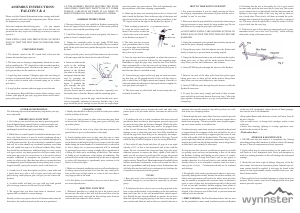
8. Now taking each complete steel
pole in turn, insert the spike that is
at the bottom end of the roof sup-
port pole the into the eyelet in the
webbing tab at the base of and near-
est to the ysheet (the outer one is
always for the peg) and repeat with
the other end by grasping the web-
bing tab rmly and pushing the pole through the pole sleeve. Repeat with the
remaining steel poles (see gure 2).
9. Next take the longest breglass
pole; this will create the canopy over
the main entrance. insert one end tip
into the eyelet in the webbing tab at
the base of and nearest to the ysheet
(the other is for the peg) and repeat
with the other end, by grasping the
webbing tab rmly and pushing the
pole through the sleeve (see gure
2A). To achieve this the pole sleeves must be eased over the poles, especially
over the metal joints or ferrules. Repeat with the breglass pole over the larg-
est bedroom at the opposite end or rear of the tent.
Leave the remaining bedroom poles until later.
10. Before starting to put in the pegs,
check that the tent’s position is ac-
ceptable, adjusting if necessary. Ini-
tially only a few pegs should be put in,
enough to give the tent its rough shape
and none under any great tension. This
will signicantly ease the installation
of the inner sleeping compartments.
Start by pegging the rear of the tent at
the back of the largest bedroom then
stand up each steel pole in turn proceeding towards the main entrance and
canopy at the front of the tent; a little like extending a concertina. All three
arched steel poles should be in line with each other.
11. With the remaining breglass
poles, insert one end tip into the
eyelet in the webbing tab at the base
of and nearest to the ysheet (the
other is for the peg) and repeat with
the other end, by grasping the web-
bing tab rmly and pushing the pole
through the sleeve (see gure 2A). To
achieve this the pole sleeves must be
eased over the poles, especially over
the metal joints or ferrules.
Peg down these parts as before.
12. Between the ends of the pole sleeves and the eyelets in the webbing there
are pole clips, these should now be attached to the poles (see gure 6).
Some will have a guy line attached so ensure that these are not tangled
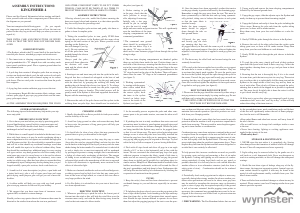
13. Gather up the inner tents, ensuring
that their doors are closed, and take
them inside the tent. The correct loca-
tion for each inner is identied by the
colour of the elastic of the uppermost
hanging point on each bedroom as it
matches a coloured tab that is next to
the correct eyelet in the ysheet (see
gure 3). Start at the rear edge of the
inner and attach the hooks that are on
the corners of its groundsheet to the “D” rings located on the main ground-
sheet (see gure 5).
14. Then, working systematically, using the hooks attach the inner to the eye-
lets located on a fabric tabs sewn to the inside of the ysheet (see gure 3).
15. Once the inners have been suspended, readjust the tension on the pegs
already in position followed by the remaining pegs. Remember to angle
the pegs away from the tent. This must be done systematically so that the
tent ends up being symmetrically
pitched, taking care to balance the
tension at each point so that the tents
fabric is stretched evenly. Ensure
that the main door is zipped closed
or too much tension will be placed in
the zip area and prevent their smooth
operation.
The apron style groundsheet will
clip to the “D” rings located at the
base of the canopy poles. (See gure 5)
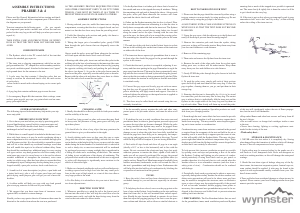
16. Unravel the guy ropes and loosely peg out each one ensuring that they
are all pegged directly in line with the seam or pole to which they will apply
tension and support. Once this is achieved tighten the adjusters so that equal
tension is applied to each guy point (see gure 4).
17. The doors may be rolled back and secured using the conveniently located
ties or stowed in the special door pockets where the zips end.
HOW TO TAKE DOWN YOUR TENT
1. Please note that the pegs should be extracted by either using a tent peg
extractor or more simply by using another peg. Do not pull them out by using
the guy rope or the elastic.
AGAIN TAKING EXTRA CARE AND PRECAUTIONS ON WINDY
DAYS SO THAT THE TENT DOES NOT BECOME DAMAGED.
2. Unclip and remove the inner sleeping compartments.
3. Unpeg the guy ropes, slide the adjuster up to the ysheet and neatly tie
them up to prevent them becoming tangled.
4. Unpeg the ysheet and remove the breglass pole ends from the eyelets
taking great care, as these will be under tension. Keep them away from your
face and children at a safe distance.
5. Gently PUSH the breglass poles through the sleeves in the ysheet.
6. Remove the ends of the steel poles from the eyelets again taking great care,
as these will be under tension. Keep them away from your face and children
at a safe distance.
7. Gently PUSH the steel poles through the pole sleeves in the ysheet.
8. To pack the poles away, simply pull each of their sections apart and fold up
and store them in their carry bag. Collect the pegs together, cleaning them as
you go, and put them in their storage bag.
9. Ensuring that the tent is thoroughly dry if it is to be stored for some time,
pack the tent away into its carry bag. The easiest way to achieve this is to
individually fold the inner tent and the ysheet to the rough width of the carry
bag and lay them on top of each other. Then slowly roll them up around the
poles, ensuring that as much of the trapped air as possible is squeezed out.
The more slowly & tightly this is done the easier it will be to get it back into
the carry bag.
Remember that this tent has a sewn in groundsheet and should be folded/rolled
in such a way so that the air is squeezed out through an opened door or vent,
otherwise it will become trapped and very difcult to pack away.
10. If the tent is wet or dirty when you temporarily pack it away remember
to fold “wet to wet” and “dry to dry”, as this will help reduce the soiling of
the inner tent etc.


Delta i konversationen om denna produkt
Här kan du dela vad du tycker om Wynnster Carina 8 Tält. Om du har en fråga, läs först noggrant igenom manualen. Att begära en manual kan göras genom att använda vårt kontaktformulär.