Bruksanvisning Westinghouse 6338900 Lampa

Behöver du en bruksanvisning för din Westinghouse 6338900 Lampa? Nedan kan du se och ladda ner PDF-bruksanvisningen gratis på svenska. Den här produkten har för närvarande 7 vanliga frågor, 0 kommentarer och har 0 röster. Om det här inte är bruksanvisningen du vill ha, vänligen kontakta oss.

Är produkten defekt och erbjuder bruksanvisningen ingen lösning? Gå till ett Repair Café för gratis reparationstjänster.
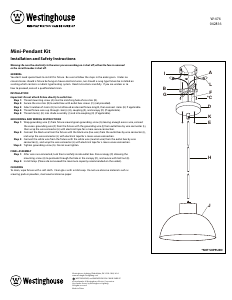
Bruksanvisning

Loading…

Mini-Pendant Kit
Installation and Safety Instructions
Warning: Be sure the electricity to the wires you are working on is shut off; either the fuse is removed
or the circuit breaker is shut off.
GENERAL
You don't need special tools to install this fixture. Be sure to follow the steps in the order given. Under no circumstances should
a fixture be hung on house electrical wires, nor should a swag type fixture be installed on a ceiling which contains a radiant type
heating system. Read instructions carefully. If you are unclear as to how to proceed, consult a qualified electrician.
INSTALLATION
Important: Do not attach fixture directly to outlet box.
Step 1: Thread mounting screw (A) into the matching hole of mounting bar (B).
Step 2: Secure the mounting bar (B) to outlet box with outlet box screws (C) (not provided).
ADJUSTING LENGTH OF CORD IF NEEDED
These steps should only be performed by someone familiar with working with electrical wiring. Care must be taken when adjust-
ing the length of the cord to ensure insulation on internal wires is not damaged. If not familiar with these steps, seek the aid of a
qualified electrician.
Step 1: Loosen the screw in strain relief (Q) until cord slides easily, being careful not to completely remove screw.
Slide canopy down cord until the fixture is the desired distance below the canopy. Tighten the screw in the strain
relief until cord does not slide.
Step 2: Cut excess cord approximately six to seven inches (6”-7”) above canopy.
Step 3: Leaving at least one inch (1”) of outer insulation above the canopy, carefully cut through outer insulation of cord,
being careful not to damage inner insulation. Remove outer insulation. Strip inner insulation from end of both
wires, leaving approximately 1/2 inch of wire exposed.
Step 4: For cords without differently colored inner insulation, identify the tracer lines on the new ends of the inner wires
to match the labels on the original ends and connect to house wiring as described in the appropriate step listed
below in the Grounding and Wiring Instructions section.
GROUNDING AND WIRING INSTRUCTIONS
Step 1: Insert the green grounding screw (G) into the hole with two raised dimples on the mounting bar (B). Wrap the bare
grounding wire (F) from the fixture canopy (D) around the green grounding screw's stem (G) on the mounting bar (B)
leaving enough excess wire.
Step 2: Connect the green grounding wire (H) from hanging cord and excess grounding wire (F) from the fixture canopy (D)
with the grounding wire (I) from outlet box by using a wire connector (P), then wrap the wire connector (P) with
electrical tape for a more secure connection. WARNING: Never connect grounding wire to black or white power
supply wires.
Step 3: Connect the black house wire with the black wire from the fixture by wire connector (P), and wrap the wire connector
(P) with electrical tape for a more secure connection.
Step 4: Con
nect the white house wire with the white wire from the fixture by wire connector
(P)
, and wrap th
e wire connector
(P) with electrical tape for a more secure connection.
Note: Try to gently pull the wire connectors (P) off of the wires. If you can pull the connector off, carefully repeat steps
2, 3 and 4 above, and check again for a firm connection. Make sure no bare wires can be seen protruding outside of
the wire connectors.
Step 5: Tighten green grounding screw (G). Do not over tighten.
FINAL ASSEMBLY
Step 1: After wires are connected, tuck them carefully inside outlet box. Raise canopy (D) allowing the
mounting screw (A) to protrude through the hole in the canopy (D), and secure with ball nut (E).
***For shade with a closed bottom, please follow below instruction (see figure 1):
Step 2a: Take off the retaining ring (L) from the socket (J). Install adaptor (M) to socket (J) with retaining ring (L) (if applicable).
Step 3a: Install lamp (not included). (Please do not exceed the maximum lamp wattage recommended on the socket).
Step 4a: Install the shade (Ka) to adaptor (M) and secure it by using thumb screws (N).
Step 5a: Turn on the switch (O) on the socket (if applicable).
***For shade with open bottom, please follow below instruction (see figure 2):
Step 2b: Take off the retaining ring (L) from the socket (J). Secure the adaptor (M) onto the shade (Kb) with thumb screw(s) (N)
(if applicable).
Step 3b: Install the shade (Kb) and adaptor (M) assembly onto the socket (J) and secure the retaining ring (L).
Step 4b: Install lamp (not included). (Please do not exceed the maximum lamp wattage recommended on the socket).
Step 5b: Turn on the switch (O) on the socket (if applicable).
CLEANING
To clean, wipe fixture with a soft cloth. Clean glass with a mild soap. Do not use abrasive materials such as scouring pads or
powders, steel wool or abrasive paper.
Westinghouse Lighting, Philadelphia, PA 19154-1029, U.S.A.
www.westinghouselighting.com
, WESTINGHOUSE, and INNOVATION YOU CAN BE SURE OF
are trademarks of Westinghouse Electric Corporation.
Used under license by Westinghouse Lighting.
All rights reserved.
Made in China
W-562
062818
*NOT SUPPLIED
*NOT SUPPLIED
P
B
H
Q
G
I
A
*C
F
D
E
M
N
L
Ka
J
O
B
H
Q
G
P
I
A
*C
F
D
E
J
O
L
Kb
M
N
FIGURE 1.
FIGURE 2.
Ladda ner bruksanvisning i Engelska (PDF, 0.31 MB)
(Tänk på miljön och skriv endast ut denna bruksanvisning om det verkligen är nödvändigt)

Loading…

Betyg

Berätta vad du tycker om Westinghouse 6338900 Lampa genom att betygsätta den. Vill du dela med dig av dina åsikter om denna produkt eller ställa en fråga? Lämna en kommentar nederst på sidan.
Är du nöjd med Westinghouse 6338900 Lampa?
Ja Nej
Bli den första personen som betygsätter denna produkt
0 röster

Delta i konversationen om denna produkt

Här kan du dela vad du tycker om Westinghouse 6338900 Lampa. Om du har en fråga, läs först noggrant igenom manualen. Att begära en manual kan göras genom att använda vårt kontaktformulär.

Mer om denna bruksanvisning

Vi förstår att det är trevligt att ha en pappersbruksanvisning för din Westinghouse 6338900 Lampa. Du kan alltid ladda ner bruksanvisningen från vår hemsida och skriva ut den själv. Om du vill ha en originalbruksanvisning rekommenderar vi att du kontaktar Westinghouse. De kanske kan tillhandahålla en originalbruksanvisning. Letar du efter bruksanvisningen för din Westinghouse 6338900 Lampa på ett annat språk? Välj ditt föredragna språk på vår hemsida och sök efter modellnumret för att se om vi har det tillgängligt.

Specifikationer

Märke Westinghouse
Modell 6338900
Kategori Lampor
Filtyp PDF
Filstorlek 0.31 MB

Alla bruksanvisningar för Westinghouse Lampor
Fler bruksanvisningar för Lampor

Vanliga frågor om Westinghouse 6338900 Lampa

Vårt supportteam söker efter användbar produktinformation och svar på vanliga frågor. Om du hittar en felaktighet bland våra vanliga frågor uppskattar vi om du meddelar oss detta via vårt kontaktformulär.

Är all LED-belysning dimbar? Verifierad

Nej, man kan inte dimma all LED-belysning. Det anges på paketet eller själva lampan.

Detta hjälpte (589) Läs mer

Jag sätter ett nytt ljus i min lampa men det tänds inte, varför är det? Verifierad

Vissa lampor är gjorda för ljuskällor med en specifik watt. När en ljuskälla sätts in som kräver högre watt än lampan kan ge, kanske inte ljuset tänds. Om lampan levererar mycket högre watt än vad ljuskällan är gjord för kan ljuskällan brinna ut.

Detta hjälpte (446) Läs mer

Varför är ljusets färg viktig? Verifierad

Detta hjälpte (343) Läs mer

Vad är lumen? Verifierad

Lumen är en mätenhet för den totala mängden synligt ljus som strålar ut från en ljuskälla.

Detta hjälpte (269) Läs mer

Vilka lampsocklar finns det? Verifierad

Världen över finns det många typer av socklar, men de flesta baseras på Edison-skruven, som anges med bokstaven E. I de flesta länder är E27 och E14 standard. I USA är E26, E17, E12 och E10 standard.

Detta hjälpte (210) Läs mer

Vad säger watt om min lampa? Verifierad

Watt mäter energiförbrukningen. Lampor som ger mer ljus, drar i princip mer Watt, men för att jämföra ljusstyrka ska man använda lumen.

Detta hjälpte (176) Läs mer

Vad är LED? Verifierad

LED står för Light-Emitting Diode. Dioder är halvledare, och när elektrisk ström flyter i rätt riktning genom en halvledare avger den ljus.

Detta hjälpte (165) Läs mer
Bruksanvisning Westinghouse 6338900 Lampa

Relaterade produkter

Relaterade kategorier

×
Download