
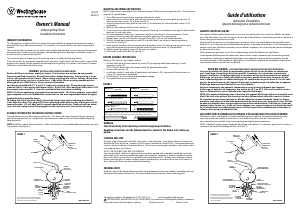
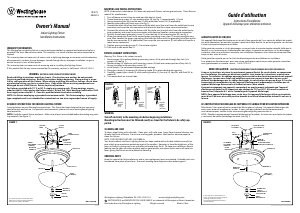
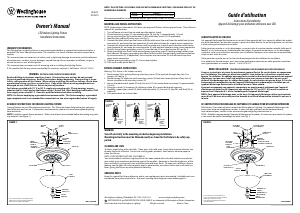
MOUNTING AND WIRING INSTRUCTIONS
NOTE: Underwriters Laboratories (UL) does not require all fixtures to have ground wires. These fixtures
meet all UL specifications.
1. Turn off power at circuit box to avoid possible electric shock.
2. Remove cap nuts (A) from back plate (B) and remove universal mounting plate or cross bar (C),
leaving mounting screws (D) in place (see fig. 1).
3. Secure universal mounting plate or cross bar (C) to outlet box (E) with outlet box screws (F) (if
applicable).
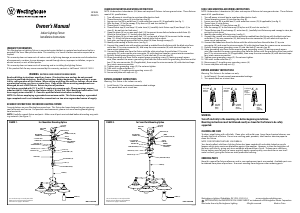
4. Identify color coding of fixture wires (see fig. 2).
5. To connect wires, take black fixture wire (group A from fig. 2) and place evenly against black outlet
box wire. Do not twist wires.
6. Fit wire connector (G from fig. 1) over wires and twist until there is a firm connection. If wire
connector (G) easily comes off, reattach and check again for a firm connection.
7. Repeat steps 5 and 6 with the white (group B from fig. 2) fixture and outlet box wires.
8. Partially thread green grounding screw (H) into side hole (I) on universal mounting plate or
cross bar (C) (see fig.1).
9. Wrap ground wire from fixture around green grounding screw (H) leaving enough excess wire,
then connect ground wire and outlet box wire with wire connector (G) (if applicable).
10. Tighten green grounding screw (H). Do not over tighten.
11. Tuck wires inside outlet box (E) (see fig. 1).
FIXTURE ASSEMBLY INSTRUCTIONS
Warning: This fixture is for indoor use only.
1. Position back plate (B) over mounting screws (D) by aligning back plate openings (J) with
mounting screws (D).
NOTE: Position back plate with power switch (K) pointed downward.
2. Secure with cap nuts (A).
3. Install glass shade (L) and plate (if applicable) into holder(s) (M). Secure with thumb screws or
ring(s) (O), whichever is applicable.
4. Install lamp(s). Do not exceed recommended wattage.
5. Turn power back on at circuit box.
W-379
052814
WARNING
Turn off electricity to the mounting site before beginning installation.
Mounting instructions must be followed exactly as shown for the fixture to be safely sup-
ported.
CLEANING AND CARE
To clean, wipe fixture with soft cloth. Clean glass with mild soap. Spray from chemical cleaners can
discolor the finish of fixture. Extend-A-Finish Laquer Conditioner, Item#70295, is recommended once
a year to clean, condition, and protect fixture. Do not use scouring pads, powders, steel wool or abra-
sive paper to clean this fixture.
NOTE FOR FIXTURES THAT ARE SOLID BRASS:
Your hand-crafted, solid brass lighting fixture has been coated with a durable, baked-on acrylic lac-
quer which gives maximum protection against the weather. However, in time the brightness of the
brass will tarnish, giving way to an authentic old-world brass finish. To keep your solid brass fixture
looking new for years to come, regularly apply a good quality, non-abrasive car wax to all metal sur-
faces, giving the fixture an extra protective covering.
ORDERING PARTS
Keep this manual for future reference, and in case replacement parts are needed. Available parts can
be ordered from place of purchase. Use exact wording from diagrams when ordering parts.
FIGURE 2.
GROUP A: GROUP B:
CONNECT TO BLACK
HOUSE WIRE
BLACK
WHITE OR GREY WITH TRACER
BROWN, GOLD OR BLACK
WITHOUT TRACER
BROWN, GOLD OR BLACK WITH TRACER
WHITE
WHITE OR GREY WITHOUT TRACER
CONNECT TO WHITE
HOUSE WIRE
NOTE: When parallel wire (SPT 1 & SPT 2) is used; the neutral wire is square shaped
and ridged, and the hot wire will be round in shape and smooth. (See below.)
WARRANTY INFORMATION
This Westinghouse Lighting Fixture is warranted against defects in material and workmanship for a
period of Five Years from purchase date. This warranty is in lieu of all other warranties expressed or
implied.
This warranty does not cover acts of nature such as lightning damage, or corrosion and discoloration
of components, nor does it cover damages caused through abuse, improper installation, surges in
electric current, or acts of third parties.
This warranty does not cover costs of removing and re-installing the lighting fixture.
If this fixture fails for any reason covered by this warranty, simply return the fixture with a copy of the
original sales receipt, freight prepaid and Westinghouse Lighting, at its option, shall repair or replace
the fixture or refund the purchase price.
ASSEMBLY INSTRUCTIONS FOR INDOOR LIGHTING FIXTURE
Congratulations on your Westinghouse purchase. This fixture has been designed to give you many
years of beauty and service. For questions and comments, please visit www.westinghouselighting.
com/contact-us.
NOTE: Carefully unpack fixture and parts. Make sure all parts are included before discarding any pack-
ing materials (see figure 1).
WARNING:
ELECTRICAL SHOCK CAN RESULT IN SERIOUS INJURY.
Read and follow instructions exactly as shown. If instructions are unclear, do not proceed.
Contact a qualified electrician. Read all instructions before beginning. Proper wiring is essen-
tial for safe operation of this fixture. When cutting or drilling into walls or ceilings, do not dam-
age electrical wiring, gas lines, or water lines. If any of the fixture or wiring components are
damaged, do not install fixture. Return to place of purchase.
For fixtures provided with 75° C or 90° C supply wire warning only. (These warnings are pro-
vided on the U.L. label and on the fixture carton.) Risk of fire. Most dwellings built before 1985
have supply wires rated 60° C. Consult a qualified electrician before installing.
NOTE: For fixture employing a grounded convenience outlet. This fixture employs a grounded
type receptacle and is not intended for connection to a two wire ungrounded source of supply.
Applicable only to portable lamps:
To reduce the risk of electrical shock, all portable lamps have a polarized plug (one blade is
wider than the other). This plug will fit into a polarized outlet only one way. If plug does not fit,
reverse the plug. If it still does not fit, contact a qualified electrician. Never use with an exten-
sion cord unless plug can be fully plugged into the extension cord. Do not alter the plug.
Owner’s Manual
Indoor Lighting Fixture
Installation Instructions
Guide d’utilisation
Instructions d’installation
Appareil d’éclairage pour utilisation intérieure
GARANTIE LIMITÉE DE CINQ ANS
Cet appareil d’éclairage Westinghouse est assorti d’une garantie de 5 ans contre les défauts de matéri-
aux et de fabrication, qui entre en vigueur à partir de la date d’achat. La présente garantie se substitue à
toute autre garantie expresse ou tacite.
Cette garantie ne porte ni sur les dommages survenant suite à une catastrophe naturelle (telle que la
foudre), ni sur la corrosion ou la décoloration des pièces; la garantie ne porte pas sur les dommages sur-
venant suite à une utilisation anormale, une installation impropre, une surtension de courant électrique
ou des actes d’un tiers.
Cette garantie ne porte pas sur les frais de démontage et de réinstallation du ventilateur.
Si cet appareil d’éclairage ne fonctionne pas pour une des raisons couvertes par la présente garantie,
renvoyez tout simplement l’appareil d’éclairage et une copie de la preuve d’achat originale, frais de
transport prépayés, à Westinghouse Lighting qui, à sa discrétion, réparera ou remplacera l’appareil ou
vous remboursera le montant du prix d’achat.
MISE EN GARDE:
L’ÉLECTROCUTION POURRAIT CAUSER DE GRAVES BLESSURES PERSONNELLES.
Lisez ces instructions et suivez-les exactement comme illustré. En cas de doute, ne commencez
pas l’installation. Consultez un électricien qualifié. Lisez toutes les instructions avant de com-
mencer l’installation. Un câblage approprié est essentiel au bon fonctionnement de cet appareil
d’éclairage. Lorsque vous faites une entaille ou que vous percez un trou dans un mur ou un pla-
fond, n’endommagez pas les câbles électriques, les canalisations de gaz ou d’eau. Si l’un des com-
posants de raccordement ou de l’appareil d’éclairage est endommagé, n’installez pas cet appareil
d’éclairage. Retournez-le à l’endroit où vous l’avez acheté.
Convient uniquement aux appareils comportant un avertissement indiquant que l’appareil
d’éclairage est doté d’un fil supportant une chaleur de 75°C ou 90°C. (Ces avertissements se trou-
vent sur l’étiquette U.L. et sur l’emballage de l’appareil d’éclairage.)
NOTA: Pour appareil d’éclairage avec sortie terre. Cet appareil d’éclairage utilise un réceptacle muni
d’un fil de terre et ne doit pas être branché à un bloc d’alimentation à deux fils non mis à la terre.
Ne s’applique qu’aux lampes portatives. Afin de réduire les risques d’incendie, toutes les lampes
portatives sont pourvues d’une fiche polarisée (une des broches est plus large que l’autre). La fiche
ne peut être branchée dans une prise polarisée que d’une seule manière. Si la fiche ne s’insère pas,
tournez-la dans l’autre sens. Si elle ne s’insère toujours pas, communiquez avec un électricien quali-
fié. N’utilisez jamais une rallonge électrique si la fiche ne peut être complètement insérée dans la
rallonge. N’essayez pas d’altérer la fiche.
LES INSTRUCTIONS D’ASSEMBLAGE DE L’APPAREIL D’ÉCLAIRAGE POUR UTILISATION INTÉRIEURE
Félicitations ! Vous avez acheté un produit de Westinghouse Lighting. Cet appareil d’éclairage a été
conçu pour durer de nombreuses années. Si vous avez des questions ou des commentaires à
nous communiquer, veuillez visiter www.westinghouselighting.com/contact-us.
NOTA : Déballez soigneusement l’appareil d’éclairage et les pièces. Assurez-vous que toutes les pièces y
sont avant de mettre l’emballage au rebut (voir fig. 1).
Westinghouse Lighting, Philadelphia, PA 19154-1029, U.S.A. www.westinghouselighting.com
, WESTINGHOUSE, and INNOVATION YOU CAN BE SURE OF are trademarks of Westinghouse Electric Corporation.
Used under licensee by Westinghouse Lighting. All rights reserved. Made in China
SIDE
HOLE (I)
*NOT SUPPLIED
Line art shown may not exactly match the
fixture enclosed. However, the installation
instructions do apply to this fixture.
FIGURE 1.
RETAINING
RING (O)
PLATE
(if applicable)
GROUND
WIRE
POWER
SWITCH (K)
(if applicable)
MOUNTING
SCREWS (D)
*OUTLET
BOX (E)
GREEN
GROUNDING
SCREW (H)
UNIVERSAL
MOUNTING
PLATE (C)
WIRE
CONNECTORS (G)
OUTLET BOX
SCREWS (F)
BACK PLATE
OPENING (J)
GLASS
SHADE (L)
THUMB
SCREWS (N)
HOLDER (M)
BACK PLATE (B)
CAP NUTS (A)
TROU
LATERAL (I)
*NON FOURNI
Il est possible que le dessin illustré ici
ne soit pas la reproduction exacte de
l’appareil d’éclairage contenu dans la boîte.
Les instructions d’installation demeurent
cependant valables.
FIGURE 1.
LA BAGUE DE
RETENTION (O)
PLAQUE
(s’il y a lieu)
FIL DE MISE
A LA TERRE
COMMUTATEUR DE
MISE EN MARCHE (K)
VIS DE
FIXATION (D)
*BOITE DE
SORTIE DE
COURANT (E)
VIS DE MISE
A LA TERRE
(VERTE) (H)
PLAQUE
DE FIXATION
UNIVERSELLE (C)
CONNECTEURS
DE FIL (G)
VIS DE LA BOITE DE
SORTIE DE COURANT (F)
OUVERTURE DE LA
PLAQUE ARRIERE (J)
ABAT-JOUR
EN VERRE (L)
VIS A CLE (N)
SUPPORT (M)
PLAQUE
ARRIERE (B)
ECROUS
CAPUCHONS (A)


Delta i konversationen om denna produkt
Här kan du dela vad du tycker om Westinghouse 6306900 Lampa. Om du har en fråga, läs först noggrant igenom manualen. Att begära en manual kan göras genom att använda vårt kontaktformulär.