OACTIVE APPLICATION INSTRUCTIONS
Please read and understand all of the following instructions before
applying the OActive™ brace
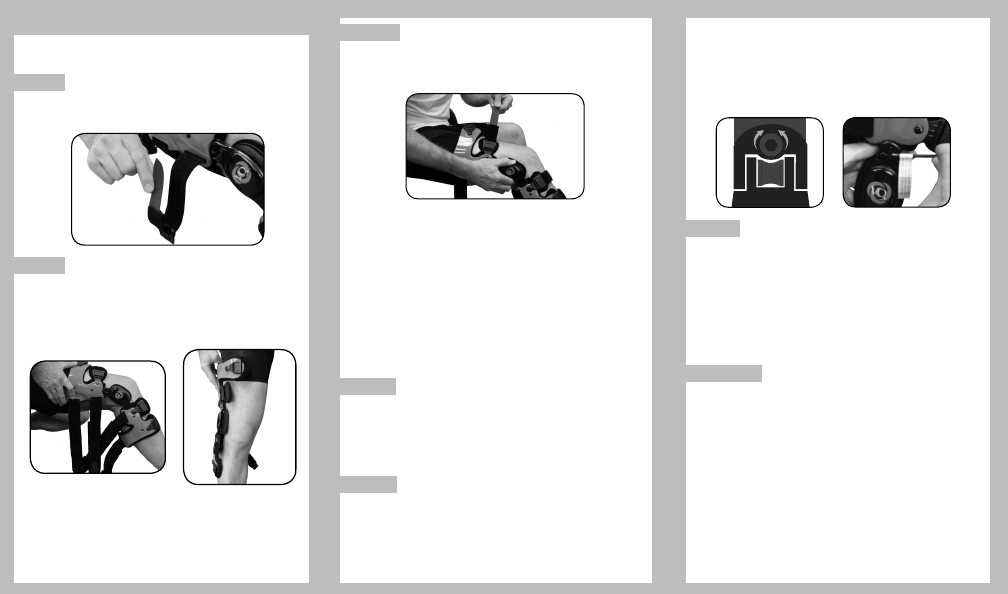
STEP 1. LOOSEN STRAPS 1 - 4
• To simplify application, attach each strap back onto itself to
minimize tangling.
• Fasten strap 1 snugly just above calf muscle. Strap 1 is important in
maintaining brace position.
• Fasten strap 2 around middle of calf.
• Fasten strap 3 around lower thigh.
• Fasten strap 4 around upper thigh.
All straps should be comfortably tightened to properly secure brace
and provide relief.
NOTE: Elastic strap extension may be used on strap 3 for medial
compartment and strap 4 for lateral compartment. Remove strap 3 or
4. Place elastic extension through frame slot and attach to strap
as shown.
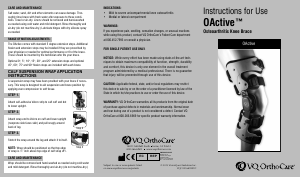
STEP 4. CHECK FIT
For initial fitting of OActive off-the-shelf (for OActive Custom skip to
section 5.1): With the brace in neutral (from step 2 above), bend the
knee to 90°. With the provided allen key, turn the Q-hinge screw 1/8 turn
clockwise (important) to increase lateral compartment relief or 1/8 turn
counter-clockwise to increase medial compartment relief. This is a good
starting point for initial use.
Lateral
Relief
Medial
Relief
Q-Hinge Screw
STEP 2. POSITION BRACE
• While sitting at edge of chair, bend knee slightly and apply brace
to lateral side (outside) of leg.
• Align center of hinge with top of kneecap and position slightly
behind midline of leg.
Important note for initial fitting: When positioning the OActive off-
the-shelf brace, it should first be adjusted to neutral. This is achieved
by setting the correction angle (see step 5) so the cuffs and hinge rest
on leg without gapping or pressure. Medial or lateral compartment cor-
rection will be adjusted in step 5. The OActive Custom has correction
pre-set and should not be set to neutral.
STEP 3. FASTEN STRAPS
Attach straps in sequence indicated on strap ends. Connect buckles
then tighten straps. Hold brace at hinge to prevent rotation while tight-
ening straps.
• Once straps are secure, center of hinge should be aligned with
middle of kneecap and positioned slightly behind midline of leg.
• To ensure proper fit for activity, walk a short distance. It is normal for
brace to drop or settle into position. Make strap and position adjust-
ments as necessary.
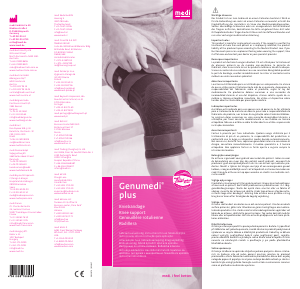
STEP 5. ADJUST BRACE CORRECTION ANGLE (Q-HINGE)
Warning: Initial adjustment of the OActive brace must be done by a
trained bracing professional in accordance with a Doctor’s prescription
indicating the compartment to unload. Subsequent adjustments must
be made only by a trained bracing professional or by the patient if the
patient has been given detailed instruction from a professional and has
fully read and understands these application instructions.
STEP 5.1 FOR INITIAL FITTING AND ALL ADJUSTMENTS
• Stand and walk a short distance to ensure comfort and proper
correction after each adjustment or upon initial fitting of OActive
Custom. If there is any discomfort in the knee joint or leg, turn the
angle adjustment back slightly.
• If more relief is required, turn Q-hinge screw no more than 1/8 turn.
Walk after the adjustment and check as above.
• Over-adjusting the Q-hinge may cause discomfort and skin pressure
issues. Adjust conservatively.
“WEAR TIME”
Gradually increase brace wear time to allow your body to adjust to
the brace. Start with 30 minutes on day one and gradually increase.
Pain caused by osteoarthritis may take time to subside. It is important
that you routinely wear the brace during weight bearing activities
(e.g. when you’re on your feet) as it will reduce joint loading and allow
you to begin feeling relief. It may take a number of weeks for relief to
become significant.


Delta i konversationen om denna produkt
Här kan du dela vad du tycker om VQ OrthoCare OActive Knäbandage. Om du har en fråga, läs först noggrant igenom manualen. Att begära en manual kan göras genom att använda vårt kontaktformulär.