Figures and illustrations in this User Manual are provided for reference only and
may differ from actual product appearance. Product design and specifications
may be changed without notice.
User Instructions
y Screen Image retention
Do not display a still image (such as on a video game) on the plasma display panel
for more than several minutes as it can cause screen image retention. This image
retention is also known as “screen burn”. To avoid such image retention, reduce the
degree of brightness and contrast of the screen when displaying a still image.
y Heat on the top of the Plasma TV
The top side of the product may be hot after long periods of use as heat dissipates
from the panel through the vent hole in the upper part of the product.
This is normal and does not indicate any defect or operation failure of the product.
However, children should be prevented from touching the upper part of the product.
y The product is making a “cracking” noise.
A “cracking” noise may occur when the product contracts or expands due to a
change in the surrounding environment such as temperature or humidity. This is
normal and not a defect of the unit.
y Cell Defects
The PDP uses a panel consisting of 2,360,000(HD-level) to 6,221,000(FHD-level)
pixels which require sophisticated technology to produce. However, there may be
a few bright or dark pixels on the screen. These pixels will have no impact on the
performance of the product.
y Avoid operating the TV at temperatures below 41°F (5°C)
y A still image displayed too long may cause permanent damage to the PDP
Panel.
Watching the Plasma TV in 4:3 format for a long period of time
may leave traces of borders displayed on the left, right and
centre of the screen caused by the difference of light emission
on the screen. Playing a DVD or a game console may cause
similar effects to the screen.
Damages caused by the above effect are not covered by the
Warranty.
y After-images on the Screen.
Displaying still images from Video games for longer than a certain period of time may
produce partial after-images.
To prevent this effect, reduce the “brightness” and “contrast” when displaying still
images for a long time.
y Warranty
Warranty does not cover any damage caused by image retention.
Burn-in is not covered by the warranty.
Contact SAMSUNG WORLD WIDE
If you have any questions or comments relating to Samsung products,
please contact the SAMSUNG customer care centre.
Country
Customer Care Centre
Web Site
AUSTRALIA 1300 362 603 www.samsung.com/au
NEW ZEALAND 0800 SAMSUNG (0800 726 786) www.samsung.com/nz
CHINA 400-810-5858 www.samsung.com
HONG KONG (852) 3698 4698 www.samsung.com/hk
(Chinese)
www.samsung.com/hk_en
(English)
INDIA 1800 3000 8282
1800 266 8282
www.samsung.com/in
INDONESIA 0800-112-8888 (Toll Free)
(021) 56997777
www.samsung.com/id
JAPAN 0120-327-527 www.samsung.com
MALAYSIA 1800-88-9999 www.samsung.com/my
PHILIPPINES 1-800-10-7267864 [PLDT]
1-800-8-7267864 [Globe landline
and Mobile]
02-4222111 [Other landline]
www.samsung.com/ph
SINGAPORE 1800-SAMSUNG(726-7864) www.samsung.com/sg
THAILAND 0-2689-3232,
1800-29-3232
www.samsung.com/th
TAIWAN 0800-32-9999 www.samsung.com/tw
VIETNAM 1 800 588 889 www.samsung.com
GEORGIA 0-800-555-555 www.samsung.com
ARMENIA 0-800-05-555 www.samsung.com
AZERBAIJAN 088-55-55-555 www.samsung.com
UZBEKISTAN 8-10-800-500-55-500 www.samsung.com
KYRGYZSTAN 00-800-500-55-500 www.samsung.com
TADJIKISTAN 8-10-800-500-55-500 www.samsung.com
MONGOLIA +7-800-555-55-55 www.samsung.com
BELARUS 810-800-500-55-500 www.samsung.com
MOLDOVA 0-800-614-40 www.samsung.com
ALGERIA 0800 100 100 www.samsung.com/n_
africa
PAKISTAN 0800-Samsung (72678) www.samsung.com/pk/
TUNISIA 80-1000-12 www.samsung.com/n_
africa
For personal and non-commercial use only.
Usage is subject to following the guidelines in the User Manual and
may not be available in all regions.
Plasma TV
user manual
© 2013 Samsung Electronics Co., Ltd. All rights reserved.
BN68-05775A-01
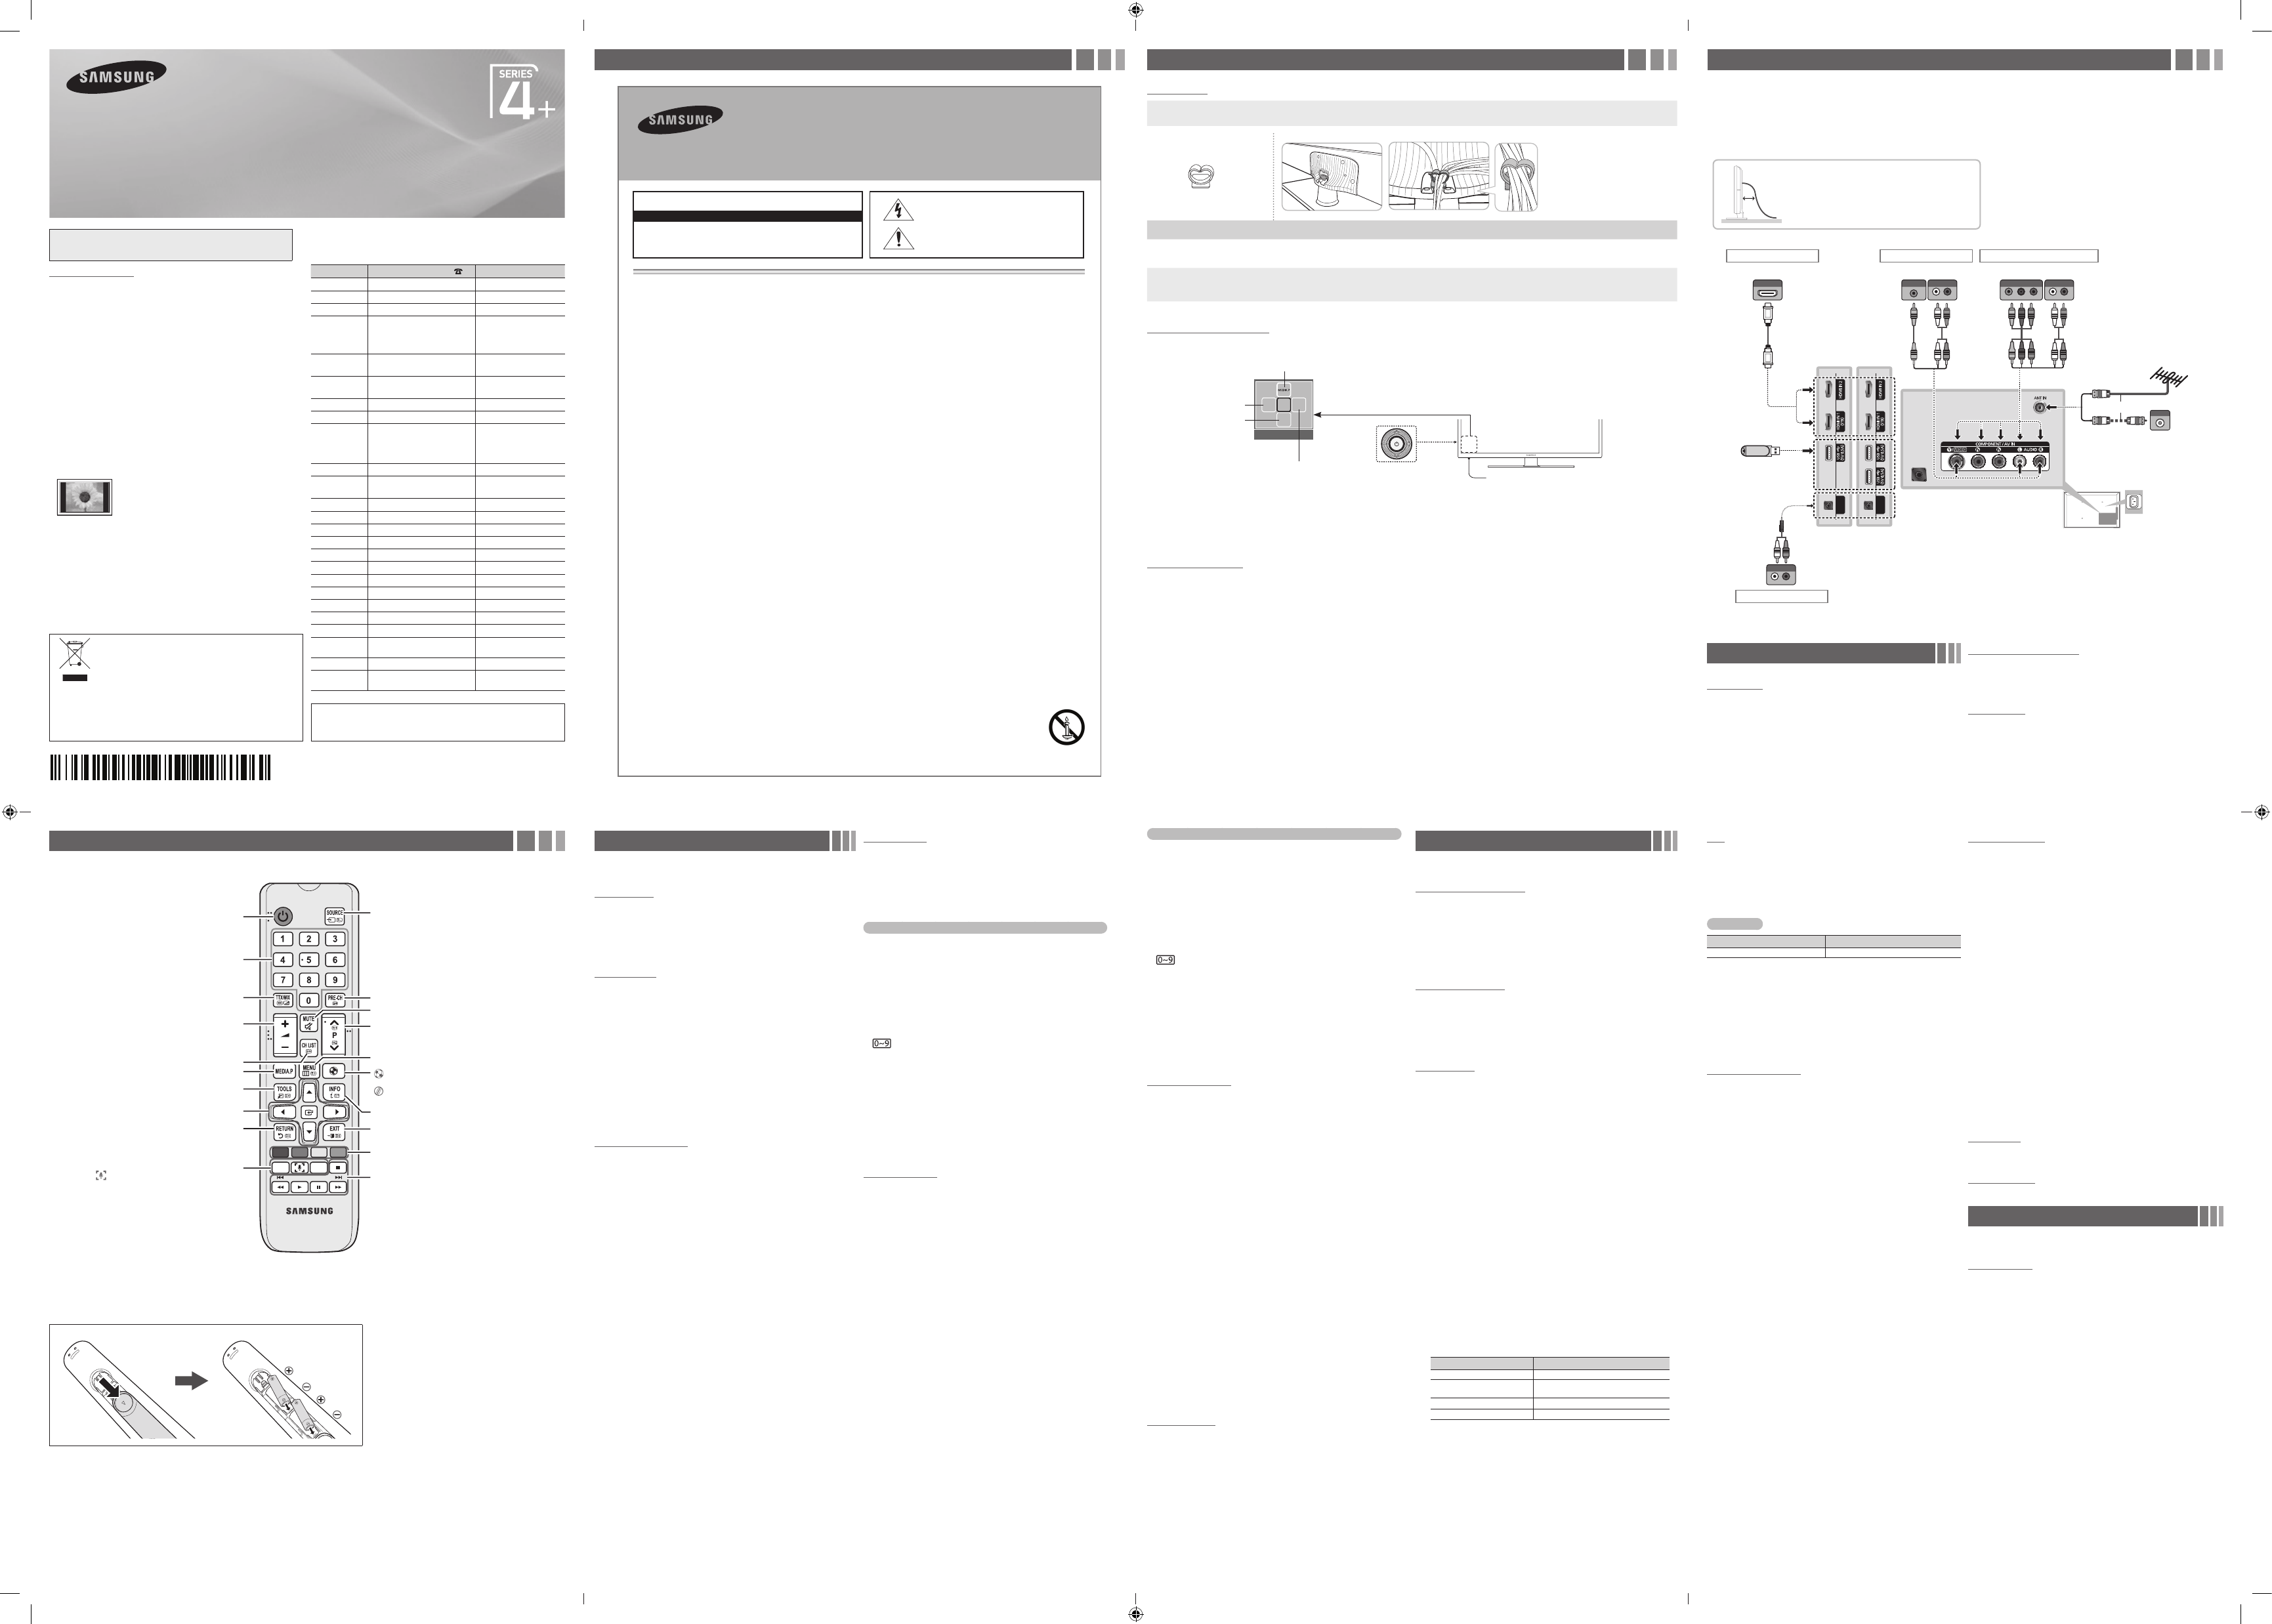
Important Safety Instructions Getting Started
Accessories
y Remote Control & Batteries (AAA x 2)
y Owner’s Instructions
y Warranty Card / Regulatory Guide (Not available in some locations)
y Power Cord
y
Cable Holder Assembling the Cable Holder
Input Cables (Sold Separately)
y Composite (AV)
y Component
y Coaxial (RF)
y HDMI
TV Controller (Panel Key)
The TV’s Controller, a small joy stick like button on the rear left side of the TV, lets you control the TV without the remote control.
Remote control sensor
TV Controller
The image is drawn by
facing the front side of
the TV.
Function menu
m
R
s
P
Return
Selecting the Media Play
Selecting a Source
Selecting the Menu
Power off
✎ Exits the menu when pressing the controller more than 1 second.
✎ When selecting the function by moving the controller to the up/down/left/right directions, be sure not to press the controller. If you press it first, you
cannot operate it to move the up/down/left/right directions.
Setup (Initial Setup)
When you turn the TV on for the first time, a sequence of on-screen prompts will assist in configuring basic settings. Press the POWER button. Set the
initial setup following instructions that the TV guides.
✎ Connecting the power cord and aerial. (refer to ‘Connections’)
Connections
y For better picture and audio quality, connect to a digital device using an HDMI
cable.
y The picture may not display normally (if at all) or the audio may not work if an
external device that uses an older version of HDMI mode is connected to the TV. If
such a problem occurs, ask the manufacturer of the external device about the HDMI
version and, if out of date, request an upgrade.
y Be sure to purchase a certified HDMI cable. Otherwise, the picture may not display
or a connection error may occur.
y For set-top box connection using HDMI cable, we highly recommend you to
connect the HDMI IN 1(STB) port.
y
The TV model is not allowed for PC connection (distortion or incorrect picture
displaying can
appear).
Changing the Input Source
Source List
Use to select TV or other external input sources such as DVD / Blu-ray
players / cable box / STB satellite receiver connected to the TV.
1. Press the SOURCE button.
2. Select a desired external input source.
■
TV / HDMI1 / HDMI2 / AV / Component
✎ You can only choose external devices that are connected to the TV.
In the Source, connected inputs are highlighted.
How to use Edit Name
Edit Name lets you associate a device name to an input source. To
access Edit Name, press the TOOLS button in Source List. Name the
device connected to the input jacks to make your input source selection
easier.
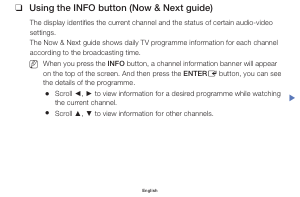
Information
You can see detailed information about the selected external device.
Remote Control
✎ This remote control has Braille points on the Power, Channel, and Volume buttons and can be used by visually impaired persons.
Installing batteries (Battery size: AAA)
✎ NOTE
• Use the remote control within 23 feet from TV.
• Bright light may affect the performance of the remote control. Avoid using nearby special fluorescent light or neon signs.
• The Colour and shape may vary depending on the model.
Alternately select Teletext ON, Double, Mix or OFF. Returns to the previous channel.
Press to directly access to channels.
Turns the TV on and off.
Use these buttons in a specific feature.
E-MANUAL : Not available.
: Display the Screen&Sound Capture mode.
SLEEP : Automatically shuts off the TV at a preset time.
Cuts off the sound temporarily.
: Turns the Sports Mode / Soccer Mode
on or off.
: Turns the Cricket Mode on or off.
(Depending on the Country)
Displays the channel list on the screen.
Displays information on the TV screen.
Quickly select frequently used functions.
Selects the on-screen menu items and changes the
values seen on the menu.
Exit the menu.
Returns to the previous menu.
Displays and selects the available video
sources.
Use these buttons according to the direction
on screen.
Changes channels.
Displays the main on-screen menu.
Views the Media Play.
Adjusts the volume.
AB CD
E-MANUAL
SLEEP
Broadcasting Menu
❑ Memorizing channels
Auto Tuning
(depending on the country)
✎ Automatically allocated programme numbers may not correspond to
actual or desired programme numbers. If a channel is locked, the PIN
input window appears.
❑ Using the Channel menu
Channel List
The Channel List contains the channels your TV displays when you press
the channel button. You can view channel information, All or Favourites
1-5. Press ►(Mode) button to change the channel mode.
✎ When you press the CH LIST button on the remote control, Channel
List screen will be displayed at once.
Channel Mode
■
Edit Favourites: Set channels you watch frequently as favourites.
✎ For detailed information about using Edit Favourites, refer to “Edit
Favourites”.
■
Favourites 1-5: Shows all favourite channels, arranged in up to five
groups. Each group has a separate screen.
✎ The TV displays Favourites 1-5 only if you have added favourites
using Edit Favourites.
■
All: Shows all currently available channels.
Schedule Manager
You can set a desired channel to be displayed automatically at the
intended time. In addition, you can view, modify or delete a channel you
have reserved to watch.
✎ You must set the current time first using the Time → Clock Set
function in the System menu to use this function.
1. Press the Schedule on the Schedule Manager screen. The Schedule
Viewing menu appears.
2. Press the ▲/▼/◄/► buttons to set each option menu.
■
Channel: Select the desired channel.
■
Repeat: Select Once, Manual, Sat~Sun, Mon~Fri or Everyday to
set at your convenience. If you select Manual, you can set the day you
want.
✎ The (
c
) mark indicates the day you’ve selected.
■
Date: You can set the desired date.
✎ It is available when you select Once in Repeat.
■
Start Time: You can set the start time you want.
✎ If you want to edit or cancel a reserved schedule, select the reserved
schedule on Schedule Manager. Then press the ENTER
E
button
and select the Edit or Delete.
Edit Channel
You can edit or delete channels.
1. Go to Edit Channel screen.
2. Press the ▲/▼ buttons to select the desired channel, then press
the ENTER
E
button. The (
c
) mark indicates the channel you’ve
selected.
✎ You can select more than one channel.
✎ Press the ENTER
E
again to deselect the channel.
Using the coloured and function buttons with the Edit Channel
■ a
Red (Change Number): Changes channel order on the channel list.
−
E
(Done): Completes changing the channel order.
■ b
Green (Delete): Deletes a channel from the channel list.
■ {
Yellow (Lock / Unlock): Lock a channel so that the channel cannot
be selected and viewed. / Unlock the channel that you locked.
✎ This function is available only when the Channel Lock is set to On.
✎ The PIN input screen appears. Enter your 4-digit PIN. Change the PIN
using the Change PIN option.
■ }
Blue (Select All / Deselect All): Selects or deselects all channels
at once.
■
(Go To): Goes to channel directly by pressing numbers (0~9).
■ k
(Page): Move to previous or next page.
■ T
(Tools): Displays the option menu. The option menu items that
appear may differ depending on the channel status and type.
− Category: Changes the channel mode to All, Recently Viewed,
Most Viewed. The selected channel mode is displayed.
− Edit Favourites: Go to Edit Favourites screen directly.
− Rename channel: Assign a name of up to five characters to a
channel. For example, Food, Golf, etc. This makes it easier to find and
select the channel.
− Channel Info: Display details of the selected channel.
− Information: Display details of the selected programme.
Edit Favourites
You can add, edit or delete favourite channels.
1. Go to Edit Favourites screen.
2. Press the ▲/▼ buttons to select the desired channel, and then press
ENTER
E
button.
3. Choose a specific favourite list among Favourites 1-5 using
b
(Change Fav.) button, and then press the
}
(Add) button. The
selected channel has been added in Favourites 1-5.
✎ One favourite channel can be added in several of favourites among
Favourites 1-5.
Using the coloured and function buttons with the Edit Favourites
■ a
Red (Category / Change order)
− Category: Changes the channel mode to All, Recently Viewed,
Most Viewed. The selected channel mode is displayed.
− Change order: Changes the favourite channel order.
E
(Done): Completes changing the channel order.
■ b
Green (Change Fav.): Changes favourite list among Favourites 1-5.
■ {
Yellow (Select All / Deselect All) : Selects or deselects all channels
at once.
■ }
Blue (Add / Delete)
− Add: Adds selected channels to Favourites 1-5.
− Delete: Deletes the favourite channel from Favourites 1-5.
■
(Go To): Goes to channel directly by pressing numbers (0~9).
■ k
(Page): Move to previous or next page.
■ T
(Tools): Displays the option menu. The option menu items that
appear may differ depending on the channel status and type.
− Copy to favourites: Copy the selected favourite channel in
Favourites 1-5. You can add from other favourite list.
− Rename Favourites: Assign your own favourite channel name.
− Edit Channel: Go to Edit Channel screen directly.
− Information: Display details of the selected programme.
❑ Other Features
Channel Settings
■
Area
(depending on the country)
You can change the desired area.
■
Manual Tuning
Scans for a channel manually and stores in the TV.
✎ If a channel is locked, the PIN input window appears.
✎ According to the channel source, Manual Tuning may be supported.
1. Press the New button.
2. Set the Programme, Colour System, Sound System, Channel and
Search.
3. Press the Store button. When scanning has finished, a channel is
updated in the channel list.
✎ Channel mode
− P (programme mode): When tuning is complete, the broadcasting
stations in your area have been assigned to the position numbers
from P0 to P99. You can select a channel by entering the position
number in this mode.
− C (aerial channel mode) / S or Z (cable channel mode) (depending
on the country): These two modes allow you to select a channel
by entering the assigned number for each aerial broadcasting
station or cable channel.
■
Fine Tune
If the signal is weak or distorted, fine tune the channel manually.
✎ Fine tuned channels are marked with an asterisk “*”.
✎ To reset the fine-tuning, select Reset.
■
Transfer Channel List
(depending on the country)
Imports or exports the channel map. You should connect a USB storage to
use this function.
✎ The PIN number input screen appears. Enter your 4 digit PIN number.
✎ Supported file systems are FAT and exFAT.
Channel Lock
Lock channels in Channel menu to prevent unauthorized users, such as
children, from watching unsuitable programme.
✎ Available only when the Source is set to TV.
Picture Menu
❑ Changing the Preset Picture Mode
Picture Mode
t
Select your preferred picture type.
■
Dynamic: Suitable for a bright room.
■
Standard: Suitable for a normal environment.
■
Movie: Suitable for watching movies in a dark room.
❑ Adjusting Picture Settings
Cell Light / Contrast / Brightness / Sharpness /
Colour / Tint (G/R)
Your television has several setting options for picture quality control.
✎ In analogue TV, AV modes of the PAL system, the Tint (G/R) function
is not available.
✎ Settings can be adjusted and stored for each external device
connected to the TV.
✎ Lowering picture brightness reduces power consumption.
Picture Size
Set the various picture options such as picture size and aspect ratio.
✎ The available items may differ depending on the selected mode.
✎ Depending on the input source, the picture size options may vary.
■
Picture Size
t
: Your cable box/satellite receiver may have its
own set of screen sizes as well. However, we highly recommend you
use 16:9 mode most of the time.
− 16:9: Sets the picture to 16:9 wide mode.
− Wide Zoom: Magnifies the picture size more than 4:3.
✎ Adjusts the Position by using ▲, ▼ buttons.
− Zoom: Magnifies the 16:9 wide pictures vertically to fit the screen size.
✎ Adjusts the Zoom or Position by using ▲, ▼ button.
− 4:3: Sets the picture to basic (4:3) mode.
✎ Do not watch in 4:3 format for a long time. Traces of borders
displayed on the left, right and centre of the screen may cause
image retention (screen burn) which are not covered by the
warranty.
− Screen Fit: Displays the full image without any cut-off when HDMI
(720p / 1080i / 1080p) or Component (1080i / 1080p) signals are
inputted.
■
Zoom/Position: Adjust the picture size and position. It is only available
in Zoom.
■
Position: Adjust the picture position. It is only available in Screen Fit or
Wide Zoom.
✎ The available items may differ depending on the selected mode.
✎ Settings can be adjusted and stored for each external device
connected to an input on the TV.
✎ If you use the Screen Fit function with HDMI 720p input, 1 line will be
cut at the top, bottom, left and right as in the overscan function.
Input Source Picture Size
ATV/AV 16:9, Wide Zoom, Zoom, 4:3
Component(480i, 480p, 576i,
576p, 720p)
16:9, Wide Zoom, Zoom, 4:3
Component(1080i, 1080p)
16:9, Wide Zoom, Zoom, 4:3, Screen Fit
HDMI(720p, 1080i, 1080p)
16:9, Wide Zoom, Zoom, 4:3, Screen Fit
PIP
You can watch the TV tuner and one external video source
simultaneously. PIP (Picture-in-Picture) does not function in the same
mode.
✎ If you turn the TV off while watching in PIP mode, the PIP window
will disappear.
✎ You may notice that the picture in the PIP window becomes slightly
unnatural when you use the main screen to view a game or karaoke.
PIP Settings
Main picture Sub picture
Component, HDMI TV / AV
■
PIP: Activate or deactivate the PIP function.
■
Source: Select the source for the sub-screen.
■
Channel: Select the channel for the sub-screen.
■
Size: Select a size for the sub-picture.
■
Position: Select a position for the sub-picture.
■
Sound Select: You can choose the desired sound (Main / Sub) in
PIP mode.
❑ Changing the Picture Options
Advanced Settings
(available in Standard / Movie mode)
You can adjust the detailed setting for the screen including colour and
contrast.
■
Dynamic Contrast: Adjust the screen contrast.
■
Black Tone: Select the black level to adjust the screen depth.
■
Flesh Tone: Adjust the flesh tone colour.
■
RGB Only Mode: Displays the Red, Green and Blue colour for
making fine adjustments to the hue and saturation.
■
Colour Space: Adjust the range of colours available to create the
image.
■
White Balance: Adjust the colour temperature for a more natural
picture. R-Offset / G-Offset / B-Offset: Adjust each colour’s (red,
green, blue) darkness.
R-Offset / G-Offset / B-Offset: Adjust each colour’s (red, green,
blue) brightness.
R-Gain / G-Gain / B-Gain: Adjust each colour’s (red, green, blue)
brightness.
Reset: Resets the White Balance to its default settings.
■
Gamma: Adjust the primary colour intensity.
■
Motion Lighting: Reduce power consumption by brightness control
adapted motion.
✎ Only available in Standard mode.
✎ When changing a setting value of Cell Light, Brightness or
Contrast, Motion Lighting will be set to Off.
Picture Options
■
Colour Tone
✎ Warm1 or Warm2 will be deactivated when the picture mode is
Dynamic.
✎ Settings can be adjusted and stored for each external device
connected to an input on the TV.
■
Digital Clean View: If the broadcast signal received by your TV is
weak, you can activate the Digital Clean View feature to reduce any
static and ghosting that may appear on the screen.
✎ When the signal is weak, try other options until the best picture
is displayed.
Auto Visualisation: When changing analogue channels, displays
signal strength.
✎ Only available for analogue channels.
✎ When the INFO button is pressed, the signal strength bar is
displayed.
✎ When bar is green, you are receiving the best possible signal.
■
MPEG Noise Filter: Reduces MPEG noise to provide improved
picture quality.
■
HDMI Black Level: Selects the black level on the screen to adjust the
screen depth.
■
Film Mode: Sets the TV to automatically sense and process film
signals from all sources and adjust the picture for optimum quality.
✎ Available in TV mode and external input mode which supports SD
(480i / 576i) and HD (1080i).
✎ If the screen does not seem natural, change its option to Off /
Auto1 / Auto2 in Film Mode.
■
Analog Clean View: Reduces diagonal noise in picture caused by the
crosstalk of signals.
Picture Off
The screen is turned off but the sound remains on. Press any button
except volume button to turn on the screen.
Reset Picture
Resets your current picture mode to its default settings.
Sound Menu
❑ Changing the Preset Sound Mode
Sound Mode
■
Standard: Selects the normal sound mode.
■
Music: Emphasizes music over voices.
■
Movie: Provides the best sound for movies.
■
Clear Voice: Emphasizes voices over other sounds.
■
Amplify: Increase the intensity of high-frequency sound to allow a
better listening experience for the hearing impaired.
ANT OUT
AUDIO OUT
AUDIO OUT
AUDIO OUT
L-AUDIO-R
VIDEO OUT
Y
R
Y
RW
RW
AUDIO OUT
L-AUDIO-R
COMPONENT OUT
PRPBY
RBRG
RB
R
G
RW
RW
SERVICE
AUDIO IN
L-AUDIO-R
RW
HDMI OUT
or
Power Input
TV Rear Panel
TV Side Panel
VHF/UHF Aerial
Cable
USB
HDMI connection
Set-top Box / Blu-ray players
Audio connection
Amplifier / Home Theater
Component connection
Blu-ray player / DVD
AV connection
VCR
✎ The side panel may differ
depending on the model.
✎ The PDP device may interfere with an amateur radio or AM radio.
✎ When using two-way radio mobile and portable units or amateur
radio or AM radio near by your TV, this may cause the TV to
malfunction.
PA43H4000 PA43H4100
For India Only
This marking on the product, accessories or literature indicates
that the product and its electronic accessories should not be
disposed of with other household waste at the end of their
working life. To prevent possible harm to the environment
or human health from uncontrolled waste disposal, please
separate these items from other types of waste and recycle
them responsibly to promote the sustainable reuse of material
resources.
For more information on safe disposal and recycling visit our website
www.samsung.com/in or contact our Helpline numbers - 18002668282,
180030008282.
• Theslotsandopeningsinthecabinetandinthebackorbottomareprovidedfornecessaryventilation.Toensurereliableoperationofthisapparatus,
andtoprotectitfromoverheating,theseslotsandopeningsmustneverbeblockedorcovered.
-Donotcovertheslotsandopeningswithaclothorothermaterials.
-Donotblocktheslotsandopeningsbyplacingthisapparatusonabed,sofa,rugorothersimilarsurface.
-Donotplacethisapparatusinaconnedspace,suchasabookcaseorbuilt-incabinet,unlessproperventilationisprovided.
• Donotplacethisapparatusnearoroveraradiatororheatregister,orwhereitisexposedtodirectsunlight.
• Donotplaceavesselcontainingwater(vasesetc.)onthisapparatus,asthiscanresultinariskofreorelectricshock.
• Donotexposethisapparatustorainorplaceitnearwater(nearabathtub,washbowl,kitchensink,orlaundrytub,inawetbasement,orneara
swimmingpooletc.).Ifthisappratusaccidentallygetswet,unplugitandcontactanauthorizeddealerimmediately.
• Makesuretopulloutthepowercordfromtheoutletbeforecleaning.
• Thisapparatususebatteries.Inyourcommunity,theremightberegulationsthatrequireyoutodisposeofthesebatteriesproperlytoprotectthe
environment.Pleasecontactyourlocalauthoritiesfordisposalorrecyclinginformation.
• Donotoverloadwalloutlets,extensioncords,oradaptorsbeyondtheircapacity,sincethiscanresultinreorelectricshock.
• Power-supplycordsshouldberoutedsothattheyarenotlikelytobewalkedonorpinchedbyitemsplaceduponoragainstthem.Payparticular
attentiontocordsattheplugend,whereconnectedtoadaptors,andatthepointwheretheyexitfromtheapparatus.
• Toprotectthisapparatusfromalightningstorm,orwhenitisleftunattendedandunusedforlongperiodsoftime,unplugitfromthewalloutletand
disconnecttheantennaorcablesystem.Thiswillpreventdamagetothesetduetolightningandpowerlinesurges.
• BeforeconnectingtheACpowercordtotheDCadaptoroutlet,makesurethevoltagedesignationoftheDCadaptorcorrespondstothelocal
electricalsupply.(dependingonthemodel)
• Neverinsertanythingmetallicintotheopenpartsofthisapparatus.Doingsomaycreateadangerofelectricshock.
• Toavoidelectricshock,nevertouchtheinsideofthisapparatus.Onlyaqualiedtechnicianshouldopenthisapparatus.
• Makesuretoplugthepowercordinuntilitisrmlyinserted.Pullontheplug,notthecord,whenremovingthepowercordfromtheoutlet.Donot
touchthepowercordwithwethands.
• Ifthisappratusdoesnotoperatenormally-inparticular,ifthereareanyunusualsoundsorsmellscomingfromit-unplugitimmediatelyandcontact
anauthorizeddealerorservicecenter.
• BesuretopullthepowerplugoutoftheoutletiftheTVistoremainunusedorifyouaretoleavethehouseforanextendedperiodoftime(especially
whenchildren,elderlyordisabledpeoplewillbeleftaloneinthehouse).
-Accumulateddustcancauseanelectricshock,anelectricleakage,orarebycausingthepowercordtogeneratesparksandheat,orcausethe
insulationtodeteriorate.
• Besuretocontactanauthorizedservicecenter,wheninstallingyoursetinalocationwithheavydust,highorlowtemperatures,highhumidity,
chemicalsubstancesorwhereitwilloperatefor24hoursa
daysuchasinanairport,atrainstation,etc.Failuretodosomaycauseseriousdamage
toyourset.
• Useonlyaproperlygroundedplugandreceptacle.
-Animpropergroundmaycauseelectricshockorequipmentdamage.(ClasslEquipmentonly.)
• Toturnofftheapparatuscompletely,youmustpullthepowerplugoutofthewallsocket.Consequently,thepowerplugshouldbereadilyaccessible
atalltimes.
• Donotallowchildrentohangontotheproduct.
• Storetheaccessories(batteries,etc.)inalocationsafelyoutofthereachofchildren.
• Donotinstalltheproductinanunstablelocationsuchasashakyself,aslantedoor,oralocationexposedtovibration.
• Donotdroporimpartashocktotheproduct.Iftheproductisdamaged,disconnectthepowercordandcontactaservicecenter.
• Tocleantheproduct,unplugthepowercordfromthepoweroutletandwipetheproductusingasoft,drycloth.Donotuseanychemicalssuch
aswax,benzene,alcohol,thinners,insecticide,airfreshener,lubricantordetergent.Thismaydamagetheappearanceorerasetheprintingonthe
product.
• Donotexposetheapparatusto
drippingorsplashing.
• Donotdisposeofbatteriesinare.
• Donotshortcircuit,disassemble,oroverheatthebatteries.
• notshortcircuit,disassemble,oroverheatthebatteries.
• Thereisadangerofexplosionifyoureplacethebatterieswiththewrongtypeofbattery.Replaceonlywiththesameorequivalenttype.
• WARNING-TOPREVENTTHESPREADOFFIRE,KEEPCANDLESOROTHEROPENFLAMESAWAYFROMTHISPRODUCTATALLTIMES.
Warning! Important Safety Instructions
(Please read the safety instructions below before installing and using the product.)
CAUTION
CAUTION:TOREDUCETHERISKOFELECTRICSHOCK,DONOTREMOVE
COVER(ORBACK).THEREARENOUSERSERVICEABLEPARTSINSIDE.RE-
FERALLSERVICINGTOQUALIFIEDPERSONNEL.
RISKOFELECTRICSHOCK.DONOTOPEN
Thissymbolindicatesthathighvoltageispresentinside.It
isdangeroustomakeanykindofcontactwithanyinternal
partofthisproduct.
Thissymbolindicatesthatimportantliteratureconcerning
operationandmaintenance hasbeenincluded withthis
product
.
To see Analog channels clearly, prevent the
antenna cables from contacting the rear of the TV.
Connect the antenna cables directly without using
a divider
- 2 -- 1 -
- 6 -- 5 -
- 3 -
- 7 -
- 4 -
- 8 -
[PH4000-AR]BN68-05775A-01ENG.indb 1 2014-01-27 2:39:38


Delta i konversationen om denna produkt
Här kan du dela vad du tycker om Samsung PA43H4000AR Plasma TV. Om du har en fråga, läs först noggrant igenom manualen. Att begära en manual kan göras genom att använda vårt kontaktformulär.