
8 9
ENGLISH
ENGLISH
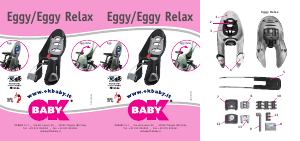
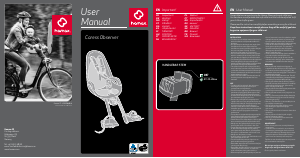
Rear child‘s seat Eggy / Eggy RelaxRear child‘s seat Eggy / Eggy Relax
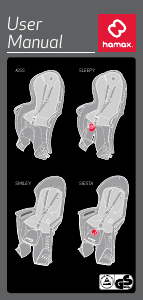
3) Adjust the seat and its components in order to give the child
the most comfort and safety. When the child is in the seat, the
backrest should be slightly tilted backwards, so as to prevent
the child from sliding forward.
4) Check to ensure that each part of your bicycle is working prop-
erly with the seat mounted.
5) Check the existence of any laws present in your State that gov-
ern the use of child bike seats.
6) Check initially and then periodically that the weight and size of
the child does not exceed the maximum allowed by the seat.
7) Check that the child or part of its clothes do not come into con-
tact with moving parts of the seat or bicycle. Avoid the child’s
hands and feet coming into contact with the wheel or being
caught in the brakes.
8) Ensure that there are no sharp edges that could come into
contact with the child (for example, frayed or deteriorated wires
etc.).
9) Ensure that the safety belts are not loose and do not come into
contact with the moving parts of the bicycle, especially with the
wheels, even when the child is not being carried in the seat.
10) Always use the safety belts. Make sure your child is properly
secured with the seat belts.
11) The child in the seat must be clothed and protected from the
cold more than the person riding the bicycle. Protect the child
from rain.
12) It is advised to make the child wear an approved protective
helmet.
13) Check that the seat is not too hot (e.g. overheated by the sun)
prior to placing the child in it.
14) Remove the seat when the bicycle is transported by car. Strong
wind could damage the seat or detach it from the bicycle, caus-
ing accidents.
15) Cover any saddle springs to avoid a child’s fingers being
trapped and/or squashed by them.
16) Before each use, check the seat is fitted onto the fastening block
correctly: on pulling the support arm upwards, the fastening
block must hold the seat down firmly.
17) The seat material (polypropylene) loses some of its mechanical
properties with ageing if exposed for longer periods to environ-
mental conditions (sun, rain, ice, etc.). In the case of normal use
and exposure to environmental conditions, the seat should be
replaced after 3 years.
Warnings
1) WARNING: Do not place any additional baggage on the
seat. Any additional baggage must be placed on the opposite
side of the bicycle with respect to the seat. For example: if the
seat is in the rear of the bicycle, use a front bag carrier and vice
versa
2) WARNING: Do not modify the seat.
3) WARNING: Riding the bicycle may be different with a child in the
seat, especially regarding balance, steering and braking.
4) WARNING: Never park the bicycle leaving the child unattended
in the seat.
5) WARNING: Do not use the seat if any part is missing or broken.
Mounting and assembling the child seat
Illustration 1:
Check the diameter of the frame and choose the most suitable plas-
tic adaptor (10). The reference diameter is indicated on each adap-
tor. Fix the fastener block (7) and the fastener counter-block (6) in
place, placing the plastic adaptor (10) and the soft plastic reducer
(11) in between them. The plastic adaptor (10) has specific grooves
to hold the cable glands welded to the frame and the cables. Do
not tighten the fastener screws (8) completely so you can adjust the
vertical position of the child seat; when the height is right; tighten
the screws firmly in place. Optimal torque is 8Nm.
Illustration 2:
Free the support arm (5) from the fastener ring and extract it from
the housing.
Illustration 3:
Insert the support arm (5) in the housing as illustrated in the dia-
gram and push the guide plate (5) until it reaches the guide seat and
can go no further (see also figure 4).
Illustration 4:
Insert the locking pin (9) into the hole B.
Illustration 5:
Rotate the locking pin 90° clockwise and click the locking pin safety
clip into the free space (see zoomed view).
WARNING: The locking pin is an important safety precaution and
must always be in place. Always check that it is positioned correctly
before every trip!


Delta i konversationen om denna produkt
Här kan du dela vad du tycker om OK Baby Eggy Cykelsit. Om du har en fråga, läs först noggrant igenom manualen. Att begära en manual kan göras genom att använda vårt kontaktformulär.