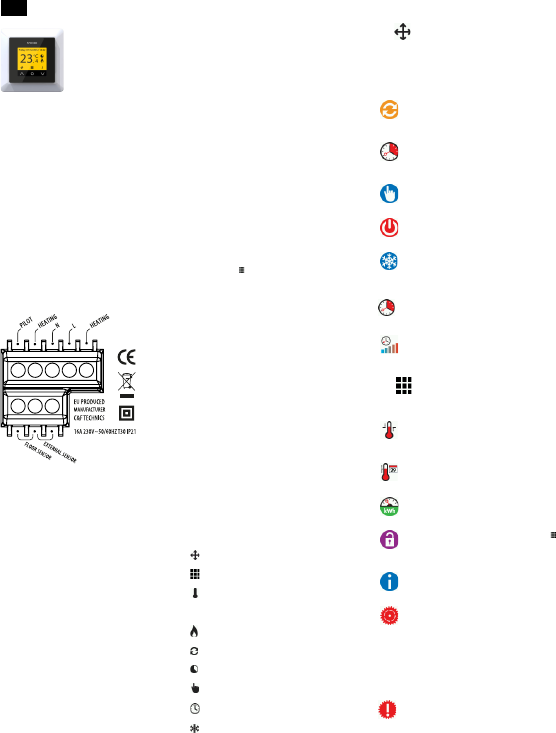
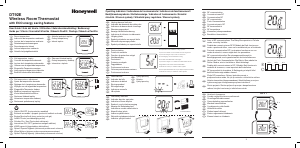
ENG MXC digital clockthermostat
Please read this manual carefully
before installation, and store with
other warrantee forms. This manual
describes the most essential
functions. A more more detailed
manual is available from our
website.
Technical data
Volt : 230V - 50/60 Hz
Max. Load : max. 16 Amp. / 230V
Temperature range : +5/+40ºC
Cover : IP21
Standard Color : Polar white (RAL 9010) and Black
Sensor : incl. Build in & external sensor
Guarantee : 2 year manufacturer warranty
Approvals : FI / CE / CCA
Manufacturer : C&F Technics, The Netherlands
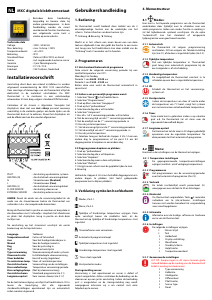
Installation
Installation needs to be done by a qualified electrician in
accordance with all current wiring and building regulations.
Before installation or re-installation of the thermostat
always isolate the power to the thermostat.
Check if the power is off. Remove the display frame by
pushing a non sharp instrument (for example the point of a
ballpoint pen) carefully in the square whole underneath the
thermostat. The display frame and the cover frame can be
removed.
PILOT : Pilot Wire (Domotica)
HEATING (N) : Heating Cable connection (N)
N : Power connection (Neutral)
L : Power connection (Live)
HEATING (L) : Heating Cable connection (L)
FLOOR SENSOR : Floor sensor connections
EXTERNAL SENSOR : External sensor connections
EARTHING: We advice to make an external earth wire
connection from the thermostat with the supplied terminal
block.
Position the thermostat and install onto the back box (not
supplied). Place the display frame back into position by
pushing it softly.
After connecting power for the first time the first question
appears on the screen:
Language Language selection
Temperature scale Celsius or Fahrenheit
Year Set the current year
Month Set the current month
Day Set the current day
Time Set the current time
Heating Type Floor heating or other system
Floor construction Installation depth floor heating
Floor covering Wood or other (Tile floor)
Sensor selection Floor or room sensor
Overview Containing the current settings
Choose temperature Program the comfort temperature
Choose temperature (Not applicable with floor heating)
Overview wizard Standaard program (2.1)
Slow start up For new floors (4.1.7)
After the final confirmation the main screen appears. The
standard settings are operational and will be executed
automatically .
User manual
1. Control
The thermostat is controlled by three touch-sensitive keys
on the underside of the screen. The basic functions of these
keys are:
^ Up, o Confirm, v Down.
An icon shown above the button will adopt that function.
Quick return: Press “up” for 2 seconds for quick return to the
main screen.
2. Program
2.1 Standard Automatic program
This includes the following heating periods with a comfort
temperature of 23°C:
Monday to Sunday
Period 1: from 06.00 - 09.00 hour
Period 2: from 15.00 - 22.00 hour
Outside these hours, the thermostat switches automatically
into power save mode.
2.2 Costum Automatic program:
1. Select “Menu” in the main screen
2. Select “Program”
3. Press O and select “Custom”
4. Press the “pencil” icon
5. Select the day you would like to set
6. Select “Setn”
7. Choose 1 or 2 heating periods
8. Set the start time of the 1
st
heating period
9. Set the end time of the 1
st
heating period
10. Set the desired temperature
11. Set the start time of the 2
nd
heating period
12. Set the end time of the 2
nd
heating period
13. Set the desired temperature
14. Select back and repeat steps 5 to 14 to program another
day or copy and paste a daily program into another day
(2.3).
2.3 Copy and paste a daily program:
1. Press the “pencil icon’
2. Select the day you want to copy
3. Select “Copy”
5. Select the day where you want to paste
6. Select “Paste”
7. A screen appears with the pasted times.
8. Confirm
Repeat steps 5 to 8 to paste the same daily program in any
other day. (The last copied daily program can be pasted
repeatedly).
3. Explenation of symbols
Mode; See 4.1.
Menu; See 4.2.
Change temporary of manual temperature. This option
only appears above the middle button if the temporary of
manual mode is selected.
Comfort period
Automatic program is operational
Temporary temperature
Manual temperature
Timer function
Frostprotection mode
Sensor error:
Sensor has a defect or may be wired incorrectly or loosely.
Heating system will not work when there is a sensor fault.
Advice: Check the wiring of the floor sensor and tighten
terminals. If the connection is sound and the sensor error is still
shown we advice you to contact your supplier.
4. Menu structure
4.1 Mode:
Here you can pause the current program of the thermostat
by (temporarily) switching to another program. When a
mode function is selected a corresponding symbol is shown.
Option “Automatic“ will activate the standard (2.1) or
custom program (2.2).
4.1.1 Automatic
The thermostat will switch on according to the
programmed settings. This can be the standard
settings (2.1) or the custom time settings (2.2).
4.1.2 Temporary temperature
To temporary override the temperature in the
automatic program. The override will operate until
the next automatic event.
4.1.3 Manual control
To permanently override the automatic program.
4.1.4 Off
Switches off the thermostat and heating system.
4.1.5 Frostprotection
In the case that the floor temperature falls below 7
degrees Celsius, the system starts heating and
keeps the temperature above 7 degrees.
4.1.6 Timer
Use this mode when you are on holidays etc. The
thermostat will be off for the chosen period.
4.1.7 Slow start-up
The thermostat will slowly raise the temperature of
the floor over a 20 day period. After this period the
thermostat automatically starts the standard or the
custom time program.
4.2 Menu:
Change the thermostat settings.
4.2 .1 Temperature settings
With this function you can change the
programmed temperature (comfort or set back
temperature).
4.2 .2 Program
The comfort temperature and times can be
changed in this menu. (See 2.2).
4.2 .3 Consumption
The total switched on time is by percentage (%)
shown over the last 30 and 365 days.
4.2 .4 Childlock
To switch the child lock function on or off, push
and hold it for a few seconds. When the child lock
is switched on, a padlock appears on the display.
4.2 .5 Information
Gives information about the current software and
hardware version of the thermostat.
4.2 .6 Settings
Change the following settings:
Date & time
Language
Brightness
Backlight delay
Color theme
Standby screen
Show Help
Temperature unit
5.2 .7 Advanced functions
Attention: Adjustments can have a big influence on
the working of the thermostat! Please consult your
supplier.
Heating system
Calibration
Intelligence
Differential
Pilot wire
Sensor type
Factory defaults

Delta i konversationen om denna produkt
Här kan du dela vad du tycker om Magnum Xtreme Control Thermostat. Om du har en fråga, läs först noggrant igenom manualen. Att begära en manual kan göras genom att använda vårt kontaktformulär.
Loading…