
ENGLISH
Congratulations on choosing to improve the hygiene
and cleanliness of your washroom. Lotus Professional’s
exciting new touchless recessed enMotion handtowel
dispensing system uses tomorrow’s innovation and
increased hand drying capacity to answer today’s need
for more efficient hygienic solutions. Your choice has
conveyed a commitment to providing a hygienic
washroom environment and a quality image, and to
improving the service in your washroom.
TOOLS AND SUPPLIES
• Screwdriver
• Power Drill
• Pencil or Pen
• Spirit level (recommended)
• 4 ea. #8 Wood Screws included
STEP ONE
Locate listed components:
• 1 enMotion recessed handtowel dispenser
• Dispenser Key
• 4 "D/LR21" Cell Batteries
• Instruction Guide
• Screws
STEP TWO
Assembling enMotion recessed handtowel dispenser
1. Locate key on right side of dispenser and open
dispenser.
2. Unwrap cellophane from batteries.
3. Load 4 “D” cell batteries in battery
compartment located in the rear of the
dispenser.
4. Close dispenser.
STEP THREE
Determining the wall location
1. Determine mounting location for dispenser.
When placing dispenser, allow at least
10 cm clearance on all sides.
2.
Notice the metal static ground clip on the
left side of the backplate. This must be in
contact with the wall to properly ground
the dispenser. Failure to properly ground
the dispenser will cause damage to the unit
and may cause unit to become inoperable.
3. If installing directly to the wall, a cut out of
38,1 cm high x 26,67 cm wide x 10,16 cm deep
will be required.
Notice: The door comes mounted on the
left side of the housing. If there is not
enough clearance for the door on the left,
refer to the directions below to switch the
door from the left to the right side.
Directions to switch door opening:
1. Use a Philips head screwdriver to remove the
silver hinges on the left side of the dispenser
and save the screws. Once removed, the hinges
should separate from the black back plate.
2. Next use a flat-head screwdriver to remove the
2 crescent push washers on the hinges so that
the door can be lifted off the hinges.
Save these washers.
3. Now use a Philips head screwdriver to remove
the lock assembly and move it to the opposite
side of the dispenser. Remove the silver cap
from the non-lock side and snap it into place on
the opposite side.
4. Finally, reattach the hinges, adding the push
washers from the previous step to ensure that
the door cannot be lifted off its hinges.
STEP FOUR
LOADING FIRST ROLL
(see step 1-4)
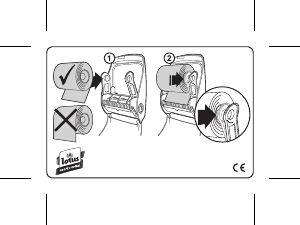
1. Place the roll as indicated at picture 1.
2. Lift the transfer bar and tuck the paper behind
it. Fold up 2,5 cm length of paper at the end of
the roll (transfer bar teeth should rest in crease).
3. With the transfer bar in place, press the blue
auto feed button on the lower right of the
dispenser (paper will be
automatically loaded).
4. Once the paper feeds through the bottom, tear
of the sheet and close the cover.
LOADING REPLACEMENT ROLLS
(see step 5 - 8)
5. When the low paper indicator is lit, add a new
paper roll.
6. Move the partial roll (approximately 7,5 cm
in Dia.) to the bottom roll holders (rewind any
excess paper back onto the roll).
7. Follow steps 1 through 2 to load a new roll in
the top bracket.
8. Close the cover.
Note: When the transfer option is used, the dispenser
will double feed paper toward the end of the partial
roll.
STEP FIVE
Operating the dispenser (see instructions on the inside
of the front cover)
1. Dispensing enMotion towels
A. In On-Demand Mode (ODM), wave hand
approximately 5 cm across front of the
dispenser. An enMotion towel will be dispensed.
B. In Hang Mode (HM) an enMotion towel will be
presented automatically, a few seconds after the
cover is closed or a towel is torn off.
C. Once towel is dispensed, a short delay will occur
to avoid paper waste. After the delay, the next
towel can be dispensed.
Note: To adjust the delay, see Step 6, "Adjusting
Settings".
2. Replacing batteries
A. The "low battery" light located on the right side
of the lens indicates that the battery power
is low.
Note: Once this light appears, dispenser
will continue to operate for a limited
period of time.
B. Replace batteries with 4 "D" cell batteries. Load
batteries as outlined in diagram located on
inside battery compartment.
3. Loading replacement rolls: see step 5.
4. Should you wave your hand 2-3 times inside the
sensor range and not receive a towel, open
cover and check to see if the paper is properly
loaded.
Then check inside the paper chute to see
if there is a jam. If necessary, clear the jam and
load paper properly. Once completed, close the
cover and the dispenser should function normally.
STEP SIX
Adjusting Settings
1. The enMotion Dispenser's "Adjustable Sheet
Length" (ASL) system allows for adjustments in
the towel length. The ASL system is located
inside the cabinet just to the right of the sensor.
Sizes are:
• Left setting - “S” Short towel
(maximum number of hand dries)
• Middle setting - “M” Medium towel
(optimal hand dry capacity)
• Right setting - “L” Long towel
(largest available towel)
Note: The ASL system is pre-set at the “L” option.
To change setting, locate the ASL
system inside the cabinet just to the right
of the sensor.
2. The enMotion Dispenser's "Adjustable Time
Delay" (ATD) system allows towels to dispense
at different time intervals after a towel is
removed from the dispenser. Settings are:
• Left setting - Short Delay
• Middle setting - Medium Delay
• Right setting - Long Delay
Note: The ATD system is pre-set at short
delay. To change setting, locate the ATD
system inside the cabinet just to the right
of the sensor.
3. The enMotion Dispenser's "Adjustable
Dispense Mode Range" (ADMR) system allows
for adjustment in how the towel is presented to
the end user.
Settings are:
• "ODM" - On-Demand Mode (the towel will
feed from the cabinet after the user has
activated the sensor)
• "HM" - Hang Mode (the towel will always be
showing. After tearing off one towel, another
towel will present itself.)
Note: The ADMR system is pre-set on the
On-Demand Mode. To change setting,
locate the ADMR system inside the cabinet
just to the right of the sensor.
= Battery

Delta i konversationen om denna produkt
Här kan du dela vad du tycker om Lotus Professional enMotion Recessed Handduksautomat. Om du har en fråga, läs först noggrant igenom manualen. Att begära en manual kan göras genom att använda vårt kontaktformulär.