GB-1 GB-2 GB-3
UNPACKING
Remove all packaging from the unit. Retain the packaging. If you dispose of it
please do so according to local regulations.
The following items are included:
• The Main Unit
• The Water Hose (P.N.: K01-08001000001)
• The Instruction Manual (P.N.: L8DHW10-003)
If items are missing or damaged, please contact Partmaster (UK only).
Tel: 0844 800 3456 for assistance.
PRODUCT OVERVIEW
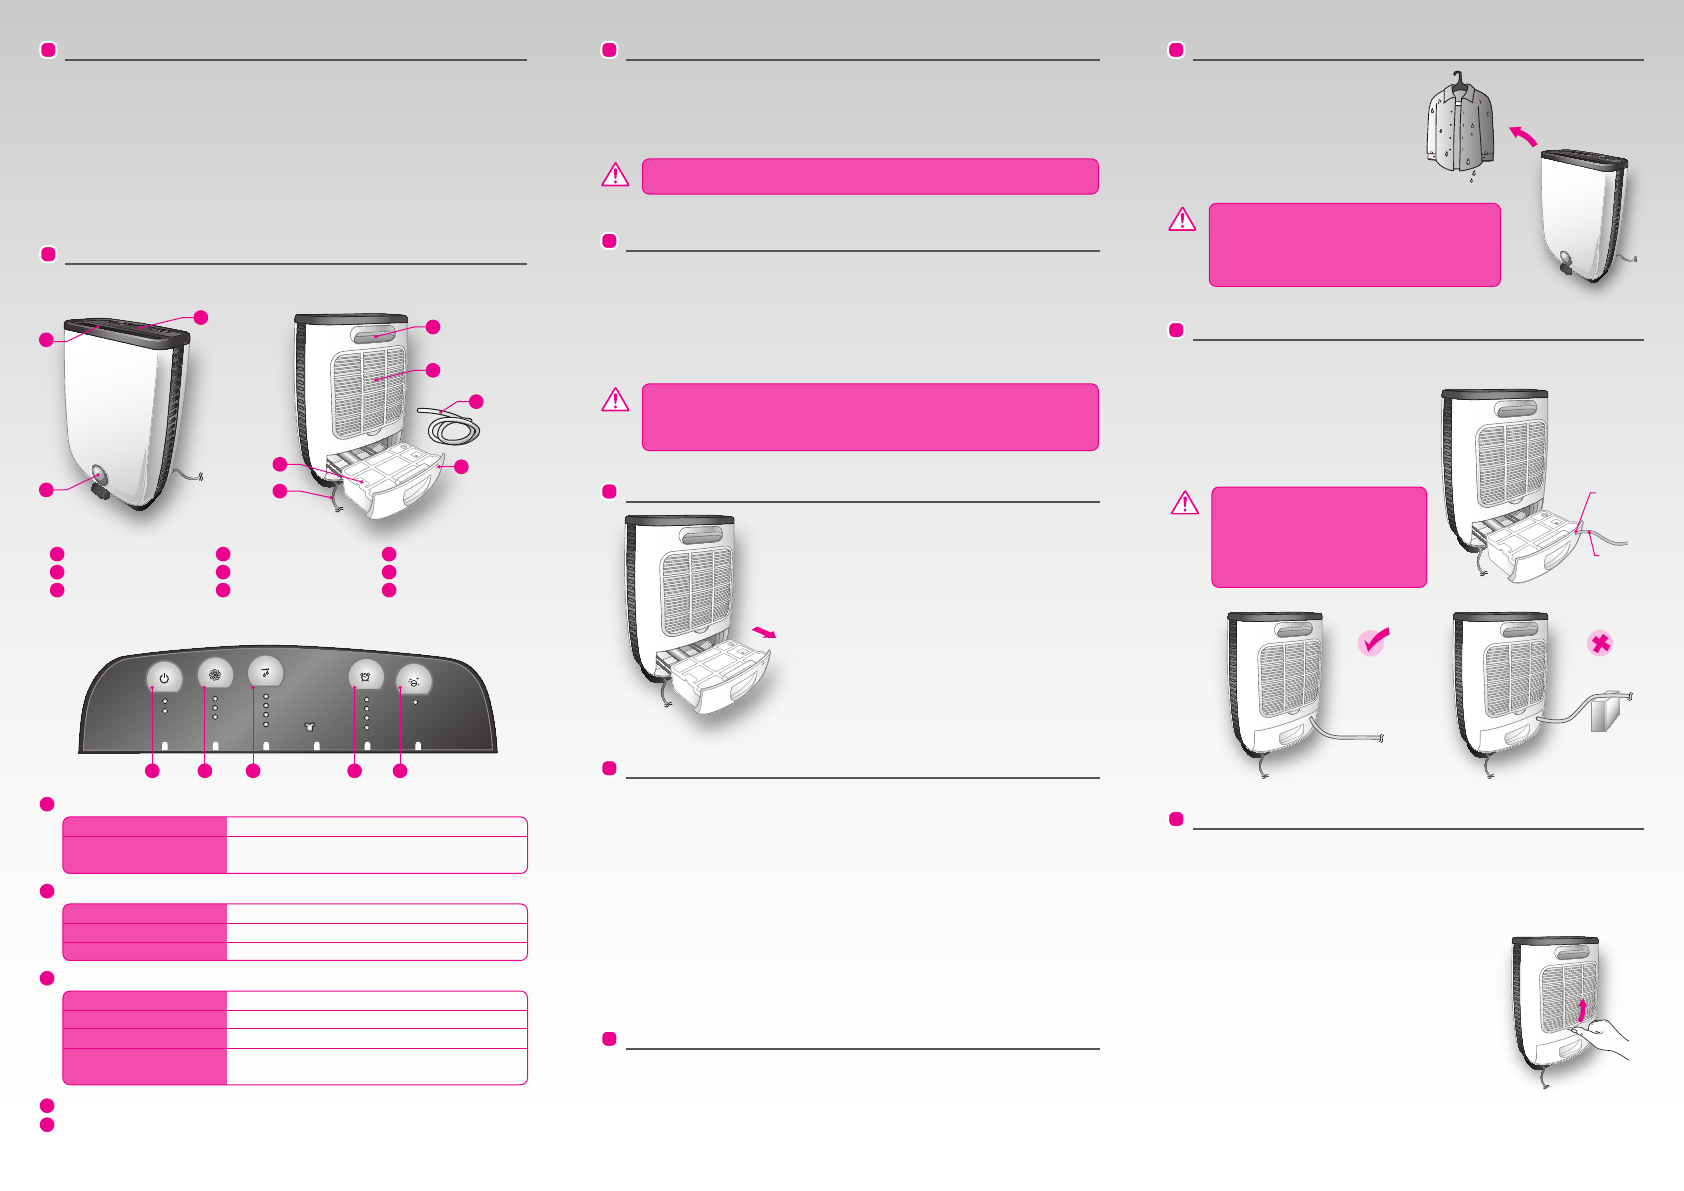
CONTINUOUS DRAINAGE
Water can be automatically emptied into a oor drain by attaching the unit with
a water hose (12mm).
• Insert the water hose into the drain
outlet as shown. Lead the hose to a
suitable drainage facility.
• Connect the unit to the mains socket and
continue operation.
CLOTHES DRYING
When the unit is used to dry your
clothes, press the HUMIDITY button to
CLOTHES DRYING mode which is the
highest dehumidication setting of the
unit. Put the unit near the wet clothes
and allow the dry air to blow towards
the wet clothes.
CLEANING & MAINTENANCE
Maintenance of your air lter
The air lter located inside the air inlet of the unit collects dust contained in the
air. The build up of dust reduces the efficiency of the unit. To prevent the dust
from clogging up the unit always use it with the air lter in place.
Always clean the air lter every 2 weeks. If the unit operates in a dusty
atmosphere clean the air lter more often.
• To remove the lter, pull up the plastic lip at the
bottom of the vents as shown.
• Clean the air lter with a vacuum cleaner. lf the air
lter is very dirty, you can wash it in warm water
(never use hot or soapy water). Make sure that the air
lter is retted correctly to the unit. Do not bend the
lter and ensure it is tted before operating the unit.
Cleaning the unit
• Clean the unit by using a damp sponge, and dry it with a clean, soft cloth.
• Never use alcohol or any product containing solvents.
• Do not immerse the unit in water.
BEFORE USE
1. Place on a stable, at oor. If the oor surface is not even:
• Vibration and noise will occur.
• Water may leak from the water tank
2. Make sure the air inlet and air outlet openings are clear and free from blockage.
OPERATION
1. Connect the unit to the mains socket. The units alarm will sound 3 times.
2. Press the ON/OFF button to turn the unit on. The indicators on the control panel
will illuminate to show the currently selected functions.
3. Select the desired functions by repeatedly pressing the relevant button.
4. Press the ON/OFF button to turn the unit off.
OVERHEAT PROTECTION
This unit has an overheat protection device. If the unit overheats, the ALARM
indicator will illuminate and the unit will shut down automatically.
Unplug the unit from the mains socket. After 5 minutes reconnect the unit to the
mains socket. Turn the unit on again and continue operation.
WATER TANK FULL
When the water tank is full, the alarm will sound 10
times. The WATER FULL indicator will illuminate and
the unit will automatically stop operating. Turn off the
unit and remove the water tank. Empty the water and
then ret the water tank back to the unit. Turn the
unit on again and continue operation.
The unit must stand upright for at least 2 hours prior to use.
When the unit is turned off, the motor will still keep running for 5-10
minutes. Do not unplug the unit unless the motor has stopped as this may
cause damage to the motor.
Do not put the unit directly under wet clothes
as the water from the clothes must not drip
down onto the unit. This may jeopardise the
unit or raise the risk of an electric shock.
When the hose is not being used,
remove the hose from the drain
outlet. The hose level must be
lower than the drain outlet, see
diagrams shown below.
Front View Rear View
Control Panel
1
2
3
4
5
6
7
8
9
1
ON /OF F
PO WER
TI MER
IO NIZ ER
HU MID IT Y
AL ARM
EC O
NO RMA L
TU RBO
40 %
50 %
60 %
CL OTH ES
DRY IN G
1H
ON
2H
4H
8H
WATER F UL L
1 2 3 4 5
Air Outlet
2
Water Level Window
3
Control Panel
4
1
Water Tank
5
Mains Cable
6
9
Handle
7
Air Intake
8
Drain Outlet Water Hose
ON/OFF button: To turn the unit on and off.
ALARM indicator : Illuminates when the unit is overheated.
WATER FULL indicator : Illuminates when the water tank is full or not in
place.
3
HUMIDITY button:
4
5
TIMER button: To select the auto shut off function (select from 1/2/4/8 hours.)
IONIZER button: To select the releasing negative ion function.
40% : Maintain room humidity at 40%.
50% : Maintain room humidity at 50%.
60%: Maintain room humidity at 60%.
CLOTHES DRYING : Continous dehumidication regardless of room
humidity.
2
POWER button:
ECO : Dehumidication with a low fan speed.
NORMAL : Dehumidication with a high fan speed.
TURBO : Dehumidication with the highest fan speed.
SUITABLE FOR USE IN
• Bedrooms • Studies
• Cellars / Basements • Kitchens
• Storage rooms • Libraries
• Galleries • Computer rooms
Protects moisture sensitive items, such as :
• Musical instruments • Cameras
• Computers
Benets:
• Prevents clothes and leather products from moulding.
• Dehumidies ooring and carpets.
• Prevents ceiling and windows from condensation.
• To obtain best results, try to avoid opening and closing windows and doors.
Water
Hose
Drain
Outlet
C
M
Y
CM
MY
CY
CMY
K
L8DHW10_IB_final110617.pdf 2 17/06/2011 11:43 AM


Delta i konversationen om denna produkt
Här kan du dela vad du tycker om Logik L8DHW10 Avfuktare. Om du har en fråga, läs först noggrant igenom manualen. Att begära en manual kan göras genom att använda vårt kontaktformulär.