
NL/BE
De verlichtingsmiddelen kun-
nen niet worden vervangen.
Mochten de verlichtingsmid-
delen aan het einde van hun
levensduur uitvallen, dient
het gehele product te worden
vervangen.
Vermijd levens-
gevaar door een
elektrische schok
Gebruik het product nooit
wanneer u enige beschadi-
ging heeft geconstateerd.
Als de externe flexibele lei-
ding van het product bescha-
digd is, mag deze alleen door
een speciaal kabel worden
vervangen, dat uitsluitend
verkrijgbaar is via de fabri-
kant of zijn service-punt.
Neem contact op met een
gekwalificeerde elektricien,
als u twijfels heeft met be-
trekking tot de installatie.
Vermijd per sé het contact
van het product met water
of andere vloeistoffen.
Controleer voor de montage,
of de ter beschikking staande
spanning overeen komt met
de benodigde bedrijfsspan-
ning van het product (230 V
~
(wisselstroom) 50 Hz).
Vermijd brand-
gevaar en kans
op letsel
Gebruik dit product niet met
dimmer en elektronische
schakelaar. Daar is het niet
voor geschikt.
Model HG01688
Bedrijfs-
spanning: 230 V
~
(wissel-
stroom) 50 Hz
Verlichtings-
middel: 20 x LED (LED‘s
kunnen niet wor-
den vervangen)
LED: 20 x 0,2 W
Nominaal
vermogen: 4,7 W
Beschermings-
klasse: II /
Q
Veiligheid
Veiligheids-
instructies
BEWAAR ALLE VEILIGHEIDS-
TECHNISCHE INSTRUCTIES
EN AANWIJZINGEN OM
DEZE EVENTUEEL LATER TE
KUNNEN RAADPLEGEN!
J Dit product kan door kinderen
vanaf 8 alsmede door per-
sonen met verminderde fy-
sieke, sensorische of mentale
vaardigheden of een gebrek
aan ervaring en kennis wor-
den gebruikt, als zij onder
toezicht staan of geïnstrueerd
werden met betrekking tot
het veilige gebruik van het
product en zij de hieruit voort-
vloeiende gevaren begrijpen.
Kinderen mogen niet met het
product spelen. Reiniging en
onderhoud mag niet door
kinderen zonder toezicht
worden uitgevoerd.
Bevestig het product niet op
een vochtige of geleidende
ondergrond.
Het product mag alleen met
de ingebouwde LED-rege-
laar worden gebruikt.
GB/IE
j Attach the product to the se-
cured mounting brackets
7
.
j Plug the connection cable
with mains plug
5
into the
socket for the connection
cable
2
.
j Plug the connection cable
with mains plug
5
into the
mains socket. Your product
is now ready for operation.
Q
Mounting
on a wall
j Use the mounting brackets
7
, screws
9
and dowels
8
for wall mounting instal-
lation.
j Measure up the wall or
mounting surface for drilling
the holes. Use a spirit level
to improve accuracy.
j Mark the two mounting
holes a distance of approx.
180 mm apart.
j Now drill the mounting holes
(ø approx. 6 mm, depth ap-
prox. 30 mm).
CAUTION! Make sure that
you do not damage any
electrical cables during this
operation.
j Insert the supplied dowels
8
into the drilled holes.
j Position the mounting bracket
7
according to the dowel
8
, then insert the supplied
screws
9
into the dowels
8
and tighten them.
j Attach the product to the se-
cured mounting brackets
7
.
j Plug the connection cable
with mains plug
5
into the
socket for the connection
cable
2
.
j Plug the connection cable
with mains plug
5
into the
mains socket. Your product
is now ready for operation.
damaged, it shall be replaced
by a special cord or cord
exclusively available from
the manufacturer or his
service agent.
J For installation, please con-
tact qualified electrician if
you have any doubt.
J Never let the product come
into contact with water or
other liquids.
J Before assembly, ensure that
the mains voltage available
corresponds to the operating
voltage necessary of the
product (230 V
~
(alternating
current) 50 Hz).
To avoid danger
of fire and injury
J Do not use this product for
dimmers or electronic
switches. It is not suitable
for these purposes.
Working safely
J Install the product so that it
is protected from moisture
and dirt.
Q
Installation and
operation
Q
Installing product
j Use the mounting brackets
7
and the screws
10
for
under cabinet installation.
j Mark the distance of 180 mm
for the two fixing holes. Drill
the holes: ø approx. 2mm,
approx. 15mm deep.
j Position the mounting brack-
ets
7
according to the
drilled holes and tighten the
screws
10
.
GB/IE GB/IE
Q
Safety
Safety advice
YOU SHOULD STORE ALL
SAFETY INFORMATION AND
INSTRUCTIONS IN A SAFE
PLACE IN CASE YOU NEED
TO REFER TO THEM AGAIN
IN THE FUTURE!
J This product can be used
by
children aged from 8 years
and above and persons with
reduced physical, sensory
or mental capabilities or lack
of experience and knowledge
if they have been given su-
pervision or instruction con-
cerning use of the product in
a safe way and understand
the hazards involved. Chil-
dren shall not play with the
product. Cleaning and user
maintenance shall not be
made by children without
supervision.
J Do not attach the product to
damp or conductive sub-
strates.
J The product may only be
used with the built-in LED
control gear.
The illuminants are not
replaceable.
If the illuminants fail at the
end of their life, the entire
product must be replaced.
To avoid danger
to life from
electric shock
J Never use your product if
you discover that it is dam-
aged in any way.
J If the external flexible cable
or cord of this product is
Q
Montage und
Inbetriebnahme
Q
Produkt
montieren
j Verwenden Sie für die
Unterbaumontage die
Montagebügel
7
und
die Schrauben
10
.
j Markieren Sie den Abstand
von 180 mm für die beiden
Befestigungslöcher. Bohren
Sie die Löcher, ø ca. 2 mm,
ca. 15 mm tief.
j Platzieren Sie die Montage-
bügel
7
entsprechend der
Bohrlöcher und schrauben
Sie die Schrauben
10
fest.
j Bringen Sie das Produkt an
den gesicherten Montage-
bügeln
7
an.
j Stecken Sie das Anschluss-
kabel mit Netzstecker
5
in
die Steckdose für Anschluss-
kabel
2
.
j Stecken Sie das Anschluss-
kabel mit Netzstecker
5
in
die Netzsteckdose. Das Pro-
dukt ist nun betriebsbereit.
Q
Wandmontage
j Benutzen Sie zur Wand-
montage die Montagebügel
7
, Schrauben
9
und
Dübel
8
.
j Vermessen Sie die Wand
bzw. Montagefläche für die
Bohrungen. Verwenden Sie
zur genauen Ausrichtung
eine Wasserwaage.
j Markieren Sie den Abstand
von ca. 180 mm für die bei-
den Befestigungslöcher.
j Bohren Sie nun die Befesti-
gungslöcher (ø ca. 6 mm,
Tiefe ca. 30 mm).
DE/AT/CH
7
Mounting bracket
8
Dowel
9
Screw for wall mounting
10
Screw for under cabinet
installation
Q
Scope of delivery
1 LED under-cabinet light
2 Mounting brackets
2 Dowels
2 Screws for wall mounting
2 Screws for under-cabinet
installation
1 Connecting lead with mains
plug
1 Extension connector (for
HG01688 only)
1 Protective cap (pre-installed)
(for HG01688 only)
1 Installation instruction
Q
Technical data
Model Z31858
Operating voltage:
230 V
~
(alter-
nating current)
50 Hz
Lamps: 18
power
LED (LED
cannot be
replaced)
LED: 18 x 0.3 W
Nominal power: 7 W
Protection
category: II /
Model HG01688
Operating voltage:
230 V
~
(alternating
current)
50 Hz
Lamps: 20 x LED
(LED cannot
be replaced)
LED: 20 x 0.2 W
Nominal power: 4.7 W
Protection
category: II /
GB/IE
5
Câble de raccordement
avec prise secteur
6
Câble de rallonge (modèle
HG01688
uniquement)
7
Arceau de montage
8
Cheville
9
Vis pour le montage mural
10
Vis pour le montage sous
placard
Q
Contenu de la
livraison
1 lampe sous meuble à LED
2 étriers de montage
2 chevilles
2 vis pour le montage mural
2 vis pour le montage de la
lampe sous meuble
1 câble de raccordement avec
prise secteur
1 câble de rallonge (modèle
HG01688 uniquement)
1 cache de protection (pré-ins-
tallé) (sur modèle HG01688
uniquement)
1 notice de montage
Q
Données
techniques
Modèle Z31858
Tension de
service : 230 V
~
(cou-
rant alternatif)
50 Hz
Ampoules : 18 power LED
(LED non rem-
plaçables)
LED : 18 x 0,3 W
Puissance
nominale : 7 W
Classe de
protection : II /
Modèle HG01688
Tension de
service : 230 V
~
(cou-
rant alternatif)
50 Hz
5
Aansluitkabel met stroom-
stekker
6
Uitbreidingsaansluiting
(alleen voor model
HG01688
)
7
Montagebeugel
8
Plug
9
Schroef voor wandmontage
10
Schroef voor onderbouw-
montage
Q
Inhoud van
de levering
1 LED-onderbouwlamp
2 montagebeugels
2 pluggen
2 schroeven voor de
wandmontage
2 schroeven voor de montage
van de onderbouwlamp
1 aansluitkabel met stekker
1 uitbreidingsaansluiting (alleen
voor model HG01688)
1 beschermdop (reeds geïnstal-
leerd) (alleen voor model
HG01688)
1 montagehandleiding
Q
Technische
gegevens
Model Z31858
Bedrijfs-
spanning: 230 V
~
(wissel-
stroom) 50 Hz
Verlichtings-
middel: 18 power-LED‘s
(LED‘s kunnen
niet worden
vervangen)
LED: 18 x 0,3 W
Nominaal
vermogen: 7 W
Beschermings-
klasse: II /
NL/BE NL/BE
Warranty
The product has been manufac-
tured to strict quality guidelines
and meticulously examined before
delivery. In the event of product
defects you have legal rights
against the retailer of this product.
Your legal rights are not limited
in any way by our warranty
detailed below.
The warranty for this product is
3 years from the date of purchase.
Should this product show any
fault in materials or manufacture
within 3 years from the date of
purchase, we will repair or re-
place it – at our choice – free
of charge to you.
The warranty period begins on
the date of purchase. Please
keep the original sales receipt in
a safe location. This document is
required as your proof of purchase
.
This warranty becomes void if
the product has been damaged,
or used or maintained improperly.
The warranty applies to defects
in material or manufacture. This
warranty does not cover product
parts subject to normal wear, thus
possibly considered consumables
(e.g. batteries) or for damage to
fragile parts, e.g. switches, rechar-
geable batteries or glass parts.
Réglette à LED
Introduction
Nous vous félicitons pour l‘achat
de votre nouveau produit. Vous
avez opté pour un produit de
grande qualité. Le mode d‘em-
ploi fait partie intégrante de ce
produit. Il contient des indications
importantes pour la sécurité,
l’utilisation et la mise au rebut.
Veuillez lire consciencieusement
toutes les indications d‘utilisation
et de sécurité du produit. Ce pro-
duit doit uniquement être utilisé
conformément aux instructions
et dans les domaines d‘applica-
tion spécifiés. Lors d‘une cession
à tiers, veuillez également remettre
tous les documents.
Q
Utilisation
conforme
Le produit est destiné
à servir d’éclairage,
et au montage sur
des meubles. Il peut également
être monté aux murs. Le produit
doit uniquement être utilisé dans
des pièces sèches. Les ampoules
ne peuvent pas être remplacées.
Le produit peut être fixé sur toutes
les surfaces normalement inflam-
mables. Ce produit est destiné
uniquement à un usage domes-
tique privé en intérieur.
Q
Descriptif des
pièces
1
Commutateur MARCHE /
ARRÊT
2
Prise femelle pour le câble
de raccordement
3
LED
4
Cache de protection
(pré-installé) (sur modèle
HG01688 uniquement)
fluids or be immersed in water.
When cleaning, only use a dry,
lint-free cloth.
Q
Disposal
The packaging is
made entirely of recy-
clable materials, which
you may dispose of at local re-
cycling facilities. The Green Dot
is not valid for Germany.
b
a
Observe the marking
of the packaging
materials for waste
separation, which are marked
with abbreviations (a) and num-
bers (b) with following meaning:
1–7: plastics / 20–22: paper
and fibreboard / 80–98: com-
posite materials.
The product and
packaging materials
are recyclable, dispose
of it separately for better waste
treatment. The Triman logo is
valid in France only.
Contact your local
refuse disposal
authority for more
details of how to dispose of
your worn-out product.
To help protect the
environment, please
dispose of the product
properly when it has reached
the end of its useful life and not
in the household waste. Informa-
tion on collection points and
their opening hours can be ob-
tained from your local authority.
NL/BEFR/BEFR/BE
MARCHE / ARRÊT
1
, pour
allumer ou éteindre le pro-
duit.
Q
Maintenance et
nettoyage
Laissez le produit complètement
refroidir.
DANGER DE MORT PAR
ÉLECTROCUTION ! Avant tout
travail sur le produit, l‘éteindre et
le débrancher de la prise.
DANGER DE MORT PAR
ÉLECTROCUTION ! Pour des
raisons de sécurité électrique, il
est interdit de nettoyer le produit
à l‘eau ou avec d‘autres liquides
ou encore de la plonger dans de
l‘eau. Pour le nettoyage, utilisez
uniquement un chiffon propre et
sec.
Mise au rebut
L’emballage se com-
pose de matières
recyclables pouvant
être mises au rebut dans les
déchetteries locales. Le «point
vert» n‘est pas valable en Alle-
magne.
b
a
Veuillez respecter
l‘identification des
matériaux d‘embal-
lage pour le tri sélectif, ils sont
identifiés avec des abbréviations
(a) et des chiffres (b) ayant la
signification suivante : 1–7 :
plastiques / 20–22 : papiers et
cartons / 80–98 : matériaux
composite.
Le produit et les ma-
tériaux d’emballage
sont recyclables,
mettez-les au rebut séparément
pour un meilleur traitement des
déchets. Le logo Triman n’est
valable qu’en France.
Votre mairie ou votre
municipalité vous
renseigneront sur les
possibilités de mise au rebut des
produits usagés.
Afin de contribuer à
la protection de l’en-
vironnement, veuillez
ne pas jeter votre produit usagé
dans les ordures ménagères, mais
éliminez-le de manière appropriée
.
Pour obtenir des renseignements
concernant les points de collecte
et leurs horaires d’ouverture, vous
pouvez contacter votre munici-
palité.
Garantie
Le produit a été fabriqué selon
des critères de qualité stricts et
contrôlé consciencieusement
avant sa livraison. En cas de dé-
faillance, vous êtes en droit de
retourner ce produit au vendeur.
La présente garantie ne constitue
pas une restriction de vos droits
légaux.
Ce produit bénéficie d‘une ga-
rantie de 3 ans à compter de sa
date d’achat. La durée de ga-
rantie débute à la date d’achat.
Veuillez conserver le ticket de
caisse original. Il fera office de
preuve d’achat.
Si un problème matériel ou de
fabrication devait survenir dans
3 ans suivant la date d‘achat de
ce produit, nous assurons à notre
discrétion la réparation ou le
remplacement du produit sans
frais supplémentaires. La garan-
tie prend fin si le produit est en-
dommagé suite à une utilisation
inappropriée ou à un entretien
défaillant.
La garantie couvre les vices ma-
tériels et de fabrication. Cette
garantie ne s’étend ni aux pièces
du produit soumises à une usure
normale (p. ex. des piles) et qui,
par conséquent, peuvent être
considérées comme des pièces
d’usure, ni aux dommages sur
des composants fragiles, comme
des interrupteurs, des batteries
ou des éléments fabriqués en
verre.
introduisez ensuite les vis
fournies
9
dans les che-
villes
8
et vissez.
j Montez le produit à l‘arceau
de fixation
7
déjà fixé.
j Branchez le câble de rac-
cordement muni de la fiche
secteur
5
sur la prise
2
.
j Branchez le câble de rac-
cordement muni de la fiche
secteur
5
sur la prise. Le
produit est maintenant prêt
à fonctionner.
Rallonge (voir
illustration A)
j Remarque : Veillez à bran-
cher ensemble un nombre
maximum de 3 réglettes de
même type (uniquement
pour modèle HG01688)
par l’intermédiaire d’une
même prise de courant. Ne
branchez qu‘une seule lampe
du même type. Ne raccor-
dez pas de lampe d‘un type
différent à ce produit.
j Retirez le cache de protection
(pré-installé)
4
. Connectez
les deux réglettes au moyen
du câble de rallonge
6
avec
la prise
2
. Ensuite, vous
avez uniquement besoin d‘un
câble de raccordement
5
pour l’alimentation électrique.
j ATTENTION! Assurez-vous
que l’ensemble des réglettes
lumineuses soient d’abord
reliées entre elles à l’aide
du câble de rallonge
6
avant de brancher le cor-
don secteur dans la prise.
Q
Mise en service
j Appuyez à nouveau sur l‘in-
terrupteur
Q
Montage et mise
en service
Q
Montage du
produit
j Pour le montage sous meuble,
utilisez l‘arceau de fixation
7
et les vis
10
.
j Marquez un écart de
180 mm pour les deux trous
de fixation. Percez des trous
d‘un ø d’env. 2 mm et d‘une
profondeur d‘env. 15 mm.
j Placez l‘arceau de fixation
7
en fonction des trous et
serrez les vis
10
.
j Montez le produit à l‘arceau
de fixation
7
déjà fixé.
j Branchez le câble de rac-
cordement muni de la fiche
secteur
5
sur la prise
2
.
j Branchez le câble de rac-
cordement muni de la fiche
secteur
5
sur la prise. Le
produit est maintenant prêt
à fonctionner.
Montage mural
Pour le montage au mur,
utilisez l‘arceau de fixation
7
, les vis
9
et chevilles
8
.
Mesurez le mur ou la sur-
face de montage pour les
trous. Pour un alignement
précis, utilisez un niveau à eau.
Marquez un écart d‘env.
180mm entre les deux trous
de fixation.
Percez à présent les trous
de fixation (ø env. 6mm,
profondeur env. 30mm).
ATTENTION! Veillez à ne
pas endommager de ligne
électrique.
Introduisez les chevilles
fournies
8
dans les trous.
Placez l‘arceau de fixation
7
en fonction des chevilles;
produit doit alors être rem-
placé.
Prévention de
risques mortels
par électrocution
N’utilisez jamais le produit
si vous constatez le moindre
endommagement.
Si le câble flexible externe
du produit est endommagé,
il doit uniquement être rem-
placé par un câble spécial,
exclusivement disponible
auprès du fabricant ou d’un
de ses représentants agréés.
Adressez-vous à un électricien
qualifié, en cas de doute
quant à l‘installation.
Évitez impérativement tout
contact du produit avec de
l‘eau ou d‘autres liquides.
Avant le montage, vérifiez
que la tension secteur cor-
responde à la tension de
service requise du produit
(230 V
~
(courant alternatif)
50 Hz).
Prévention de
risque d‘incendies
et de blessures
N’utilisez pas ce produit
pour des variateurs ni des
commutateurs électroniques.
Il n‘est pas adapté à cet
usage.
Conduite
à tenir
Montez le produit de telle
sorte qu‘il soit protégé de
l‘humidité et des salissures.
GB/IEDE/AT/CH
LED under-cabinet light
Introduction
We congratulate you on the
purchase of your new product.
You have chosen a high quality
product. The instructions for use
are part of the product. They
contain important information
concerning safety, use and dis-
posal. Before using the product,
please familiarise yourself with
all of the safety information and
instructions for use. Only use the
product as described and for
the specified applications. If you
pass the product on to anyone
else, please ensure that you also
pass on all the documentation
with it.
Q
Proper use
The product is in-
tended for providing
illumination and for
mounting on furniture. The prod-
uct can also be mounted on walls.
The product may only be used
indoors in dry rooms. The lamps
cannot be
replaced. The
product
can be mounted
on all normally
flammable surfaces. This product
is intended for indoor use only in
a domestic, private household
environment.
Q
Description of
parts and features
1
ON/OFF switch
2
Socket for connecting lead
3
LED
4
Protective cap (pre-installed)
(for Model HG01688 only)
5
Connecting lead with mains
plug
6
Extension connector (for
Model HG01688 only)
Kaufdatum. Bitte bewahren Sie
den Original-Kassenbon gut auf.
Diese Unterlage wird als Nach-
weis für den Kauf benötigt.
Tritt innerhalb von 3 Jahren ab
dem Kaufdatum dieses Produkts
ein Material- oder Fabrikations-
fehler auf, wird das Produkt von
uns – nach unserer Wahl –
für
Sie kostenlos repariert oder ersetzt.
Diese Garanti
e verfällt, wenn das
Produkt beschädigt, nicht sach-
gemäß benutzt oder gewartet
wurde.
Die Garantieleistung gilt für
Material- oder Fabrikationsfehler.
Diese Garantie erstreckt sich
nicht auf
Produktteile, die normaler
Abnutzung ausgesetzt
sind (z. B.
Batterien) und daher als Ver-
schleißteile angesehen werden
können oder für Beschädigungen
an zerbrechlichen Teilen, z. B.
Schalter, Akkus oder die aus
Glas gefertigt sind.
FR/BEFR/BEFR/BE
DE/AT/CH DE/AT/CHDE/AT/CHDE/AT/CH
FR/BEFR/BEFR/BEFR/BEGB/IEGB/IEGB/IE
DE/AT/CHDE/AT/CHDE/AT/CH
Q
Sicherheit
Sicherheits-
hinweise
BEWAHREN SIE ALLE
SICHERHEITS HINWEISE UND
ANWEISUNGEN FÜR DIE
ZUKUNFT AUF!
J Dieses Produkt kann von
Kin-
dern ab 8 Jahren und darüber
sowie von Personen mit ver-
ringerten physischen, senso-
rischen oder mentalen
Fähigkeiten oder Mangel an
Erfahrung und Wissen benutzt
werden, wenn sie beaufsichtigt
oder bezüglich des sicheren
Gebrauchs des Produktes un-
terwiesen wurden und die da-
raus resultierenden Gefahren
verstehen. Kinder dürfen nicht
mit dem Produkt spielen. Rei-
nigung und Benutzerwartung
dürfen nicht von Kindern
ohne Beaufsichtigung durch-
geführt werden.
Befestigen Sie das Produkt
nicht auf feuchtem oder
leitendem Untergrund.
Das Produkt darf nur mit der
eingebauten LED-Regelvor-
richtung betrieben werden.
Die Leuchtmittel sind nicht
austauschbar.
Sollten die Leuchtmittel am
Ende ihrer Lebensdauer
ausfallen, muss das ganze
Produkt ersetzt werden.
Vermeiden Sie
Lebensgefahr
durch elektrischen
Schlag
Benutzen Sie das Produkt
niemals, wenn Sie
Extensions (See Fig. A)
j Note: Ensure that no more
than 3 under-cabinet lights of
the same type (for model
HG01688 only) are con-
nected together in series.
Connect only same type of
lamp only. Don’t connect
other type of lamp with this
product.
j Remove the protective cap
(pre-installed)
4
. Connect
the two under-cabinet lights
to the socket
2
using the
extension connector
6
.
Then you only need one
connection lead
5
for the
power supply.
j CAUTION! First ensure that
all the under-cabinet lights
are connected by an exten-
sion connector
6
before
you insert the mains lead
into the mains socket.
Q
Operation
j Press the ON / OFF switch
1
to turn the product on /
off.
Q
Maintenance and
Cleaning
Allow the product to cool down
completely.
DANGER
TO LIFE FROM
ELECTRIC
SHOCK! Before carrying out
any tasks on the product, switch
off the product and disconnect
the plug from the mains socket.
DANGER
TO LIFE FROM
ELECTRIC
SHOCK! For reasons of electrical
safety, the product must never be
cleaned with water or other
Unterbauleuchten mittels
Erweiterungsanschluss
6
verbunden sein müssen, be-
vor Sie das Netzkabel in
die Steckdose stecken.
Q
Inbetriebnahme
j Drücken Sie den EIN / AUS-
Schalter
1
, um das Produkt
ein- bzw. auszuschalten.
Q
Wartung und
Reinigung
Lassen Sie das Produkt vollstän-
dig ab kühlen.
LEBENS-
GEFAHR DURCH STROM-
SCHLAG! Schalten Sie vor allen
Arbeiten an dem Produkt dieses
aus und ziehen Sie den Netzste-
cker aus der Steckdose.
LEBENS-
GEFAHR DURCH STROM-
SCHLAG! Aus Gründen der
elektrischen Sicherheit darf das
Produkt niemals mit Wasser oder
anderen Flüssigkeiten gereinigt
oder gar in Wasser getaucht
werden. Verwenden Sie zur
Reinigung nur ein trockenes
fusselfreies Tuch.
Q
Entsorgung
Die Verpackung be-
steht aus umweltfreund-
lichen Materialien
, die
Sie über die örtlichen Recycling-
stellen entsorgen können. Der
Grüne Punkt gilt nicht für
Deutschland.
b
a
Beachten Sie die Kenn-
zeichnung
der Verpa-
ckungsmaterialien bei
der Abfalltrennung, diese sind
gekennzeichnet mit Abkürzungen
(a) und Nummern (b) mit fol-
gender Bedeutung: 1–7: Kunst-
stoffe / 20–22: Papier und
Pappe / 80–98: Verbundstoffe.
Das Produkt und die
Verpackungsmateria-
lien sind recycelbar,
entsorgen Sie diese getrennt für
eine bessere Abfallbehandlung.
Das Triman-Logo gilt nur für
Frankreich.
Möglichkeiten zur
Entsorgung des aus-
gedienten Produkts
erfahren Sie bei Ihrer Gemeinde-
oder Stadtverwaltung.
Werfen Sie Ihr Pro-
dukt, wenn es ausge-
dient hat, im Interesse
des Umweltschutzes nicht in den
Hausmüll, sondern führen Sie es
einer fachgerechten Entsorgung
zu. Über Sammelstellen und deren
Öffnungszeiten können Sie sich
bei Ihrer zuständigen Verwaltung
informieren.
Garantie
Das Produkt wurde nach strengen
Qualitätsrichtlini
en sorgfältig
produziert und vor Anlieferung
gewissenhaft geprüft. Im Falle
von Mängeln dieses Produkts
stehen Ihnen gegen den Verkäufer
des Produkts gesetzliche Rechte
zu. Diese gesetzlichen Rechte
werden durch unsere im Folgen-
den dargestellte Garantie nicht
eingeschränkt.
Sie erhalten auf dieses Produkt
3 Jahre Garantie ab Kaufdatum.
Die Garantiefrist beginnt mit dem
VORSICHT! Stellen Sie
sicher, dass Sie keine Zulei-
tung beschädigen.
j Führen Sie die beigefügten
Dübel
8
in die Bohrlöcher
ein.
j Platzieren Sie die Montage-
bügel
7
den Dübeln ent-
sprechend; führen Sie
anschließend die beigefügten
Schrauben
9
in die Dübel
8
ein und schrauben Sie
sie fest.
j Bringen Sie das Produkt an
den gesicherten Montage-
bügel
7
an.
j Stecken Sie das Anschluss-
kabel mit Netzstecker
5
in
die Steckdose für Anschluss-
kabel
2
.
j Stecken Sie das Anschluss-
kabel mit Netzstecker
5
in
die Netzsteckdose. Das Pro-
dukt ist nun betriebsbereit.
Erweiterung (siehe Abb. A)
j Hinweis: Achten Sie
darauf, dass Sie nur maximal
3 Unterbauleuchten des
gleichen Typs (nur für
Modell HG01688) über
eine Steckdose zusammen-
schalten. Schließen Sie nur
eine Lampe gleichen Typs
an. Schließen Sie keine an-
dere Art von Lampe an
dieses Produkt an.
j Entfernen Sie die Schutz-
kappe
(vorinstalliert)
4
.
Verbinden Sie die beiden
Unterbauleuchten mittels Er-
weiterungsanschluss
6
mit
der Steckdose
2
. Sie be-
nötigen dann für die Strom-
versorgung nur ein
Anschlusskabel
5
.
j VORSICHT! Achten Sie
darauf, das erst alle
irgendwelche Beschädigun-
gen feststellen.
Wenn die äußere flexible
Leitung des Produktes be-
schädigt ist, darf sie nur
durch eine spezielle Leitung
ersetzt werden, die aus-
schließlich über den Hersteller
oder seinen Servicevertreter
erhältlich ist.
Wenden Sie sich an einen
qualifizierten Elektriker, wenn
Sie bei der Installation
irgendwelche Zweifel haben.
Vermeiden Sie unbedingt
die Berührung des Produkts
mit Wasser oder anderen
Flüssigkeiten.
Vergewissern Sie sich vor
der Montage, dass die vor-
handene Netzspannung mit
der benötigten Betriebs-
spannung des Produkts
übereinstimmt (230 V
~
(Wechselstrom) 50 Hz).
Vermeiden Sie
Brand- und Ver-
letzungsgefahr
Verwenden Sie dieses Pro-
dukt nicht für Dimmer und
elektronische Schalter. Es ist
dafür nicht geeignet.
So verhalten
Sie sich richtig
Montieren Sie das Produkt
so, dass es vor Feuchtigkeit
und Verschmutzung geschützt
ist.
6
Erweiterungsanschluss (
nur
für
Model HG01688)
7
Montagebügel
8
Dübel
9
Schraube für Wandmontage
10
Schraube für Unterbau-
montage
Q
Lieferumfang
1 LED-Unterbauleuchte
2 Montagebügel
2 Dübel
2 Schrauben für die
Wandmontage
2 Schrauben für die Montage
der Unterbauleuchte
1 Anschlusskabel mit Netzstecker
1 Erweiterungsanschluss (nur für
Model HG01688)
1 Schutzkappe (vorinstalliert)
(nur für Model HG01688)
1 Montageanleitung
Q
Technische Daten
Model Z31858
Betriebsspannung: 230 V
~
(Wechsel-
strom) 50 Hz
Leuchtmittel: 18 Power-LED
(LED kann nicht
ausgetauscht
werden)
LED: 18 x 0,3 W
Nennleistung: 7 W
Schutzklasse: II /
Model HG01688
Betriebsspannung: 230 V
~
(Wechsel-
strom) 50 Hz
Leuchtmittel: 20 x LED
(LED kann nicht
ausgetauscht
werden)
LED: 20 x 0,2 W
Nennleistung: 4,7 W
Schutzklasse: II /
LED-Unterbauleuchte
Einleitung
Wir beglückwünschen Sie zum
Kauf Ihres neuen Produkts. Sie
haben sich damit für ein hoch-
wertiges Produkt entschieden.
Die Bedienungsanleitung ist Teil
dieses Produkts. Sie enthält
wichtige Hinweise für Sicherheit,
Gebrauch und Entsorgung. Ma-
chen Sie sich vor der Benutzung
des Produkts mit allen Bedien-
und Sicherheitshinweisen vertraut.
Benutzen Sie das Produkt nur wie
beschrieben und für die ange-
gebenen Einsatzbereiche. Hän-
digen Sie alle Unterlagen bei
Weitergabe des Produkts an
Dritte mit aus.
Q
Bestimmungsge-
mäße Verwendung
Das Produkt ist für
Beleuchtungszwecke
und zur Montage an
Möbeln vorgesehen. Es kann
ebenso
an Wänden montiert
werden. Das
Produkt darf nur in
trockenen Innenräumen verwen
-
det werden. Leucht
mittel
können
nicht ausgetauscht werden. Das
Produkt kann
auf allen
normal
entflammbaren Oberflächen be-
festigt werden. Dieses Produkt ist
nur für den Einsatz im Innenraum
in privaten Haushalten vorgesehen.
Q
Teilebeschreibung
1
EIN- / AUS-Schalter
2
Steckdose für Anschlusskabel
3
LED
4
Schutzkappe (vorinstalliert)
(nur für Model
HG01688
)
5
Anschlusskabel mit
Netzstecker
Ampoules : 20 x LED (LED
non rempla-
çables)
LED : 20 x 0,2 W
Puissance
nominale : 4,7 W
Classe de
protection : II /
Q
Sécurité
Consignes de
sécurité
CONSERVEZ POUR L’AVENIR
L’ENSEMBLE DES INSTRUC-
TIONS DE SÉCURITÉ ET INS-
TRUCTIONS !
J Ce produit peut être utilisé
par des enfants âgés de
8 ans et plus ainsi que par
des personnes ayant des
capacités physiques, senso-
rielles ou mentales réduites
ou manquant d‘expérience
ou de connaissances, s‘ils
sont surveillés ou s‘ils ont été
informés de l‘utilisation sûre
du produit et comprennent
les risques liés à son utilisa-
tion. Les enfants ne doivent
pas jouer avec le produit. Le
nettoyage et l‘entretien de
l’appareil ne doivent pas être
effectués par des enfants
laissés sans surveillance.
Ne fixez pas le produit sur
un support humide ou
conducteur de courant.
Le produit doit être uniqu-
ement utilisé avec le disposi-
tif de contrôle LED inclus.
Les ampoules ne sont pas
remplaçables.
Si les ampoules arrivent en
fin de vie, l‘ensemble du
LED-onderbouw-
verlichting
Inleiding
Hartelijk gefeliciteerd met de
aankoop van uw nieuwe product.
U heeft voor een hoogwaardig
product gekozen. De gebruiks-
aanwijzing is een deel van het
product. Deze bevat belangrijke
aanwijzingen voor veiligheid,
gebruik en verwijdering. Maakt
U zich voor de ingebruikname
van het product met alle bedie-
nings- en veiligheidsvoorschriften
vertrouwd. Gebruik het appa-
raat alleen zoals beschreven en
voor de aangegeven toepas-
singsgebieden. Overhandig alle
documenten bij doorgifte van
het product aan derden.
Correct gebruik
Het product is bestemd
voor verlichtingsdoel-
einden en voor de
montage aan meubels. Maar het
kan eveneens aan wanden
wor-
den gemonteerd. Het product mag
alleen in droge ruimtes binnens-
huis worden gebruikt. De lampen
kunnen niet worden vervangen.
Het product kan op alle normaal
ontvlambare oppervlakken be-
vestigd worden. Dit product is
bestemd voor het gebruik bin-
nenshuis in privé-huishoudens.
Beschrijving van
de onderdelen
1
AAN- / UIT-schakelaar
2
Aansluiting voor aansluitkabel
3
LED
4
Beschermkap (reeds geïn-
stalleerd) (alleen voor model
HG01688
)
LED UNDER-CABINET
LIGHT
Assembly, operating and
safety instructions
LED-UNTERBAULEUCHTE
Montage-, Bedienungs- und
Sicherheitshinweise
LED-UNTERBAULEUCHTE /
LED UNDER-CABINET LIGHT /
RÉGLETTE À LED
REGLETA BAJO MUEBLE
CON LEDES
Instrucciones de montaje,
de uso y de seguridad
ARMADURA DE LED
Indicações de montagem,
utilização e segurança
LED-ONDERBOUW-
VERLICHTING
Montage-, bedienings- en
veiligheidsinstructies
RÉGLETTE À LED
Instructions de montage,
d‘utilisation et consignes de sécurité
IAN 277855
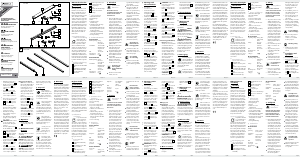
A
3
1
8
2 x
9
2 x
5
7
2 x
10
2 x
2
3
8
2 x
9
2 x
10
2 x
7
2 x
5
61 4
64
2
Z31858
HG01688
HG01688
LED SVÍTIDLO
Pokyny k montáži, obsluze
a bezpečnostní pokyny


Delta i konversationen om denna produkt
Här kan du dela vad du tycker om LivarnoLux IAN 277855 Lampa. Om du har en fråga, läs först noggrant igenom manualen. Att begära en manual kan göras genom att använda vårt kontaktformulär.