Bruksanvisning Lasko 3138 Fläkt

Behöver du en bruksanvisning för din Lasko 3138 Fläkt? Nedan kan du se och ladda ner PDF-bruksanvisningen gratis på svenska. Den här produkten har för närvarande 2 vanliga frågor, 0 kommentarer och har 0 röster. Om det här inte är bruksanvisningen du vill ha, vänligen kontakta oss.

Är produkten defekt och erbjuder bruksanvisningen ingen lösning? Gå till ett Repair Café för gratis reparationstjänster.
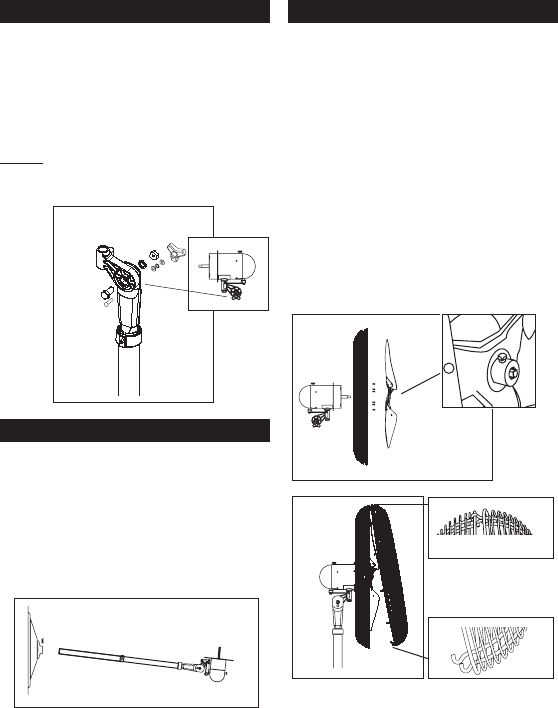
Bruksanvisning

Loading…

Locate Motor Hardware Bag to Assemble Column and Motor Assembly.
1. Place flat section on Upper Tube of Column Assembly next to
Neck on Motor Assembly. Align the 1/2” diameter hole in the
flat section on the Upper Tube of Column Assembly with the
1/2” diameter hole in the Motor Assembly. (Figure 4)
2. Insert the 1/2” X 1Hex Bolt (3/4” head) through the Motor
Neck, and the Upper Tube Assembly. Place 1/2” diameter Split
Lockwasher then the 1/2” diameter Hex Nut (3/4” head) and
tighten fully with a adjustable wrench. (Figure 4)
3. From the same side of the Motor Neck,insert one 1/4-20 X 1 5/8”
Carriage Bolt through the Arc-Shaped Slot in the Motor Neck
and Hole in the Upper Pipe of Column Assembly. (Figure 4)
To Fasten: Place one 1/4” Flatwasher, one 1/4” Internal Tooth Lock-
washer, a second 1/4” Flatwasher and then tighten the Adjustable
Knob over the remaining threads.
4. Attach pull string to motor speed switch, if desired.
Rev. E 8/10 4
5084445
Locate remaining parts from Motor Hardware Bag to Assemble
Grills and Blade to the Motor.
1. Install the Rear Grill onto the Motor, lining up the six holes in the
grill with the six threaded holes in the motor mounting flange.
Install (6) 10-32 X 5/16” Hex Screws through the rear grill into
the mounting flange. Securely tighten all (6) screws. (Figure 6)
2. Push the Fan Blade onto the Motor Shaft, centering the Hub
facing away from the motor, until it stops against the shaft
(Inset A) . Align Square Head Bolt with flat of the motor shaft.
TIGHTEN VERY SECURELY WITH AN ADJUSTABLE WRENCH.
Failure to securely tighten the Bolt could result in damage to
the Fan and/or personal injury.
3. Hold the Front Grill so that the name, in the center, is right side
up and straight across. Starting at the top: Fasten Front Grill
to Rear Grill by sliding the hooked wires on the Front Grill over
the outermost ring on the Rear Grill. (Figure 7 / Detail A). The
bottom most hooks will require the use of a flathead screwdriver
to complete assembly. Stand behind the Fan. Slip the flat of
the screwdriver between the Front and Rear Grills, next to one
of the unfastened hooks. (Figure 7 / Detail B) Pull screwdriver
handle upwards towards the Rear Grill. Slip the Front Grill hook
over the Rear Grill outer ring with a push. Repeat procedure
with remaining hooks.
CAUTION: DO NOT BEND WIRES ON THE FRONT OR THE
REAR GRILLS.
GRILL AND BLADE ASSEMBLY
COLUMN AND MOTOR ASSEMBLY
COLUMN/MOTOR TO BASE ASSEMBLY
1. Rest Column and Motor Assembly on floor next to the Base
Assembly. Tilt Base Assembly up on end. Pick up lower pipe
of Column Assembly and insert into the Mounting Flange. (Figure 5)
2. Tighten the 3/8-16 X 1” Square Head Bolt into the
Mounting Flange.
3. Tilt entire assembly to the upright position.
MAKE SURE BOLTS IN COLUMN AND MOTOR ASSEMBLY STEPS
ARE TIGHT BEFORE STANDING FAN UPRIGHT.
4. Loosen 3/8-16 X 1” Square Heat Bolt in the Mounting Flange.
This will allow the Column to settle in the bottom of the Base
after setting the Fan upright.
5. Tighten the 3/8-16 X 1” Square Head Bolt in the Mounting
Flange.
Figure 6
Inset A
Figure 7
Detail A
Detail B
Figure 5
Figure 4
Actual motor not shown for
detailed hardware view.
Ladda ner bruksanvisning i Engelska (PDF, 0.75 MB)
(Tänk på miljön och skriv endast ut denna bruksanvisning om det verkligen är nödvändigt)

Loading…

Betyg

Berätta vad du tycker om Lasko 3138 Fläkt genom att betygsätta den. Vill du dela med dig av dina åsikter om denna produkt eller ställa en fråga? Lämna en kommentar nederst på sidan.
Är du nöjd med Lasko 3138 Fläkt?
Ja Nej
Bli den första personen som betygsätter denna produkt
0 röster

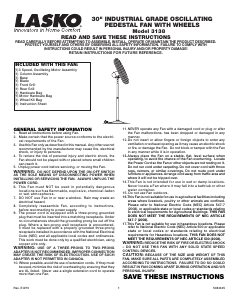
Delta i konversationen om denna produkt

Här kan du dela vad du tycker om Lasko 3138 Fläkt. Om du har en fråga, läs först noggrant igenom manualen. Att begära en manual kan göras genom att använda vårt kontaktformulär.

Mer om denna bruksanvisning

Vi förstår att det är trevligt att ha en pappersbruksanvisning för din Lasko 3138 Fläkt. Du kan alltid ladda ner bruksanvisningen från vår hemsida och skriva ut den själv. Om du vill ha en originalbruksanvisning rekommenderar vi att du kontaktar Lasko. De kanske kan tillhandahålla en originalbruksanvisning. Letar du efter bruksanvisningen för din Lasko 3138 Fläkt på ett annat språk? Välj ditt föredragna språk på vår hemsida och sök efter modellnumret för att se om vi har det tillgängligt.

Specifikationer

Märke Lasko
Modell 3138
Kategori Fläktar
Filtyp PDF
Filstorlek 0.75 MB

Alla bruksanvisningar för Lasko Fläktar
Fler bruksanvisningar för Fläktar

Vanliga frågor om Lasko 3138 Fläkt

Vårt supportteam söker efter användbar produktinformation och svar på vanliga frågor. Om du hittar en felaktighet bland våra vanliga frågor uppskattar vi om du meddelar oss detta via vårt kontaktformulär.

Påverkar en fläkt rumstemperaturen? Verifierad

Nej, en fläkt flyttar bara luft och ger en kylande effekt på huden.

Detta hjälpte (230) Läs mer

Vad är det bästa stället för en fan? Verifierad

Om det finns en källa till kall luft, som en luftkonditionering, kan en fläkt användas för att bättre och ytterligare fördela den kalla luften. Om bara fläkten används är det bäst att placera den med huvudhöjd. Huvudet är en av de kroppsdelar som transpirerar mest och den rörliga luften hjälper till att avleda värmen. Detta ger maximal kylningseffekt.

Detta hjälpte (229) Läs mer
Bruksanvisning Lasko 3138 Fläkt

Relaterade produkter

Relaterade kategorier

×
Download