PRE-START CHECKS
STARTING AND OPERATION
MAINTENANCE (Refer to “PERIODIC SERVICE” when to maintenance.)
PRECAUTIONS AT RECOIL STARTING
STOPPING
STORAGE
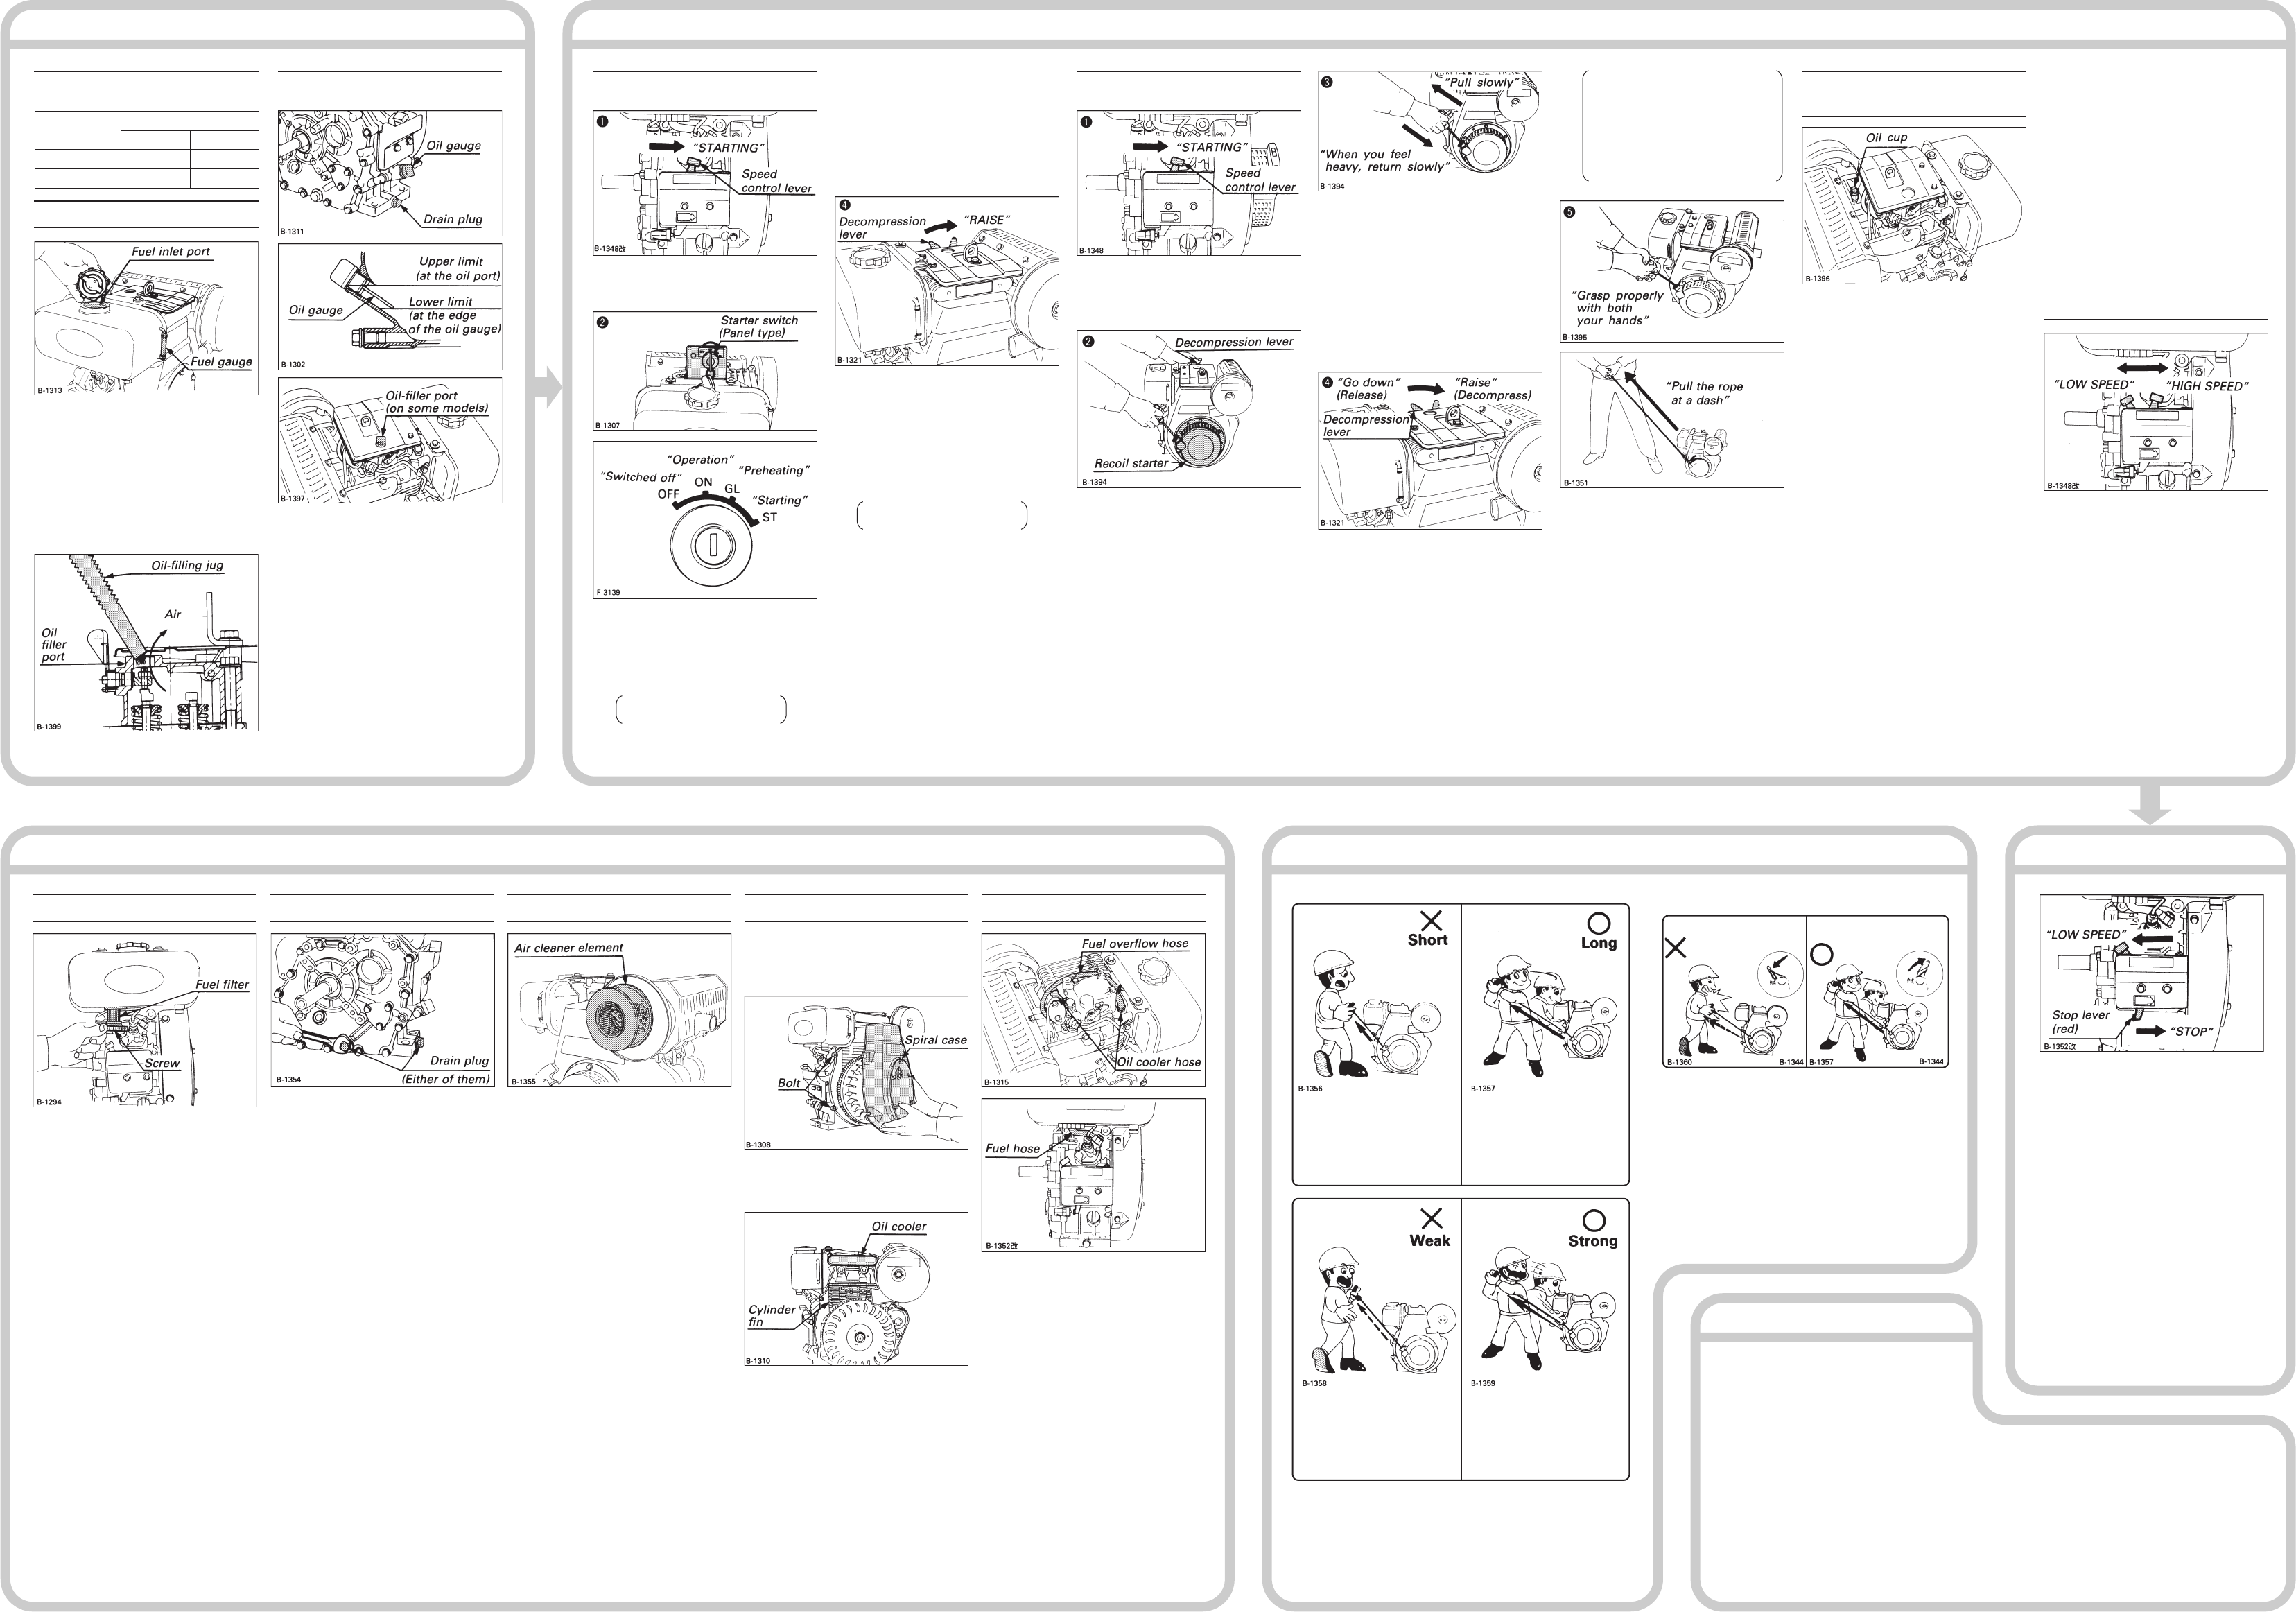
CAPACITY CRANKCASE OIL
Place the engine horizontally and fill it
with oil.
Always check the oil level with the oil
gauge screwed in.
On models with an oil filler port in the
head cover, be sure to take out the oil
gauge first and then pour oil. When filling
oil, take care not to let the oil-filling jug’s
tip or the like block the oil filler port: this
is for air inside the engine to go out of
the oil filler port. This is essential for
measuring the oil level correctly after
letting the poured oil flow down into the
oil pan.
Item
Fuel tank
Crankcase (oil)
Capacity
AC60, OC60
3.6L
1.3L
OC80, OC95
5.5L
1.7L
Use SAE No.2-D Diesel Fuel Oil.
As air trapped in the fuel is purged
automatically, there is no need to bleed
the air.
FUEL
CAUTION
3
3 The engine must be shut down
and kept away from any source
of fire when fuel is added.
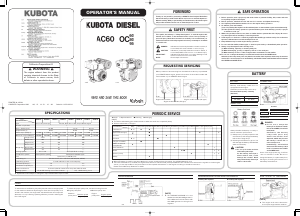
Set the speed control lever to the
“starting” position.
STARTING (Electric starting model)
Set the speed control lever to the
“starting” position.
STARTING (Recoil starting model)
Set the engine to “Compression”.
q Take your hand off the
decompression lever and pull the
recoil starter rope gradually.
w When you feel heavy in pulling the
rope, it is the position of
“Compression”. Stop pulling the
rope and return the handle slowly
to the original position.
This decompression device is
automatic return system. After
pulling the rope of recoil starter,
the decompression lever
automatically returns to the
original position. And the
decompression is released.
Pour a small amount of fuel through the
oil cup of the air cleaner flange for smooth
starting at low temperatures.
(1) Take the steps q and w of the recoil
starting and make sure the injection
sound is proper.
(2) Open the oil cup lid and pour a small
amount (less than 3 cc) of fuel.
(3) Close the oil cup lid.
(4) Take the steps e thru t of the recoil
starting to start the engine.
(Some models have no oil cup.)
[NOTE]
(1) Do not put in more than 3 cc of fuel,
because otherwise the starting will
become difficult.
(2) If the engine fails to start at the first
try, put in a smaller amount of fuel
for the next.
(3) It is essential to use SAE10W or
SAE10W30 oil for the crankcase in
cold season. Higher-viscosity oil
makes starting difficult.
Warm-up
As it takes a certain amount of time for
oil to circulate through the engine,
execute no-load operation for several
minutes to check the engine condition.
Break-in
Break-in the engine for the first week (40
to 50 hours) without applying excess load.
OPERATION
Setting the starter switch to “ST”
(starting) rotates the starter and starts
the engine.
As soon as the engine starts, release
the starter switch.
The starter switch position
varies by model.
e When the temperature is 5°C (41°F)
or less
Leave the starter switch at “GL” (to
preheat) for approximately five
seconds, then set it to “ST” (starting).
r When combined with a high-starting
load machine such as a compressor
Use the decompression lever for a
smoother start.
Raise the decompression lever and
turn the starter switch to “ST”
(starting). Release the decompression
lever after the engine rotates
smoothly.
Some models have no
decompression lever.
[NOTE]
(1) If the engine does not start after
starter motor is activated for 10
seconds, wait for about 30 seconds
and try again, otherwise, damage to
starter motor may occur.
(2) Never set the starter switch to “ST”
during operation to avoid damaging
the starter motor.
Make sure the sound of an injection.
q Put up the decompression lever
with your left hand and pull the
recoil starter rope with your right
hand four or five times to turn the
crank.
w After making sure of the sound of
injection, take step e.
e If you can not hear the sound,
check the fuel level or the position
of the speed control lever.
Raise the decompression lever.
(Decompress)
q Make it certain that the
decompression lever does not go
down even after hand is apart
from the lever.
w In case the decompression lever
goes down, please repeat the
operation refferred to in previous
item e.
Start the engine.
q Did you raise the decompression
lever?
w Grasp the handle of recoil starter
properly with your two hands.
e Pull the rope fully at a dash and the
engine starts. (Pulling the rope at a
dash is the knack for easy starting.)
r In case engine does not start, repeat
item e.
(Recoil starting model)
STARTING AT LOW TEMPERATURE
(4) Never open the oil cup lid while the
engine is running. Dust or dirt may be
sucked in, possibly damaging the
engine.
CAUTION
3
3 Never pour any fuel or oil in the
oil cup while the engine is
running. The engine may
overrun, which is very
dangerous.
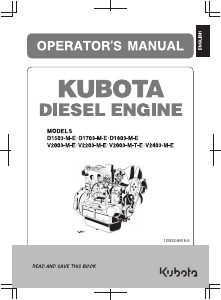
THE FUEL FILTER THE CRANKCASE OIL THE AIR CLEANER THE OIL COOLER THE RUBBER HOSE
(1) Since the fuel filter is made of high-
quality filter paper designed to collect
fine dust, remove it after every 100
hours of operation by loosening the
screw and clean it in fresh fuel.
(2) Before removing the fuel filter, always
empty the fuel tank by removing the
drain plug.
[NOTE]
(1) If the fuel filter breaks, replace it.
Otherwise, dust invasion will occur,
shortening the service life of the fuel
injection pump or nozzle.
(2) Note that rough handling of the fuel
filter results in damage.
Change the crank case oil 25 hours after
initial operation and every 100 hours
thereafter, using the following procedure:
(1) While the engine is still warm, empty
the crankcase by removing the drain
plug.
(2) Fill the crankcase up to the specified
level with fresh oil.
Clean the air cleaner after every 100 hours
of operation. If the work site is especially
dusty, check and clean the air cleaner
every day.
Cleaning procedure
(1) Remove any dust from the air cleaner
and wipe the inner surfaces.
(2) Remove dust from the air cleaner
element by tapping it gently or by
applying compressed air from the
inside while rotating the element. If
the element is oily or coated with
carbon dust, soak it in a neutral
detergent solution for 15 minutes,
wash it several times, rinse with fresh
water, then allow it to dry.
[NOTE]
(1) Replace the element every year or
after every sixth cleaning, whichever
comes first.
(2) If the element breaks, replace it.
Otherwise, the service life of the
engine will be shortened.
CAUTION
3
3 Always stop the engine before
cleaning the oil cooler.
(1) Loosen the four bolts and remove the
spiral case.
(2) Check if the cylinder and oil cooler fins
are clogged with dust. If so, blow it
off using an air gun. As the oil cooler
fins are fragile, to prevent damage,
never use a screwdriver or spatula.
Replace the fuel and oil cooler hoses
every two years. When leakage is
detected during inspection, immediately
replace the hose even if its service period
has not expired.
If you pull the rope short, it
causes engine not only
unstart but also it gives
shock to your hand.
Pull the rope fully at a dash.
The engine does not start if
the pulling power is weak
and slow.
Pull the rope strongly at a
dash.
[IMPORTANT]
(1) When starting the engine, be sure to raise the
decompression lever.
(Refer to item STARTING r.)
If you try to start the engine without raising the
decompression lever, it causes not only difficulty in
starting but also sometimes the cause of rope
breakdown.
(2) After starting, if you notice unusual sound or smoke
from Air Cleaner, stop the engine immediately.
Because there is a possibility that engine rotates
reversely.
(1) Replace the engine oil and clean each
part.
(2) Thoroughly clean the air cleaner element
to prevent dust from sticking to it.
(3) After the engine cools down, place a
cover over it to protect it from dust, then
store in a place free from moisture and
dust.
CAUTION
3
3 To avoid the risk of fire when
storing the engine in a small
room, allow sufficient time for the
engine to cool down before
storage.
(4) If the engine is to be stored for a long
period, disconnect the battery from the
engine, adjust the fluid level properly
and store it in a dry, dark place.
(5) Since the battery discharges even during
storage, charge it every month in
summer or every two months in winter.
(1) Reduce the engine speed and operate
it for two or three minutes.
(2) Press the stop lever (red) in the
direction of the arrow until the engine
shuts down.
(3) Set the starter switch to “OFF”, then
extract it. (Electric starting model)
3 Loosening the idling set bolt enables
the speed control lever to shut the
engine down. For details, contact your
nearest local sales representative.
[NOTE]
3 Never stop the engine using the
decompression lever. Otherwise,
valves or related parts may be
damaged.
Decompression lever
“Down” (Released)
Decompression lever “Up”
(Decompressed)


Delta i konversationen om denna produkt
Här kan du dela vad du tycker om Kubota AC60 Motor. Om du har en fråga, läs först noggrant igenom manualen. Att begära en manual kan göras genom att använda vårt kontaktformulär.