
Aan de slag
• Sluit de USB-C-voedingskabel aan op de achterkant van de klok en sluit het
andere uiteinde aan op de meegeleverde stroomadapter. Sluit de adapter
vervolgens aan op een standaard stopcontact.
Draadloze luidspreker
• Om de draadloze speaker AAN of UIT te zetten, houdt u de SPEAKER AAN/
UIT-knop kort ingedrukt. De speaker speelt een toon af bij het aan- of uitzetten.
• Zoek op uw Bluetooth-apparaat naar de apparaatnaam: 71091CN en maak
verbinding.
• Let op: Het indicatielampje van de draadloze speaker knippert op het display
totdat deze is gekoppeld met een apparaat. Als er binnen 3 minuten geen
verbinding is gemaakt, stopt de klok met wachten op een apparaat. Zodra er
verbinding is, blijft het indicatielampje van de draadloze speaker branden.
• Wanneer uw apparaat is verbonden met de draadloze luidspreker,
synchroniseert de klok automatisch de tijd met uw draadloze apparaat.
• Om het volume aan te passen, drukt u op de knoppen OMHOOG of OMLAAG
en laat u deze weer los.
• Om een nummer over te slaan of terug te gaan, houdt u de knoppen OMHOOG
of OMLAAG ingedrukt.
• Let op: Wanneer u verbinding maakt met de draadloze luidspreker, kunt u de
12/24-uurs tijdnotatie niet aanpassen.
Nachtlampje en dimmer
• Met de SNOOZE/NIGHT LIGHT-knop kunt u het nachtlampje bedienen. Er
zijn vier helderheidsniveaus: 100%, 75%, 50% en 25%. De knop werkt in de
volgende volgorde:
• Druk eenmaal om de lamp op 100% helderheid te zetten.
• Druk nogmaals om de helderheid te verlagen naar 75%.
• Druk nogmaals om de helderheid te verlagen naar 50%.
• Druk nogmaals om de helderheid te verlagen naar 25%.
• Druk nogmaals om het licht uit te schakelen.
Draadloos opladen
• Plaats uw telefoon in het midden van het draadloze oplaadgebied. De
oplaadindicator licht op terwijl uw telefoon wordt opgeladen.
• Belangrijke opmerkingen:
• Het draadloze oplaadvermogen bedraagt 15 Watt (MAX).
• Voor maximale efciëntie zorgt u ervoor dat de telefoon zich in het midden van
het oplaadgebied bevindt.
• Verwijder metalen of dikke telefoonhoesjes van derden voordat u gaat opladen.
• Houd minimaal 25 cm afstand tussen de klok en medische geïmplanteerde
apparaten.
• Plaats de klok niet in de buurt van uw identiteitsbewijs of bankpas, om schade
aan de magneetstrip of de ingebouwde chip te voorkomen.
De tijd instellen
• Houd de TIME SET-knop 3 seconden ingedrukt. De uurcijfers knipperen.
• Gebruik de knoppen OMHOOG of OMLAAG om het uur aan te passen.
• Druk nogmaals op de TIME SET-knop. De minutencijfers knipperen.
• Gebruik de knoppen OMHOOG en OMLAAG om de minuten aan te passen.
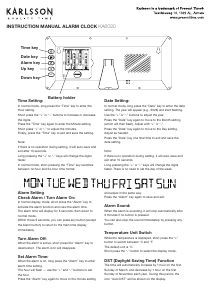
GEBRUIKSAANWIJZING WEKKER/DRAADLOZE SPEAKER
WIRELESS CHARGING
TOP SURFACE
(FOR SMARTPHONES)
WIRELESS
CHARGING
INDICATOR
INDOOR
TEMPERATURE
(°C/°F)
AM
PM
AM/ PM
INDICATORS
ALARM
(SET&ON/OFF)
TIME SETSNOOZE &
NIGHT LIGHT
(ON/OFF&DIMMER)
UP
SPEAKER
ON/OFF
DOWN
&
12/24 HOUR
USB C
POWER
INPUT
(MAX 12V-1.67A)
Printed in China
3) To adjust the volume, PRESS andrelease the UP or DOWN buttons.
Note: The clock will automatically connecttoapaired device if the device is
turned on, and within range.
2) On your bluetooth enabled device, search and connect to device name:
71091CN.
Note: The wireless speaker indicator light will flash on the display until it is
paired withadevice. The clock will automatically stop waiting foradevice to
connect after3minutes. When your device is connected the wireless speaker
indicator on the clock will stay illuminated.
Note: When your device
is connected to the wireless speaker, The clock will
automatically synchronize the time with your wireless device. The time will
update shortly after the device is connected.
1) To turn the wireless speaker ON or OFF. Press and hold the SPEAKER ON /
OFF briefly. The speaker will playamusic tone when turning on or o.
Wireless Speaker
4) To skip or go backasong, HOLD the UP or DOWN buttons.
Note: When your device is connected to the wireless speaker, the 12/24
Hour time format can not be adjusted.
- Press Once to turn the light ON-100%.
- Press Again to reduce the light brightness to 75%.
- Press Again to reduce the light brightness to 50%.
- Press Again to reduce the light brightness to 25%.
- Press Again to turn the light OFF.
The SNOOZE/NIGHT LIGHT button allows you to turn ON, Adjust Brightness
and turn OFF the night light. There are4levels of brightness (100%-75% -
50%-25%) The button controls the lightinthefollowing sequence:
Night Light&Dimmer
Plug the USBCpower cord into the back of the clock, and the other end into
the included power adapter. Plug the adapter intoastandard electrical
outlet. The display will turn on. The clock is now ready to be set.
Getting Started
Important: Use only a 5V-3A, 9V-2.22A, or 12V-1.67A power adapter or USB
power source.
Note:
- Wireless charging power rating is 15 Watt (MAX).
- May not work with all 3rd party phone cases. Metal cases should be
removed before wireless charging.
- For maximumchargingeciency, the phone must be aligned with the
center of the charging area.
Important:
- Do NOT place too close to ID and banking cards. The wireless charger
may damage the magnetic strip or embedded chip.
- Keep at least 10” / 25cm between the clock and medical implanted
devices. The wireless charger may cause disruption to the medical device.
- Keep away from children. This is not a toy.
Place your phone on the center the of the wireless charging area. The
charging light indicator will illuminate on the frontoftheclock whileyour
phoneischar
ging.
Wireless Charging
Note: When the alarm is activated, the ALARM ON indicator will
illuminate on the display.
Press the ALARM button to turn the alarm ON or OFF.
Alarm On / O
Note: When setting the alarm, The alarm indicator on the display will flash
so you can be sure you are setting the alarm. If no adjustments are made
within 10 seconds,theclock will automaticallyexit the setting mode.
IMPORTANT: When using the 12hr time display format, Be sure to set the
alarm hour to the desired wake up time: AM or PM. Check for the AM or PM
indicator light on the display.
1) Hold the ALARM button fo r3seconds. The HOUR digits will flash. Use
the UP or DOWN buttons as needed to set the desired alarm hour.
2) Press the ALARM button once. The MINUTE digits will flash. Use the UP or
DOWN buttonsasneeded to set the desired alarmtime.
3) Press the ALARM button oncetosaveandexit.
Setting the Alarm
TIP: To automatically set the time, connect your device to the wireless
speaker. Refer to the Wireless Speaker section of this user manual. The clock
will automatically synchronize the time with your wireless device. The time will
update shortly after the device is connected.
Note: When setting the clock, if no adjustments are made within 10 seconds,
the clock will automaticallyexit the setting mode.
Note: When using the 12hr time display format, be sure to set the time to the
correct AM or PM time period. Check for the AM or PM indicator on the display.
1) Hold the TIME SET button for3seconds. The HOUR digits will flash. Use
the UP or DOWN buttonsasneededtosetthecorrect hour.
2) Press the TIME SET button once. The MINUTE digits will flash. Use the UP
or DOWN buttonsasneededtosetthecorrect minutes.
3) Press the TIME SET button oncetosaveandexit.
Setting the Time
Note: If the alarmisnotturned o, the alarm will ringfor5minutes.
To stop the alarm, press the ALARM button. The alarm will stop, but will
remain on for the next day.PresstheALARM button again to turn the
alarm o. Check for the ALARM ON indicator on the display.
When the alarmissounding, press SNOOZE/LIGHT button. The alarm will
be silenced temporarily, but will resume sounding after5minutes. The snooze
can be repea
ted as many times as desired.
Using the Snooze
Temperature °C / °F
Press the UP button to select Celsius or Fahrenheit(°C/ °F).
Note: When your device is connected to the wireless speaker, the 12/24
Hour time format can not be adjusted.
Press the DOWN button to switch between 12 and 24 Hourtimeformat.
12 / 24 Hour Display
1) Unplug the clock from the electrical source/outlet.
2) Press any button 2 -3times (This will drain a ny residual electricity).
3) Wait 30 seconds, then plug the clock back into the electrical source /
outlet.
Note: If you are experiencing any problems with the display, setting or
other issues, preformaHARD RESET:
Reset
TIME DISPLAY WIRELESS
SPEAKER
INDICATOR
ALARM ON
INDICATOR
INSTRUCTION MANUAL
KA6033
• Druk op de knop TIME SET om op te slaan en af te sluiten.
• Let op: zorg ervoor dat u de juiste AM/PM-tijdsperiode selecteert wanneer u de
12-uursnotatie gebruikt.
• Als er binnen 10 seconden geen aanpassingen worden gedaan, verlaat de klok
automatisch de instelmodus.
Het alarm instellen
• Houd de ALARM-knop 3 seconden ingedrukt. De uurcijfers knipperen.
• Gebruik de knoppen OMHOOG of OMLAAG om het alarmuur in te stellen.
• Druk op de ALARM-knop. De minutencijfers knipperen.
• Gebruik de knoppen OMHOOG of OMLAAG om de alarmminuten in te stellen.
• Druk op de ALARM-knop om op te slaan en af te sluiten.
Let op: Wanneer u de 12-uurs tijdsweergave gebruikt, zorg er dan voor dat u de juiste
AM/PM-tijdsperiode selecteert.
Wanneer het alarm actief is, licht de ALARM ON-indicator op het display op.
Het alarm AAN/UIT zetten
• Druk op de ALARM-knop om het alarm AAN of UIT te zetten.
• Wanneer het alarm afgaat, drukt u op de SNOOZE/LIGHT-knop om het tijdelijk
te dempen. Het alarm wordt na 5 minuten hervat. De snooze-functie kan indien
nodig worden herhaald.
• Om het alarm voor de dag te stoppen, drukt u op de ALARM-knop. Om het
helemaal uit te zetten, drukt u nogmaals op de ALARM-knop.
• Let op: Als u het alarm niet uitschakelt, blijft het 5 minuten afgaan en stopt het
vervolgens automatisch.
Temperatuurweergave
• Druk op de OMHOOG-knop om te wisselen tussen Celsius (°C) en Fahrenheit
(°F).
12/24-uursweergave
Druk op de knop OMLAAG om te schakelen tussen 12-uurs- en 24-uurs-tijdnotatie.
Let op: Wanneer u verbinding maakt met de draadloze luidspreker, kunt u de 12/24-
uurs tijdnotatie niet aanpassen.
De klok opnieuw instellen
• Haal de stekker van de klok uit het stopcontact.
• Druk 2-3 keer op een willekeurige knop om de resterende elektriciteit af te
voeren.
• Wacht 30 seconden en sluit de klok dan weer aan.
• Let op: voer een harde reset uit als u problemen ondervindt met het scherm of
de instellingen.
Belangrijke veiligheidsinformatie
• Dit product is geen speelgoed. Houd het buiten bereik van kinderen.
• Gebruik alleen een stroomadapter met een vermogen van 5V-3A, 9V-2,22A of
12V-1,67A.
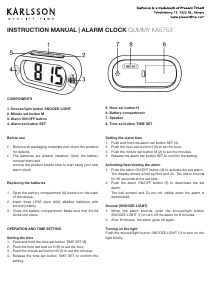
USB-C
STROOM
INVOER
(MAXIMAAL
12V-1,67A)
OMHOOGOMLAAG
&
12-24 UUR
TIJD INSTEL-
LEN
SNOEZEN &
NACHTLICHT
(AAN/UIT &
DIMMER)
ALARM
AAN/UIT
INDICATOR
WIRELESS-
PEKER
INDICATOR
TIJD WEER-
GAVE
AM/PM
INDICATOREN
DRAADLOOS OPLADEN
BOVENOPPERVLAK
VOOR SMARTPHONES
DRAADLOOS
OPLADEN
INDICATOR
BINNENTEMPERA-
TUREC°/F°
ALARM INGESTELD
(AAN/UIT)
SPREKER
(AAN/UIT)


Delta i konversationen om denna produkt
Här kan du dela vad du tycker om Karlsson KA6033OR Väckarklocka. Om du har en fråga, läs först noggrant igenom manualen. Att begära en manual kan göras genom att använda vårt kontaktformulär.