
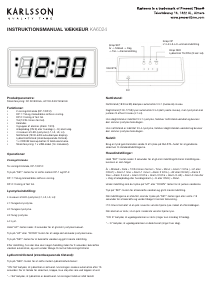
INSTRUCTION MANUAL ALARM CLOCK KA6024
Product Parameters:
Power supply: DC 5V/500mA, AC100-240V 50/60Hz
Features:
• 2 display modes (DP-1/DP-2):
• DP-1: Time and month/date alternate display.
• DP-2: Fixed time display.
• Time (12/24-hour format).
• Calendar.
• 3 groups of alarms (Alarm 1/2/3).
• Workday (ON:E) or everyday (--:E) alarm selection.
• 4 levels of LED brightness (L1, L2, L3, L4).
• Night mode (18:00-6:59 auto-dimmer display).
• Sound control mode (power-saving mode).
• 1 x CR2032 backup battery for time memory.
• Power supply: 1 x USB cable (1m included).
Operations:
Display Modes:
Two display modes, DP-1/DP-2:
Press the “SET” key to switch between DP-1 and DP-2.
DP-1: Time and month/date alternate display.
DP-2: Fixed time display.
Brightness Setting:
4 levels of LED brightness (L1, L2, L3, L4):
L1: Weakest brightness.
L2: Weaker brightness.
L3: Weak brightness.
L4: Bright.
Hold the “UP” key for 3 seconds to enter brightness level setting.
Press the “UP” or “DOWN” key to select the desired brightness level.
Press the “SET” key to con rm the value and move to the next setting.
After setting, if no operation occurs within 3 seconds, the value is automatically
con rmed, and the clock returns to normal time display mode.
Sound Control Mode (Power-Saving Mode):
Press the “DOWN” key to toggle the sound control function:
“ON: Sd” means sound control is activated. The clock display will automatically turn
off after 15 seconds. To turn the display on, clap, make noise, or touch the top of
the clock.
“--: Sd” means sound control is deactivated. The clock display remains always on.
Night Mode:
Night mode (18:00-6:59) automatically dims to the L1 (darkest) level.
Day mode (7:00-17:59) automatically brightens to L4 (brightest level), but brightness
can be adjusted to any level (L1-L4).
If day mode is set to L1 brightness, night mode remains unchanged, keeping the same
brightness throughout the day.
If night mode is set to L4 brightness, day mode remains unchanged, keeping the same
brightness throughout the day.
Reset:
Use a thin object or probe to press the RESET hole to restore the display to default
settings.
Main Settings:
Hold the “SET” key for 2 seconds to enter setting mode. The setting sequence is as
follows:
Year > Month > Date > 12/24-hour format > Hour > Minute > Alarm 1 on/off (--:A1 or
ON:A1) > Alarm 1 hour > Alarm 1 minute > Alarm 2 on/off (--:A2 or ON:A2) > Alarm
2 hour > Alarm 2 minute > Alarm 3 on/off (--:A3 or ON:A3) > Alarm 3 hour > Alarm 3
minute > Workday or everyday alarm selection (--:E or ON:E) > Quit.
During setting, press the “UP” or “DOWN” key to adjust the values.
Press the “SET” key to con rm the value and move to the next setting.
After completing settings, press the “SET” key again or wait for 15 seconds to con rm
and return to normal time display mode.
In the 12-hour format, a dot in the upper left corner will be lit during the afternoon.
When the alarm is active, a dot in the lower left corner will be lit.
“ON: E” means the weekday alarm is active (rings only Monday to Friday).
“--: E” means the weekday alarm is deactivated (rings every day).
DC
RESET
Button UP
L1-L2-L3-L4 Luminance Setting
Button DOWN
Sound Control ON/OFF(on:sd/-:sd)
Button SET
Year -> Month -> Day
-> Time -> Alarm Setting


Delta i konversationen om denna produkt
Här kan du dela vad du tycker om Karlsson KA6024WD Väckarklocka. Om du har en fråga, läs först noggrant igenom manualen. Att begära en manual kan göras genom att använda vårt kontaktformulär.