EN | INSTRUCTION MANUAL | ALARM CLOCK RETRO RADIO KA5719
USER MANUAL
Read this manual carefully and retain for future reference.
Product description:
This wooden radio shows the time, date and ambient temperature, and allows you to listen to your
favourite radio programmes at any hour of the day.
This kit contains:
-1 wooden alarm clock
-1 CR2032 back-up battery
-1 USB charging cord
Details:
-Input: DC 5 V
-Power supplied by standard USB port and/or 4 AAA, 1,5V
-Maximum ambient temperature for use: 25
Functions
-Display showing perpetual calendar (2000-2099), time, and date
-Thermometer: display in ° C (0~50) or ºF (32~122)
-Choice of 12 or 24 hour clock
-Energy saving function
Start-up:
Power, battery insertion and replacement.
-USB Power supply
-Insert the plug on cable (14) into the power input port (1) then connect the other end of the cable to a
standard USB port on a computer.
-Battery power supply
-Open the battery compartment (3) and insert 4 AAA LR03 1.5 V batteries, taking care to follow the
polarity as indicated.
-Close the battery compartment.
-Replacing the back-up battery.
-Open the battery compartment (3) and remove the AAA batteries if necessary.
-Open the back-up battery cover (2) using a screwdriver.
-Remove the old battery and insert a CR2032 battery, taking care to follow the polarity indicated.
-Close the cover and the battery compartment.
Main control adjustments:
-Press SET (4) for 3 seconds and the year will begin to flash.
-Press the UP (5) or DOWN (6) buttons to set the year, then press SET (4) to confirm, next the month (12)
will flash.
-Press the UP (5) or DOWN (6) buttons to set the month (12), then press SET (4) to confirm, next the day
will flash.
-Press the UP (5) or DOWN (6) buttons to set the day (12), then press SET (4) to confirm.
-Press the UP (5) or DOWN (6) buttons to set the time format (12 or 24 hour clock), then press SET (4) to
confirm, next the hour will flash.
-Press the UP (5) or DOWN (6) buttons to set the hour (12), then press SET (4) to confirm, next the minutes
(12) will flash.
-Press the UP (5) or DOWN (6) buttons to set the minutes (12), then press SET (4) to confirm, next the
alarm clock mode (12) will flash.
-Press the UP (5) or DOWN (6) buttons to activate the alarm (ON) or to deactivate it (12), then press SET (4)
to confirm, next the alarm hour (12) will flash.
-Press the UP (5) or DOWN (6) buttons to set the alarm hour (12), then press SET (4) to confirm, next the
alarm minutes (12) will flash.
-Press the UP (5) or DOWN (6) buttons to set alarm minutes (12), then press SET (4) to confirm.
-Alarm Mode
-Press the FM button (8) to deactivate the alarm.
-Radio Mode
-Press the FM button (8) to activate the radio.
-Press the SCAN button (10) to skip to the next frequency.
-Press the VOL + ( 9 ) or VOL -(11) to adjust the radio volume.
Adjusting temperature mode ° C / ° F:
-Press UP (5) button to change to ° F mode.
-Press UP (5) button again to revert to ° C mode.
Adjusting display
-Press the SET (4) button and the DP-1 mode is activated showing the time, temperature and date.
-Press the SET (4) button again to change to DP-2 mode to display the time and temperature only.
Adjusting energy saving mode
-This mode allows you to turn off the screen display and to reactivate it by clapping your hands as a way
to save energy.
-Press the DOWN (7) button to activate the energy saving mode and press the DOWN (7) button again to
deactivate it.
Notes:
It is not possible to make adjustments when the radio is playing.
Warnings while using product:
Do not use any cable apart from the one supplied with the device for recharging.
Take care not to open, modify or take apart the device. Taking the product apart may cause the risk of
electric shock or fire. In the event of product malfunction, take your device to a specialist technician.
Keep the device protected from rain, water or moisture when in use.
Do not allow the device to come into contact with combustible materials or high levels of heat. Do not
dispose of in fire or flames.
Cleaning and storage:
Clean the device using a soft, dry cloth.
Do not use detergent as this may damage the device.
Note about disposal:
When no longer usable, dispose of this product at a collection point for electrical and
electronic equipment waste recycling.
Read this manual carefully and retain
for future reference.
Product description
This wooden radio shows the time, date and ambient
temperature, and allows you to listen to your favourite radio
programmes at any hour of the day.
This kit contains
• 1 wooden alarm clock
• 1 CR2032 back-up battery
• 1 USB charging cord
Details:
• Input: DC 5 V
• Power supplied by standard USB port
and/or 4 AAA, 1,5V
• Maximum ambient temperature for use: 25
Functions
• Display showing perpetual calendar (2000-2099),
time, and date
• Thermometer: display in C (0~50) or F (32~122)
• Choice of 12 or 24 hour clock
• Energy saving function
Cleaning and storage
Clean the device using a soft, dry cloth.
Do not use detergent as this may damage the device.
Start-up
Power, battery insertion and replacement.
• USB Power supply
• Insert the plug on cable (14) into the power input
port (1) then connect the other end of the cable to
a standard USB port on a computer.
• Battery power supply-Open the battery
compartment (3) and insert 4 AAA LR03 1.5 V
batteries, taking care to follow the polarity as indicated.
• Close the battery compartment.
• Replacing the back-up battery.
• Open the battery compartment (3) and remove the
AAA batteries
if necessary.
• Open the back-up battery cover (2) using a
screwdriver.
• Remove the old battery and insert a CR2032
battery, taking care to follow the polarity indicated.
• Close the cover and the battery compartment.
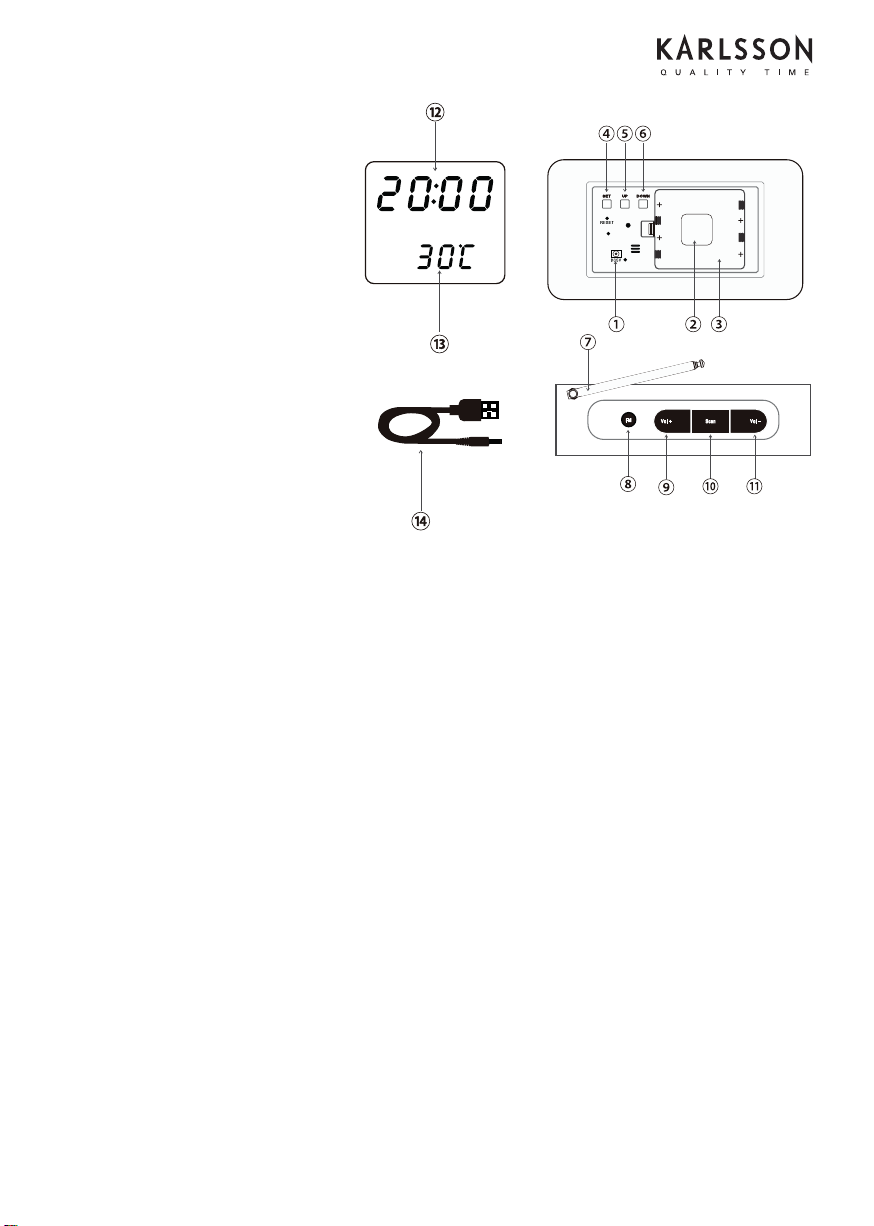
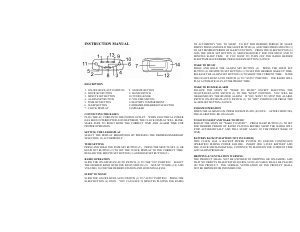
1. Power input
2. Back-up battery cover
3. Battery compartment
4. SET
5. UP
6. DOWN
7. Aerial
8. FM
9. VOL+
10. SCAN
11. VOL-
12. Hour/year Display
13. Temperature/Day-Month Display
14. Charging cable
USER MANUAL
Read this manual carefully and retain for future reference.
Product description:
This wooden radio shows the time, date and ambient temperature, and allows you to listen to your
favourite radio programmes at any hour of the day.
This kit contains:
-1 wooden alarm clock
-1 CR2032 back-up battery
-1 USB charging cord
Details:
-Input: DC 5 V
-Power supplied by standard USB port and/or 4 AAA, 1,5V
-Maximum ambient temperature for use: 25
Functions
-Display showing perpetual calendar (2000-2099), time, and date
-Thermometer: display in ° C (0~50) or ºF (32~122)
-Choice of 12 or 24 hour clock
-Energy saving function
Start-up:
Power, battery insertion and replacement.
-USB Power supply
-Insert the plug on cable (14) into the power input port (1) then connect the other end of the cable to a
standard USB port on a computer.
-Battery power supply
-Open the battery compartment (3) and insert 4 AAA LR03 1.5 V batteries, taking care to follow the
polarity as indicated.
-Close the battery compartment.
-Replacing the back-up battery.
-Open the battery compartment (3) and remove the AAA batteries if necessary.
-Open the back-up battery cover (2) using a screwdriver.
-Remove the old battery and insert a CR2032 battery, taking care to follow the polarity indicated.
-Close the cover and the battery compartment.
Main control adjustments:
-Press SET (4) for 3 seconds and the year will begin to flash.
-Press the UP (5) or DOWN (6) buttons to set the year, then press SET (4) to confirm, next the month (12)
will flash.
-Press the UP (5) or DOWN (6) buttons to set the month (12), then press SET (4) to confirm, next the day
will flash.
-Press the UP (5) or DOWN (6) buttons to set the day (12), then press SET (4) to confirm.
-Press the UP (5) or DOWN (6) buttons to set the time format (12 or 24 hour clock), then press SET (4) to
confirm, next the hour will flash.
-Press the UP (5) or DOWN (6) buttons to set the hour (12), then press SET (4) to confirm, next the minutes
(12) will flash.
-Press the UP (5) or DOWN (6) buttons to set the minutes (12), then press SET (4) to confirm, next the
alarm clock mode (12) will flash.
-Press the UP (5) or DOWN (6) buttons to activate the alarm (ON) or to deactivate it (12), then press SET (4)
to confirm, next the alarm hour (12) will flash.
-Press the UP (5) or DOWN (6) buttons to set the alarm hour (12), then press SET (4) to confirm, next the
alarm minutes (12) will flash.
-Press the UP (5) or DOWN (6) buttons to set alarm minutes (12), then press SET (4) to confirm.
-Alarm Mode
-Press the FM button (8) to deactivate the alarm.
-Radio Mode
-Press the FM button (8) to activate the radio.
-Press the SCAN button (10) to skip to the next frequency.
-Press the VOL + ( 9 ) or VOL -(11) to adjust the radio volume.
Adjusting temperature mode ° C / ° F:
-Press UP (5) button to change to ° F mode.
-Press UP (5) button again to revert to ° C mode.
Adjusting display
-Press the SET (4) button and the DP-1 mode is activated showing the time, temperature and date.
-Press the SET (4) button again to change to DP-2 mode to display the time and temperature only.
Adjusting energy saving mode
-This mode allows you to turn off the screen display and to reactivate it by clapping your hands as a way
to save energy.
-Press the DOWN (7) button to activate the energy saving mode and press the DOWN (7) button again to
deactivate it.
Notes:
It is not possible to make adjustments when the radio is playing.
Warnings while using product:
Do not use any cable apart from the one supplied with the device for recharging.
Take care not to open, modify or take apart the device. Taking the product apart may cause the risk of
electric shock or fire. In the event of product malfunction, take your device to a specialist technician.
Keep the device protected from rain, water or moisture when in use.
Do not allow the device to come into contact with combustible materials or high levels of heat. Do not
dispose of in fire or flames.
Cleaning and storage:
Clean the device using a soft, dry cloth.
Do not use detergent as this may damage the device.
Note about disposal:
When no longer usable, dispose of this product at a collection point for electrical and
electronic equipment waste recycling.


Delta i konversationen om denna produkt
Här kan du dela vad du tycker om Karlsson KA5719 Klockradio. Om du har en fråga, läs först noggrant igenom manualen. Att begära en manual kan göras genom att använda vårt kontaktformulär.