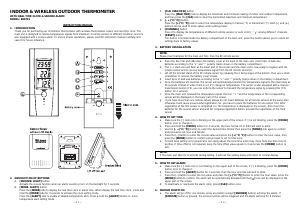
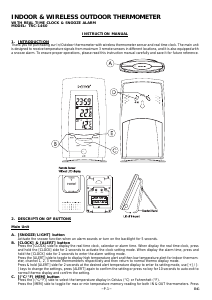
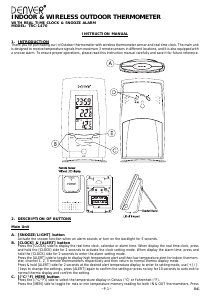
7. HOW TO DISPLAY DIFFERENT OUTDOOR TEMPERATURES
a. You can select the temperature shown in Celsius or Fahrenheit by pressing the [+(°C/°F)] button.
b. The main unit is designed to receive RF signals from maximum 3 RF remote sensors. Pressing the [CHANNEL]
button will change the temperature display from one sensor to another.
c. If there is only one remote sensor, the [CHANNEL] button will be disabled. This main unit is also equipped with
auto scroll function, when there is more than one remote sensor, press and hold the [CHANNEL] button for 3
seconds, a “
” icon will be displayed and the outdoor temperature display will automatically cycle among the
remote sensors. The auto scroll function can be deactivated by pressing and hold the [CHANNEL] button for
another 3 seconds.
8. HOW TO DISPLAY MAX/MIN TEMPERATURE
a. The main unit records the maximum and minimum value of both indoor and outdoor temperature.
b. Press the [MAX/MIN] button once to read the minimum temperature, press it again for the maximum
temperature.
c. To erase the max/min temperature record, select max or min temperature then press the [CLR] button once.
9. HOW TO SET TEMPERATURE ALERT
You can pre-define the desired temperature range of the main unit and/or the remote sensor(s) whenever you like.
a. Press and hole the [ALERT] button for 2 seconds, the “ ” and the “---” dash icons in the middle segment
will start to blink. The main unit is now under temperature alert setting mode.
b. Press [- +(°C/°F)] button to select the temperature alert for the desired indoor or outdoor channel and press
the [ ALERT] button to confirm.
c. After pressing the [ALERT] button, the “ ” icon will start to flash, you can use the [- +(°C/°F)] button to
enter the upper limit value, press the [ALERT] button again to confirm, and the main unit will enter the lower
limit setting mode.
d. The “ ” icon will blink, same as the previous procedure (10c), you can use the [- +(°C/°F)] button to enter
the lower limit value and press the [ALERT] button to confirm.
e. Repeat the above a-d procedure to define the temperature range of other channels.
f. Once the temperature range is defined, the “
” icon will be displayed and which means the temperature alert
is enabled. You can disable the temperature alert function by pressing the [ALERT] button once.
g. When the temperature goes beyond/below the pre-defined range, the corresponding segment will start to blink
and the buzzer will start to beep for 5 seconds followed by 45 seconds off. This sequence will repeat until any
key is pressed.
10. BATTERY INDICATORS
The main unit comes with battery level detectors, it will continuous monitor the battery level of both the main unit
and the RF remote sensor(s). There are two “
” low battery level icons, when low battery level of the main unit is
detected, the “
” icon will be displayed on the indoor temperature segment of the screen. If low battery level of any
remote sensor is detected, the “
” icon will be displayed on the outdoor temperature segment of the corresponding
remote sensor channel.
11. THE HOLD SEEK FUNCTION
In order to have a quick re-registration of remote sensor, it is recommended to activate the hold seek function before
replacing batteries of any remote unit.
a. Choose the remote sensor channel which batteries have to be replaced, press and hold the [-] button for 3
seconds to activate the hold seek function.
b. The main unit will temporary stop seeking signal from the corresponding remote sensor and waiting for new
signal registration.
c. Once the batteries have been replaced, the remote unit will start to transmit signal to the main unit again and
the main unit will automatically set the new signal back to its previous channel. With this hold seek function,
there is no need to reset the main unit or proceed the whole registration procedures again when batteries of any
remote unit have to be replaced.
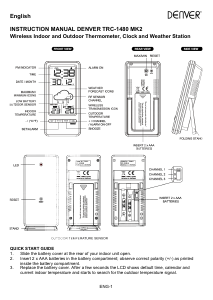
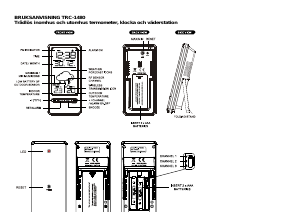
12. RF REMOTE SENSOR WITH DETACHABLE PROBE (OPTIONAL)
a. In order to avoid freezing up of battery, when the outdoor temperature is below 20°C, open the side cover of the
RF remote sensor and insert the probe plug. Extend the 6 feet probe cord, leave the probe sensor outdoor and
place the remote sensor unit indoor.
b. Besides overcomes the extreme low temperature, the detachable probe can also be used to measure the
temperature of water, soil or other liquid.
13. HOW TO RESET THE MAIN UNIT
The [RESET] button is located inside the battery compartment of the main unit, press this button allows you to
return all settings back to factory values.
14. MAINTENANCE
a. Do not clean the main unit/RF remote sensor with abrasive or corrosive substance.
b. Do not immerse the main unit/RF remote sensor in water.
c. Do not subject the main unit/RF remote sensor to excessive force, shock, dust, temperature or humidity.
d. Do not modify or temper with the internal components of the main unit/RF remote sensor. Doing so can cause a
malfunction and might invalidate its warranty.
e. Do not subject the main unit/RF remote sensor to excessive exposure to direct sunlight or to heavy rain.
f. Do not mix old and new batteries, this can cause rupture or leakage, resulting in personal injury or property
damage.
g. Read this instruction manual thoroughly before operating the main unit/RF remote sensor.
15. TROUBLE SHOOTING (RECEIVING RF SENSOR SIGNAL)
If the (---) dash icon still flashes after inserting the batteries to the RF remote sensor for more than 11 minutes, that
means the RF signal has been lost. Please rotate the sensor in 45°steps, and wait for 3 minutes after each position
change. If the main unit still cannot receive the RF signal, move the remote sensor closer to the main unit or
reposition both RF remote unit and the main unit until successful reception is observed.
16. SPECIFICATIONS
Main Unit Operating Temperature Range : 0°C to +50°C (+32°F to +122°F)
RF Remote Sensor Operating Temperature Range
Sensor with LCD Display : 0°C to +50°C (+32°F to +122°F)
Sensor without LCD Display : -20°C to +50°C (-4°F to +122°F)
Detachable Outdoor Probe : -50°C to +70°C (-58°F to +158°F)
Transmission Range : 100 feet, open area
Battery
Main Unit : DC 3V, 2 x AAA size
RF Remote Sensor : DC 3V, 2 x AAA size
Alarm Duration : 1 minute
Snooze : 8 minutes
Battery Life Time
Main Unit : 12 months
RF Remote Sensor : 6 months
17. DISCLAIMER
NOTE:
In order to protect our environment, please dispose the old batteries promptly and properly. Do not burn or bury
them.
NOTE:
The main unit and the RF remote sensor contains no user-serviceable parts.
NOTE:
Signals from other household devices such as door bell, home security system may interfere with this product and
cause temporarily reception failure. The transmission and reception will resume once the interfere recedes.
The information in this document has been viewed and is believed to be accurate. However, neither the
manufacturer nor its affiliates assume any responsibility for inaccuracies, errors or omissions that may be
contained herein. In no event will the manufacturer or its affiliates be liable for direct, indirect, special, incidental
or consequential damages arisen by using this product or resulting from any defect/omission in this document,
even if advised of the possibility of such damages.
The manufacturer and its affiliates reserve the right to make improvements or changes to this document and the
products and services described at any time, without notice or obligation.
~ P. 4 ~~ P. 3 ~

Delta i konversationen om denna produkt
Här kan du dela vad du tycker om Denver TRC-1400 Väderstation. Om du har en fråga, läs först noggrant igenom manualen. Att begära en manual kan göras genom att använda vårt kontaktformulär.