Bruksanvisning Cyborg F.L.Y 9 (for PlayStation 3) Spelkontroll

Behöver du en bruksanvisning för din Cyborg F.L.Y 9 (for PlayStation 3) Spelkontroll? Nedan kan du se och ladda ner PDF-bruksanvisningen gratis på svenska. Den här produkten har för närvarande 2 vanliga frågor, 0 kommentarer och har 0 röster. Om det här inte är bruksanvisningen du vill ha, vänligen kontakta oss.

Är produkten defekt och erbjuder bruksanvisningen ingen lösning? Gå till ett Repair Café för gratis reparationstjänster.

Bruksanvisning

Loading…

[2] [3]
ENGLISH Cyborg F.L.Y. 9 Wireless Flight Stick
Thank you for purchasing the Cyborg F.L.Y. 9 Wireless Flight Stick for use with the PlayStation 3 video game system. Be sure to register your product
online at www.madcatz.com and check out our full line of other quality video game accessories.
IMPORTANT! Before using the PlayStation 3 system with this product, read the PlayStation 3 system instruction manual for safety, health, and other
information regarding the use of the PlayStation 3 system.
All questions regarding the console should be directed to the manufacturer.
GENERAL SETUP
CONNECTING YOUR CONTROLLER TO YOUR PS3 SYSTEM
Up to four controllers, wired and wireless, can be actively connected to a PlayStation 3 console at one time. Each connected controller is assigned a
player indicator number. To connect a wireless controller, a player indicator number must be free (unlit).
1. Insert 2 (two) AA batteries into the battery compartment.
2. Insert the USB receiver into any available USB port on the PS3 – the receiver’s Red LED will flash.
3. Power ON the Wireless Flight Stick – the 4 (four) controller port indicator LEDs located at the top of the Flight Stick will rapidly flash while the
Flight Stick is searching for a signal.
4. Once a connection has been established, the 4 (four) LEDs will flash less rapidly and the receiver’s LED will turn solid.
5. Press the Home Button (located between Start and Select) on the Flight Stick. The PS3 will automatically assign a player number – from 1 (one) to 7 (seven).
6. The assigned player number will be indicated by the LEDs at the top of the Flight Stick:
a. Player 1 (one) – the LED above the # 1 (one) position will be lit.
b. Player 6 (six) – the LEDs above the # 2 (two) and # 4 (four) positions will be lit. Refer to your PS3’s instruction manual for more information.
SETTING UP YOUR WIRELESS FLIGHT STICK
A. Attach the Flight Stick handle to the base by inserting it into the base collar and tightening the securing screw.
B. Remove the adjustment tool from the compartment on the Flight Stick base.
C. Press the locking switch (c1) and move the Flight Stick up or down to adjust the height.
D. Insert the adjustment tool in the locking nut (d2) and turn counter-clockwise. Press the locking pin (d1) in and move the stick forward or backwards
to the required angle. Lock by turning locking nut (d2) clockwise.
E. Insert the adjustment tool into the locking nut (e1) and turn counter-clockwise. Move to the desired angle and lock by turning the locking nut clockwise.
LAP-MOUNT OPTIONS
To make it easier to use your Flight Stick on your lap, we have added 4 (four) lap-mount brackets. To attach the brackets, turn the Flight Stick over.
Each bracket will display the letter L or R. The L brackets will attach onto the left side and the R brackets will attach onto the right side. To attach,
push the brackets into the securing holes (f1) and with all brackets in place, slide the lock catches (f2) into place.
CONFIGURING YOUR WIRELESS FLIGHT STICK FOR DIFFERENT GAME TITLES
Your Flight Stick has two modes which configure controls for specific flying games. You can switch between modes by sliding the switch on the right
side of the Flight Stick base to either mode M1 or M2. In mode M1, all controls will have the default labeled function - please see your game manual.
Mode M1 (Page 4) - Your Flight Stick buttons and controls are configured to play IL-2 Sturmovik, Tom Clancy: HAWX, or any future flight simulation games.
Mode M2 (Page 5) - Your Flight Stick buttons and controls are configured to play Blazing Angels 1 and 2.
FREQUENTLY ASKED QUESTIONS (FAQ)
QUESTION: When I have the Cyborg F.L.Y. 9 Flight Stick plugged into my PS3, I cannot navigate the XMB (XrossMediaBar) menu correctly.
ANSWER: Ensure the throttle is set to the “0” (neutral) position. If the throttle is engaged all the way up or down, you may experience the XMB menu
moving unexpectedly. When the Flight Stick is in mode 2, the throttle emulates the analog stick on a standard gaming controller used to navigate the
XMB menu.
QUESTION: My Flight Stick is not functioning at all. The LEDs surrounding the Home button are flashing, but there is no response in the XMB menu or game.
ANSWER 1
: Ensure fresh batteries are in the Flight Stick. If the battery level is too low, you may experience loss of connection to the USB dongle and console.
ANSWER 2:
Pair again (synchronize) the USB dongle with the Flight Stick:
1. Insert USB dongle into PS3 console.
2. Power ON Flight Stick by pushing Home button.
3. Simultaneously hold down both the Home button and the L3 (left stick button) for 5-10 seconds.
4. If successfully paired, the player indicator LEDs surrounding the Home button will no longer flash, and one of those LEDs will stay lit.
A B C D E
c1
d1
d2
e1
F
f1
f2
Ladda ner bruksanvisning i Svenska (PDF, 0.46 MB)
(Tänk på miljön och skriv endast ut denna bruksanvisning om det verkligen är nödvändigt)

Loading…

Betyg

Berätta vad du tycker om Cyborg F.L.Y 9 (for PlayStation 3) Spelkontroll genom att betygsätta den. Vill du dela med dig av dina åsikter om denna produkt eller ställa en fråga? Lämna en kommentar nederst på sidan.
Är du nöjd med Cyborg F.L.Y 9 (for PlayStation 3) Spelkontroll?
Ja Nej
Bli den första personen som betygsätter denna produkt
0 röster

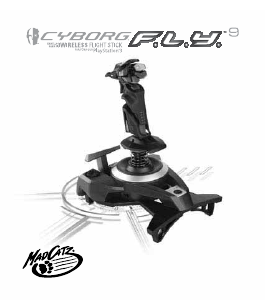
Delta i konversationen om denna produkt

Här kan du dela vad du tycker om Cyborg F.L.Y 9 (for PlayStation 3) Spelkontroll. Om du har en fråga, läs först noggrant igenom manualen. Att begära en manual kan göras genom att använda vårt kontaktformulär.

Mer om denna bruksanvisning

Vi förstår att det är trevligt att ha en pappersbruksanvisning för din Cyborg F.L.Y 9 (for PlayStation 3) Spelkontroll. Du kan alltid ladda ner bruksanvisningen från vår hemsida och skriva ut den själv. Om du vill ha en originalbruksanvisning rekommenderar vi att du kontaktar Cyborg. De kanske kan tillhandahålla en originalbruksanvisning. Letar du efter bruksanvisningen för din Cyborg F.L.Y 9 (for PlayStation 3) Spelkontroll på ett annat språk? Välj ditt föredragna språk på vår hemsida och sök efter modellnumret för att se om vi har det tillgängligt.

Specifikationer

Märke Cyborg
Modell F.L.Y 9 (for PlayStation 3)
Kategori Spelkontroller
Filtyp PDF
Filstorlek 0.46 MB

Alla bruksanvisningar för Cyborg Spelkontroller
Fler bruksanvisningar för Spelkontroller

Vanliga frågor om Cyborg F.L.Y 9 (for PlayStation 3) Spelkontroll

Vårt supportteam söker efter användbar produktinformation och svar på vanliga frågor. Om du hittar en felaktighet bland våra vanliga frågor uppskattar vi om du meddelar oss detta via vårt kontaktformulär.

Ett batteri i min enhet är oxiderat, kan jag fortfarande använda det säkert? Verifierad

Ja, enheten kan fortfarande användas säkert. Ta först bort det oxiderade batteriet. Använd aldrig bara händer för att göra detta. Rengör sedan batterifacket med en bomullspinne doppad i ättika eller citronsaft. Låt det torka och sätt i nya batterier.

Detta hjälpte (143) Läs mer

Kan jag linda sladden runt enheten efter användning? Verifierad

Det är bättre att inte göra detta eftersom det kan skada sladden. Det bästa du kan göra är att slå in sladden som den var när produkten förpackades.

Detta hjälpte (109) Läs mer
Bruksanvisning Cyborg F.L.Y 9 (for PlayStation 3) Spelkontroll

Relaterade produkter

Relaterade kategorier