
GB
GBGBGBGB
GBGBGBGB
GBGBGB
Ennen käyttöönottoa
Paristojen paikoilleen asetus
Paina paristotilan kannen
6
,
15
avauspainiketta
8
,
16
ja
käännä kansi auki.
Aseta paristot paristotilaan
7
,
14
. Tarkista, että napai-
suus on oikea! Tämä näytetään paristotilassa.
Käännä paristotilan kansi
6
,
15
taas alas. Avauspai-
nike
8
,
16
lukkiutuu kuultavasti.
Huomautus: Etuvalon Päälle- / Pois -painikkeessa
2
on paristoilmaisin. Mikäli tämä palaa punaisena, paristot
on vaihdettava.
Huomautus: Takavalon sisällä, LEDin alapuolella, on
paristoilmaisin. Tämä palaa vihreänä. Mikäli tämä palaa
heikosti tai ei enää ensinkään, paristot on vaihdettava.
Tarkista paristoja paikoilleen asettaessasi, että napaisuus
on oikea! Tämä näytetään paristotilassa.
Puhdista paristo- ja laitekontaktit tarvittaessa ennen niiden
paikoilleen asetusta.
Tyhjentyneet paristot on poistettava laitteesta välittömästi.
Ne voivat vuotaa paristotilaan!
Paristot eivät kuulu talousjätteisiin!
Jokainen kuluttaja on lain mukaan velvoitettu hävittämään
paristot määräystenmukaisesti!
VARO! RÄJÄHDYSVAARA! Säilytä paris-
tot lasten ulottumattomissa. Älä koskaan heitä
paristoja tuleen äläkä oikosulje tai pura niitä!
Ellei näitä edellä mainittuja ohjeita noudateta, paristot
voivat tyhjentyä yli loppujännitteensä. Silloin on olemassa
vuotamisvaara. Jos laitteesi paristo on päässyt vuotamaan,
poista se välittömästi, näin vältät laitteen vaurioitumisen!
Vältä kosketusta ihoon, silmiin ja limakalvoihin. Huuhtele
paristohapon kanssa kosketuksiin joutunut kohta heti run-
saalla vedellä ja / tai mene välittömästi lääkäriin!
Muista, että asiantuntemattomasta käsittelystä, käyttöohjeen
noudattamatta jättämisestä tai valtuuttamattomien henki-
löiden puuttumisesta tuotteeseen aiheutuneet vauriot on
poissuljettu takuun piiristä.
Älä missään tapauksessa pura tuotetta osiin. Asiantunte-
mattomista korjauksista voi aiheutua huomattavia vaaroja
käyttäjälle. Anna korjaukset ainoastaan pätevän ammat-
tihenkilön tehtäväksi.
LED-lamppuja ei voida vaihtaa.
Paristojen
turvallisuusohjeet
Poista paristot, jos tuote on pitemmän ajan pois käytöstä.
VARO! RÄJÄHDYSVAARA! Älä koskaan
lataa paristoa uudelleen!
Turvallisuusohjeet
HENGEN- JA TAPA-
TURMAVAARA PIKKULAPSILLE JA
LAPSILLE! Älä koskaan jätä pakkausmateri-
aalia lasten käsiin ilman valvontaa. Pakkausmateriaali voi
aiheuttaa tukehtumisvaaran. Lapset aliarvioivat useinkin
uhkaavat vaarat. Pidä lapset aina loitolla tuotteesta. Tuote
ei ole lasten leikkikalu!
Tämä tuote ei ole tarkoitettu sellaisten henkilöiden (lapset
mukaan luettuina) käyttöön, joiden fyysinen, aistimuksellinen
tai henkinen kunto on rajoittunut tai joilla ei ole kokemusta /
tietoja laitteen käytöstä. He saavat käyttää laitetta aino-
astaan turvallisuudesta vastuussa olevan henkilön valvon-
nassa tai jos heille on annettu opastusta laitteen käytössä.
Lapsia on valvottava ja varmistauduttava, etteivät he pääse
leikkimään tuotteen kanssa.
FIFIFIFI
FIFIFI
LED Bike Light Set
Introduction
The operating instructions form part of this product.
They contain important information on safety, assem-
bly and disposal. Make yourself familiar with all
the operating instructions and safety advice for the product
before use. Use the product only as described and for the
indicated purposes. If you pass the product on to anyone else,
please ensure that you also pass on all the documentation
with it.
Proper use
The product is intended to be used as a light source on bicycles
for illuminating the road. The light provided is in addition to
dynamo lighting. Lighting provided by a LED battery light set
alone is only allowed on racing cycles weighing less than 11 kg.
The distribution of light must not be obstructed by other parts
of the bicycle. The product is intended for outdoor use. Any
use other than that described here or modification to the
product is not permitted and could lead to injury and / or
damage to the product. The manufacturer accepts no liability
for loss or damage arising from improper use. The product is
not intended for commercial use.
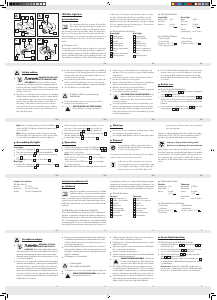
Description of parts
Front light:
1
Light housing
2
On / Off Button
3
Bracket
4
Clamping bolt
5
Mounting ring
6
Battery compartment
cover
7
Battery compartment
8
Opening button
Rear light:
9
Light housing
10
On / Off Button
11
Bracket
12
Clamping bolt
13
Mounting ring
14
Battery compartment
15
Battery compartment
cover
16
Opening button
Technical data
Front light:
Rated power: 3 W
LED class: 1
Batteries: 4 x AA
(1.5 V )
Rear light:
Bulbs: 5 LEDs
LED class: 1
Batteries: 2 x AAA
(1.5 V )
Battery
operating life: up to 50 hrs
Included items
1 LED front light
1 Front bracket
4 Batteries, AA, 1.5 V
1 Operating instructions
1 LED rear light
1 Rear bracket
2 Batteries, AAA, 1.5 V
Please note that damage arising from improper handling,
non-observance of the operating instructions or interference
with the inside of the device by unauthorised persons is
excluded from the warranty.
Never take the product apart. Unsatisfactory repairs can
lead to considerable danger for the user. Have repairs
carried out by a suitably qualified or experienced specialist.
The LED bulbs are non-replaceable.
Safety advice concerning
batteries
Remove the batteries if you are not going to use the
product for an extended period.
CAUTION! RISK OF EXPLOSION!
Never attempt to recharge the batteries!
Safety advice
DANGER OF LOSS OF
LIFE OR ACCIDENT TO INFANTS AND
CHILDREN! Never leave children unsuper-
vised with the packaging materials. Packaging materials
present a suffocation hazard. Children often underestimate
danger. Always keep children away from the product. The
product is not a toy!
This device is not intended to be used by persons (including
children) with restricted physical, sensory or mental abilities
or with insufficient experience and / or knowledge, unless
they are supervised by a person who is responsible for
their safety or they have received instruction on how to
use the device from such a responsible person. Children
should be supervised in order to ensure that they do not
play with the product.
Make sure you insert the batteries the right way round
(polarity). The correct polarity is shown inside the battery
compartment.
If necessary clean the contacts on the batteries and on
the device itself before inserting them.
Remove exhausted batteries from the device immediately,
Otherwise the batteries are more likely to leak.
Batteries do not belong in household refuse.
Every consumer is obliged to dispose of batteries properly
in accordance with the regulations.
CAUTION! RISK OF EXPLOSION! Keep
batteries away from children. Do not throw
batteries into a fire. Never short-circuit them
or take them apart.
If you disregard the above instructions and advice, your
batteries may discharge beyond their minimum voltage,
thus increasing the chance of leakage. If your batteries
leak, remove them from the device immediately to prevent
it from being damaged.
Do not let the fluid from a leaking battery come into contact
with your skin, eyes or mucous membranes. In the event
of contact with fluid leaking from a battery, thoroughly
flush the affected area with water and / or seek the advice
of a doctor!
Before use
Inserting the batteries
Press the opening button
8
,
16
of the battery compartment
cover
6
,
15
and lift it up.
Insert the batteries into the battery compartment
7
,
14
.
Make sure you fit the batteries the right way round (polar-
ity). The correct polarity is shown inside the battery com-
partment.
Lower the battery compartment cover
6
,
15
again. The
opening button
8
,
16
can be heard to engage.
When doing this, ensure that the nut, which is loose in
the recess in the mounting ring
13
, does not fall out.
Place the mounting ring
13
around the saddle post.
Refasten the bracket
11
back on to the mounting ring
13
with the clamping bolt
12
.
Push the light housing
9
on to the bracket
11
.
Operation
Switch on the lights by pressing the On / Off button
2
,
10
.
Switch the lights off by pressing the On / Off button
2
,
10
again or for a second time.
Note: The front light has two illumination settings.
20 lux: Press the On / Off button
2
once for cycling in
dark, unlit areas.
10 lux: Press the On / Off button
2
for a second time
for cycling in lit areas.
Note: If the LEDs fail then the whole light must be replaced.
Note: There is a battery indicator in the On / Off button
2
of the front light. This lights up red when the batteries need
to be replaced.
Note: There is a battery indicator inside the rear light
below the LEDs. This lights up green. If this glows weakly
or not at all, then the batteries need to be replaced.
Assembling the lights
Front light:
Release the clamping bolt
4
from the mounting ring
5
.
Place the mounting ring
5
around the handlebar.
Turn the clamping bolt
4
to tighten it into the mounting
ring
5
.
Push the light housing
1
on to the bracket
3
.
Rear light:
Release the clamping bolt
12
from the mounting ring
13
and remove the bracket
11
.
Cleaning
Do not use corrosive or abrasive cleaning agents. Other-
wise damage to the product may occur.
Use a slightly damp, fluff-free cloth for cleaning the product.
Disposal
The packaging is wholly composed of environ-
mentally friendly materials that can be disposed
of at a local recycling centre.
Contact your local refuse disposal authority for more details
of how to dispose of your worn-out product.
In the interest of the environment, do not throw
out your product with your household refuse. Take
it to a suitable centre where it can be disposed of
properly. Your local council will be able to tell
you where the collection centres are located and
their opening times.
Defective or exhausted batteries must be recycled in accordance
with Directive 2006 / 66 / EC. Return the batteries and / or
the device through the appropriate collection facilities.
Pb
Improper disposal of rechargeable
batteries can damage the environment!
Batteries must not be disposed of with the household refuse.
They may contain toxic heavy metals and require to be handled
as special waste. The chemical symbols of heavy metals are:
Cd = cadmium, Hg = mercury, Pb = lead For this reason, you
must dispose of discarded batteries at a communal disposal
centre.
Led-paristovalaisinsetti
Johdanto
Käyttöohje on tärkeä osa tätä tuotetta. Se sisältää
tärkeitä turvallisuus-, asennus- ja hävittämisohjeita.
Tutustu ennen tuotteen käyttöönottoa sen kaikkiin
käyttö- ja turvallisuusohjeisiin. Käytä tuotetta vain kuvatulla
tavalla ja ainoastaan ilmoitettuihin käyttötarkoituksiin. Anna
kaikki ohjeet aina mukaan, jos luovutat tuotteen edelleen muille
käyttäjille.
Määräystenmukainen käyttö
Tuote toimii valolähteenä polkupyörille ajotien valaistukseen.
Valaistus on tarkoitettu lisävarusteeksi dynamo-valaistukseen.
LED-paristovalaisinsetti on sallittu ainoaksi valaistukseksi vain
alle 11 kilon kilpapyöriin. Valaistukseen ei saa vaikuttaa mikään
muu polkupyörän osa. Tuote on tarkoitettu ulkokäyttöön. Muun-
lainen käyttö kuin mitä kuvattu tai muutosten teko laitteeseen
Product description:
LED Bike Light Set
Art. No.: 97331-3
Model No.: XC-992 / XC-998
Model: DuoLux / Kompakt Plus
on määräystenvastaista ja voi aiheuttaa huomattavia tapatur-
mavaaroja ja / tai tuotteen vahingoittumisen. Valmistaja ei ota
mitään vastuuta määräystenvastaisesta käytöstä aiheutuneista
vahingoista. Tuote ei ole tarkoitettu ammattimaiseen käyttöön.
Osien kuvaus
Etuvalo:
1
Valaisimen kotelo
2
Päälle- / Pois -painike
3
Kiinnitin
4
Lukitusruuvi
5
Kiinnitysrengas
6
Paristotilan kansi
7
Paristotila
8
Avauspainike
Takavalo:
9
Valaisimen kotelo
10
Päälle- / Pois -painike
11
Kiinnitin
12
Lukitusruuvi
13
Kiinnitysrengas
14
Paristotila
15
Paristotilan kansi
16
Avauspainike
Tekniset tiedot
Etuvalo:
Nimellisteho: 3 W
LED-luokka: 1
Paristo: 4 x AA
(1,5 V )
Takavalo:
Valonlähde: 5 LEDiä:
LED-luokka: 1
Paristo: 2 x AAA
(1,5 V )
Valaistuksen
kesto: max 50 tuntia
Toimitukseen kuuluu
1 LED-etuvalo
1 etukiinnitin
4 paristoa, AA, 1,5 V
1 käyttöohje
1 LED-takavalo
1 takakiinnitin
2 paristoa, AAA, 1,5 V
A
2
1
B
8
6
7
3
C
9 10
11
4
5
12
13
D
14
15
16

Delta i konversationen om denna produkt
Här kan du dela vad du tycker om Crivit IAN 64303 Cykellampa. Om du har en fråga, läs först noggrant igenom manualen. Att begära en manual kan göras genom att använda vårt kontaktformulär.