
English
GREAT BRITAIN • customer service
3
4
5
2
1
Ver. 20130624
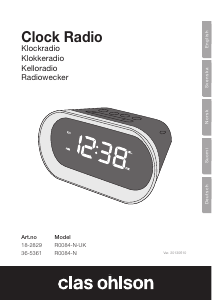
Radio Controlled Alarm Clock
Art.no 36-5340 Model RC123
Please read theentire instruction manual before using theproduct and save it
for future reference. We reserve theright for any errors in text or images and any
necessary changes made to technical data. If you have any questions regarding
technical problems please contact our Customer Services.
Things to consider:
• Other wireless equipment using thesame frequency can reduce
thetransmission range.
• The range of all wireless equipment depends on thetype of obstacles located
between thetransmitter and thereceiver (e.g. aconcrete wall will interfere with
thesignal more than aplasterboard wall).
If you experience problems, try thefollowing:
• Turn off any other existing wireless equipment and check if this is thecause of
theproblem.
• Reposition thewireless equipment, shorten thedistance between thesending
and receiving devices or reduce thenumber of obstacles (walls, furniture, etc.)
between them.
What is aradio controlled clock?
A radio controlled clock is anextremely accurate timekeeping device. The time is
controlled by theatomic clock in Braunschweig, Germany (accuracy ±1 second per
1 million years). The clock has abuilt -in radio receiver that decodes theincoming
atomic clock signal (long wave 77.5 kHz). The product also has aprecisely
calibrated quartz clock movement with afrequency of 32 kHz that keeps it running.
The transmitter in Germany has anofficial range of 2,000 km. This means that
theUK and Ireland should be well within range.
Safety
• The alarm clock must only be repaired by qualified service technicians.
• The alarm clock is intended for indoor use only.
• Do not place thealarm clock where there is arisk of it falling into water or
other liquid.
• Do not place thealarm clock in damp or dusty environments or where it could
be subject to strong vibrations.
• Do not expose thealarm clock to extremely high or low temperatures. Do not
expose theproduct to direct sunlight.
• Never try to open, change or modify thealarm clock in any way.
• Always remove thebatteries if thealarm clock is not to be used for along time.
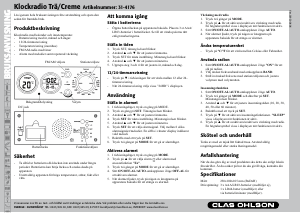
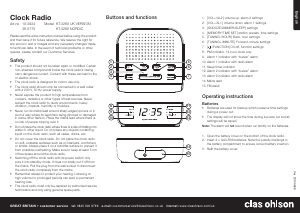
Buttons and functions
3. [ ▲ ] Increases and sets values for
date, time, alarm and activates
backlight
4. [ ▼ ] Decreases and sets values
for date, time, alarm and activates
backlight
5. Battery holder
4. Press [ Alarm on/off ] to turn thealarm on or off.
5. When thealarm sounds, both theset alarm time and alarm icon will flash.
6. Press [ Alarm on/off ] to turn thealarm off.
7. If no button is pushed thealarm will automatically shut off after 2 minutes.
12/24 hour time display
Press [ ▲ ] to select either a12 or 24 hour clock display.
Displaying seconds or day and language selection
Press [ ▼ ] to select whether to display seconds or current day.
Hold in [ ▼ ] for 3 seconds to select language from therolling display:
“DE” (German), “FR” (French), “IT” (Italian), “SP” (Spanish), “DU” (Dutch),
“SW” (Swedish) or “EN” (English). Release thebutton once thedesired
language is shown.
Dual time zone setting
1. Hold in [ ▲ ] until “F” appears in thedisplay.
2. Set the[ Date set, Time set, Alarm set — ] switch in the Time set position.
3. Press [ ▲ ] or [ ▼ ] until thedesired time zone is displayed (-12 to +12 hours).
4. Set the[ Date set, Time set, Alarm set — ] switch in the— position once all
desired settings have been entered.
5. Hold in [ ▲ ] to switch between local/normal time display and theother time zone.
Snooze function
Press [ ▲ ] or [ ▼ ] when thealarm sounds to activate thesnooze function.
The alarm will pause and then sound again after 4 minutes.
Display illumination
Press [ ▲ ] or [ ▼ ] to turn on thebacklight. The backlight has a5-second duration
and turns off automatically.
Care and maintenance
Clean theproduct using alightly moistened cloth. Only use mild cleaning agents,
never solvents or corrosive chemicals.
Troubleshooting guide
The clock is not working. • Check that thebatteries are not flat.
• Check for correct battery insertion.
Disposal
This product should be disposed of in accordance with local regulations.
If you are unsure how to proceed, contact your local authority.
Specifications
Batteries 2×AAA/LR03
Size 80×80×30 mm
1. [ Alarm on/off ]
2. [ Date set, Time set,
Alarm set — ]
Display symbols
Time signal received
Time signal scan
PM (shown only for the12-hour clock display)
Alarm
Snooze
Time zone
British Summer Time (GMT+1)
Low battery
Operating instructions
1. Open thebattery cover by sliding it downwards.
2. Insert 2×AAA/LR03 batteries. Note thepolarity markings in thebattery
compartment to ensure correct insertion.
3. Once thebatteries have been inserted theclock will immediately begin
scanning for thetime signal transmission
4. If thetime signal is received, both time and date will automatically be set and
thereceived time signal icon will appear.
If no time signal is received, thesearch icon will stop flashing and no icon willap-
pear. The time and date must also be set manually.
Manually setting thedate
1. Set the[ Date set, Time set, Alarm set — ] switch in the Date set position.
2. Hold in [ ▲ ] or [ ▼ ] until thecorrect year appears. Release thebutton when
thecorrect year is shown.
3. Hold in [ ▲ ] or [ ▼ ] until thecorrect month appears. Release thebutton when
thecorrect month is shown.
4. Hold in [ ▲ ] or [ ▼ ] until thecorrect day appears. Release thebutton when
thecorrect day is shown.
Manually setting thetime
1. Set the[ Date set, Time set, Alarm set — ] switch in the Time set position.
2. Hold in [ ▲ ] or [ ▼ ] until thecorrect time appears.
Setting thealarm
1. Set the[ Date set, Time set, Alarm set — ] switch in the Alarm set position.
2. Hold in [ ▲ ] or [ ▼ ] until thecorrect alarm time appears.
3. Set the[ Date set, Time set, Alarm set — ] switch in the— position once all
desired settings have been entered.

Delta i konversationen om denna produkt
Här kan du dela vad du tycker om Clas Ohlson RC123 Klockradio. Om du har en fråga, läs först noggrant igenom manualen. Att begära en manual kan göras genom att använda vårt kontaktformulär.
svara | Detta hjälpte (0) (Översatt av Google)