Safety instructions
Read the following instructions carefully before using the
appliance. Keep this instruction manual for future reference or
new users.
- Make sure that the mains voltage matches the voltage specied
on the product’s rating label and that the plug is earthed.
- This appliance can be used by children aged 8 years and above
and people with reduced physical, sensory, or mental capabilities
or lack of experience and knowledge if they have been given
supervision or instruction concerning the use of the appliance in
a safe way and understand the hazards involved. Children must
not play with the appliance. Cleaning and user maintenance
must not be carried out by children without supervision.
- The appliance must be powered at a low safety voltage as
stated on the marking.
- This device should only be used with water or specic solutions.
- To avoid risk of burns, electric shock, re, or injury:
- Do not attempt to connect or disconnect the charger with wet
hands. To disconnect it, pull on the adapter, not the cable.
- Ensure the mains voltage matches the voltage specied on the
appliance’s rating label and that the socket is properly earthed.
- Check the charging cable regularly for visible damage. If the cord
or adapter is damaged, malfunctioning, or has been dropped, it
must be repaired by Cecotec’s ocial Technical Support Service
to avoid any danger.
- Disconnect the charger from the mains when the product is
charged.
- Keep the product and cord away from re and other heat
sources.
-Never leave a product unattended while plugged in.
- You must charge the product with the charger supplied by
Cecotec. Do not use any other charger type.
- Use the appliance only for the purposes described in this
manual.
- Only use tips or accessories recommended or marketed by
Cecotec.
- Do not drop or insert any foreign object into any opening or
hose.
- Do not direct water under the tongue, ear, nose, or other
sensitive areas. This product can produce pressures which may
cause serious damage in these areas.
- Do not use the device if you are wearing oral jewellery. Remove
it before use.
- Do not use the device if you have an open wound on your tongue
or your mouth. If you have been advised by your physician to
receive antibiotic pre-medication prior to dental procedures, you
should consult your dentist before using this device or any other
oral-hygiene device.
- This appliance is designed for domestic use only and is not
intended for bars, restaurants, farmhouses, hotels, motels, and
oces.
- Store the appliance and its instruction manual in a safe and dry
place when not in use.
- The oral irrigator may cause bleeding gums when rst used.
This is completely normal and will stop happening with frequent
use. Adjust the intensity of the appliance to reduce the presence
of bleeding gums.
- Do not use the device without assembling a tip.
- Do not place the device in a hot or wet place, nor in places with
direct sunlight.
- During cleaning or maintenance, make sure that the device is
switched o and is not charging.
- Users suering from periodontitis or those who have
undergone oral surgery within the last 2 months should consult
a physician before using this device.
- Do not try to open, disassemble, or repair the appliance by
yourself. There are no serviceable parts inside the appliance.
- To avoid burns, do not ll the tank or attempt to clean your
mouth with water above 40 ºC.
- Do not use the device for any purpose other than oral hygiene.
- To avoid injury, do not press the tip between your gums or teeth.
- Do not use iodine, salt water, or concentrated essential oils
that are insoluble in water with this appliance. Doing so would
reduce performance and shorten its shelf life.
- Do not ll the device with pure mouthwash liquid. If you
want to use mouthwash, dilute it according to the appropriate
proportions.
Battery instructions
- This appliance contains an irreplaceable battery.
- This appliance includes a Li-ion battery. Do not incinerate or
expose it to high temperatures, as it may explode.
- WARNING: to recharge the battery, use only the power cord
supplied with the appliance.
- Leaks from the battery or cells can occur under extreme
conditions. Do not touch any liquid that leaks from the battery.
If the liquid comes into contact with skin, wash immediately
with soap and water. If the liquid gets into the eyes, wash them
EN
immediately with clean water for a minimum of 10 minutes and
seek medical attention. Wear gloves to handle the battery and
dispose of it immediately in accordance with local regulations.
- Keep batteries out of the reach of children when there is a risk
of ingestion.
- Battery ingestion can cause burns, soft tissue perforation and
death. Severe burns may occur within two hours of ingestion.
- In case of battery ingestion, please seek medical help
immediately.
- Do not expose batteries to heat or re. Avoid storage in direct
sunlight.
- Do not subject batteries to mechanical shock.
- Do not leave the battery charging for an extended period of
time when not in use.
- After long periods of storage, it may be necessary to charge
and discharge the batteries several times to obtain maximum
performance.
- Dispose of the battery properly.
- The recommended room-temperature range during charging is
between 4 °C and 40 °C.
- The recommended room temperature range for battery
storage is between 0 to 50ºC.
- The recommended room-temperature range during charging is
between 5 and 50 °C.
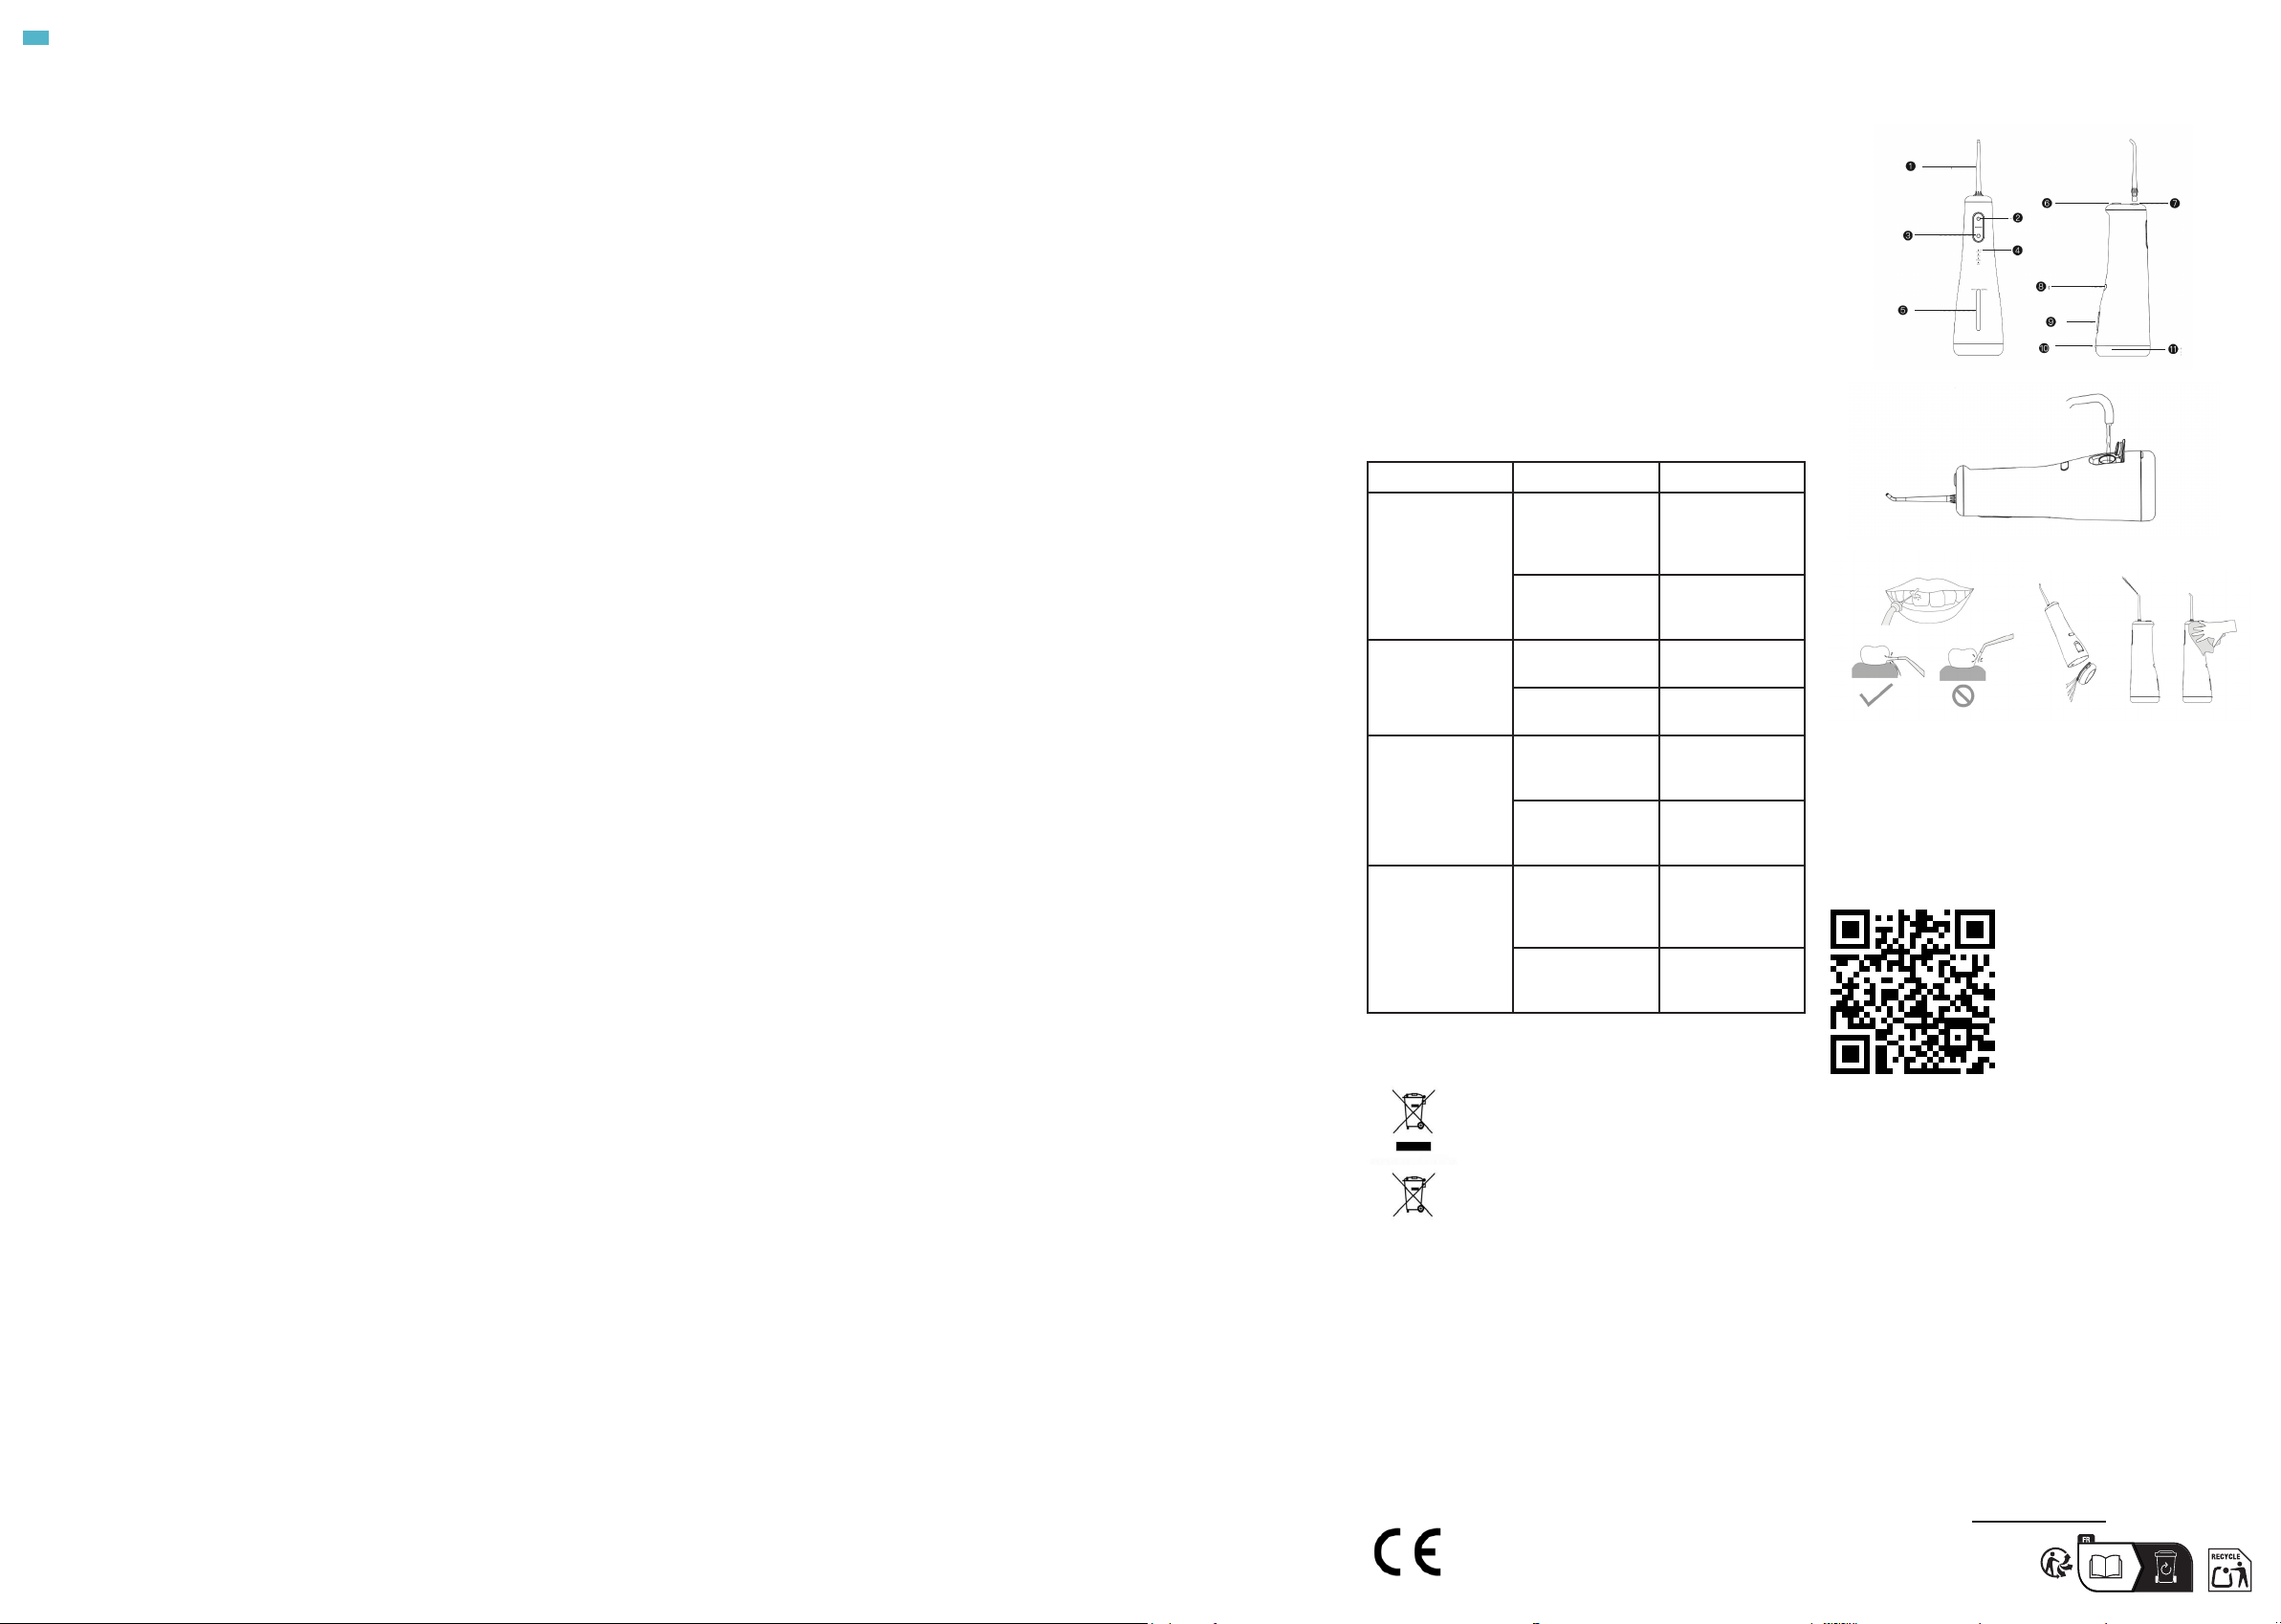
1. Parts and components
Fig. 1
1. Replaceable tip
2. Power button
3. Mode selection button
4. Mode indicator light
5. Water tank level viewing window
6. Tip release button
7. Tip input port
8. Charging port
9. Water inlet port
10. Water tank drainage button
11. Water tank lid
NOTE:
The graphics in this manual are schematic representations and
may not exactly match the product.
2. Before use
- This appliance comes in a packaging designed to protect it
during transport. Take the appliance out of its box and remove
all packaging materials. You can keep the original box and other
packaging materials in a safe place to prevent damage to the
appliance if you need to transport it in the future. If you wish
to dispose of the original packaging, make sure all items are
recycled properly.
- Check that all parts and components are included and in good
condition. If any of them are missing or damaged, please contact
Cecotec’s Ocial Technical Support Service immediately.
Box content
- ToothCare Jet Liberty
- 5 standard tips
- 1 orthodontic tip
- 1 periodontal tip
- 1 tongue cleaner
- Charging cable
- Instruction manual
3. Operation
Make sure that the battery is fully charged before using the
device for the rst time. The device cannot be used while
charging.
Filling the water tank
Make sure the device is switched o before adding water to the
tank.
1. Remove the water inlet cap by pulling it downward and ll the
tank.
Fig. 2
2. Once lled, replace the cap ensuring there are no leaks.
Attaching the tip
1. Insert the tip into the designated port. A click will be heard
when properly inserted.
2. Rotate the tip to adjust the water output direction.
3. To remove the tip, press the release button and pull upwards.
Mode selection
You may select one of the 4 available operating modes before
switching on the device. To do this, press the mode change
button repeatedly. The indicator light for each mode will light up
for 5 seconds.
1. The rst light corresponds to the Clean mode.
2. The second light corresponds to Soft mode.
3. The third light corresponds to the Pulse mode.
4. The fourth light corresponds to the DIY mode.
Note: The DIY mode pressure can only be adjusted when the
irrigator is switched on.
You may also change modes while using the irrigator by
repeatedly pressing the mode selection button.
Adjusting the DIY mode water pressure
To adjust the pressure in DIY mode, press and hold the mode
selection button while the irrigator is running. You will notice
dierent pressure levels as you keep the button pressed.
Using the irrigator
1. Fill the water tank and insert a tip into the irrigator.
2. Select the desired mode and place the irrigator tip in your
mouth.
NOTE: When using the device for the rst time, start with Soft
mode or DIY mode at its lowest setting. Water pressure can be
gradually increased as your mouth adapts. You may experience
slight gum tingling or minor bleeding during use. This is normal
and should subside after 1-2 weeks of continued use.
3. Direct your mouth towards the sink and keep it slightly open to
allow water to ow out.
4. Press the power button once to switch on the device.
5. Begin cleaning from the back molars and move the irrigator,
maintaining it at 90°, along the gum line and between teeth until
reaching the incisors. Continue to the molars on the other side.
NOTE: Use a continuous movement; do not linger too long on
each tooth to avoid gum damage.
Fig. 3
1. Repeat this step on both outer and inner surfaces of each jaw.
2. If you need to rell the water tank during use, switch o the
irrigator, rell the tank and then turn it back on to continue
cleaning.
3. When you have nished using the device, switch it o by
pressing the power button. The device will automatically switch
o after 2 minutes of continuous operation.
Note: The irrigator memorises the last setting, so when you
switch it on again it will automatically programme the last mode
used.
4. Empty the water from the irrigator and remove it after each
use.
Checking the battery charge level
Once you switch o the irrigator using the power button, the
mode lights will illuminate indicating battery level as follows:
- Between 100 and 75% - all lights on
- Between 75 and 50% - three lights on
- Between 50 and 25% - two lights on
- Between 25 and 0% - one light on
Charging the irrigator
Connect the charging cable to the irrigator and a compatible
power adapter.
While charging, one of the mode lights will slowly ash
depending on the battery range. When fully charged, all 4 mode
indicator lights will remain illuminated.
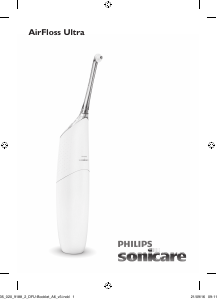
4. Cleaning and maintenance
Before cleaning the device, make sure that it is switched o.
Fig. 4
- Remove the water inlet plug. Turn the irrigator upside down to
remove all water.
- Remove the water tank by pulling it and rinse its interior with
clean water at room temperature. Do not clean the tank with any
type of cleaning agent.
- Remove the tip and clean it with water.
- Only use clean water or a neutral cleaning agent to clean the
body of the device. Do not use abrasive or corrosive products.
The temperature of the water used to clean the device must not
exceed 50 °C, otherwise the device may get damaged.
- Do not immerse the body of the device in water. If necessary,
clean the surface of the device with a soft cloth and a little
neutral soap.
- After cleaning the irrigator, dry all parts thoroughly before
storing.
- Store the device in a dry place away from sunlight.
Limescale removal
- Depending on the mineral content of the water used, limescale
deposits may build up in the device. If not removed, product
eciency will decrease.
- Direct the tip towards the sink, switch on the device and allow
all water to drain from the tank.
- Fill the tank with clean lukewarm water and repeat the previous
step to clean the tank. This cleaning process should be repeated
every 1-3 months.
5. Troubleshooting
Problem Possible cause Solution
The device does
not turn on
Newly purchased
or unused for
more than three
months
Use the device
after charging for
more than 4 hours
Device failure Please contact the
Technical Support
Service
The water
pressure is low
during operation
There is something
blocking the tip
Replace the tip
The lter tip is
blocked
Clean the lter tip
Can only be used
for a short time
with full charge
The battery has
reached the end of
its useful life
Purchase a new
device
Insucient
charging
Use the device
after charging for
more than 4 hours
The charging
indicator
light does not
illuminate while
charging
The power
connector is
not properly
connected
Please connect
the power supply
correctly
The product’s
charging circuit is
faulty
Please contact the
Technical Support
Service
6. Disposal of old electrical and electronic appliances
This symbol indicates that, according to the
applicable regulations, the product and/or
batteries must be disposed of separately from
household waste. When this product reaches
the end of its service life, you must remove the
batteries/accumulators and take it to a collection
point designated by local authorities.
For detailed information on the most appropriate
way to dispose of electrical and electronic
equipment and/or batteries, consumers should contact their
local authorities.
Compliance with the above guidelines will help protecting the
environment.
7. Copyright
The intellectual property rights over the texts in this manual
belong to CECOTEC INNOVACIONES, S.L. All rights reserved. The
content of this publication may not, either in part or in its entirety,
be reproduced, stored in a retrieval system, transmitted or
distributed by any means (electronic, mechanical, photocopying,
recording or similar) without prior authorisation from CECOTEC
INNOVACIONES, S.L.
8. Simplied EU Declaration of Conformity
Cecotec Innovaciones hereby declares that this
product complies with the essential requirements
and other relevant provisions of the regulations
applicable in the European Union. This appliance
has been designed, manufactured and tested in compliance
with required safety and quality standards. The full text of the
EU Declaration of Conformity can be found on the following
website: https://cecotec.es/es/information/declaration-of-
conformity
www.cecotec.es
Fig./Img./Abb./Afb./ Rys. 1
Fig./Img./Abb./Afb./ Rys. 2
Fig./Img./Abb./
Afb./ Rys. 3
Fig./Img./Abb./
Afb./ Rys. 4
ES • Escanea el código QR para leer en más idiomas.
EN • Scan the QR code to access the instruction manual in more lan-
guages.
FR • Scannez ce code QR pour accéder au manuel d’instructions dans
d’autres langues.
DE • Scannen Sie den QR-Code, um die Bedienungsanleitung in mehre-
ren Sprachen zu lesen.
IT • Scansiona il codice QR per accedere al manuale in altre lingue.
PT • Digitalize o código QR para aceder ao manual em mais línguas.
NL • Scan de QR-code voor toegang tot de handleiding in meer talen.
PL • Zeskanuj kod QR, aby przeczytać instrukcje w innych językach.
CZ • Naskenujte QR kód pro zobrazení návodu k použití v dalších jazy-
cích.
TR • Daha fazla dil için kodu tarayın.
CT • Escaneja el codi QR per accedir al manual d’instruccions en més
idiomes.
GR • Σαρώστε τον κωδικό QR για να αποκτήσετε πρόσβαση στο εγχειρίδιο
οδηγιών σε περισσότερες γλώσσες.
HU • Olvasd be a QR-kódot, hogy több nyelven olvashass.
ARA • امسح رمز الاستجابة السريعة لقراءة المزيد من اللغات.


Delta i konversationen om denna produkt
Här kan du dela vad du tycker om Cecotec ToothCare Jet Liberty Flosser. Om du har en fråga, läs först noggrant igenom manualen. Att begära en manual kan göras genom att använda vårt kontaktformulär.