Making Coffee Immediately (Cont.)
7. Do not open the tank cover when the coffee maker is operating. This will
result in hot splashes of water.
8. You can remove the jug to serve when brewing is finished (about one
minute after the coffee stops dripping into the jug.)
Note: The amount of coffee you get will be less than the water you have
put in the tank, as some water is absorbed by the ground coffee.
9. Always turn the coffee maker off and unplug the mains cable from the
mains socket when the coffee maker is not in use.
The brewed coffe in the jug and the grounds in the filter are very hot.
Handle them with care to avoiding scalding.
Funnel Assembly
• Water will overflow if funnel is not locked firmly and properly.
• The funnel should not move when locked properly.
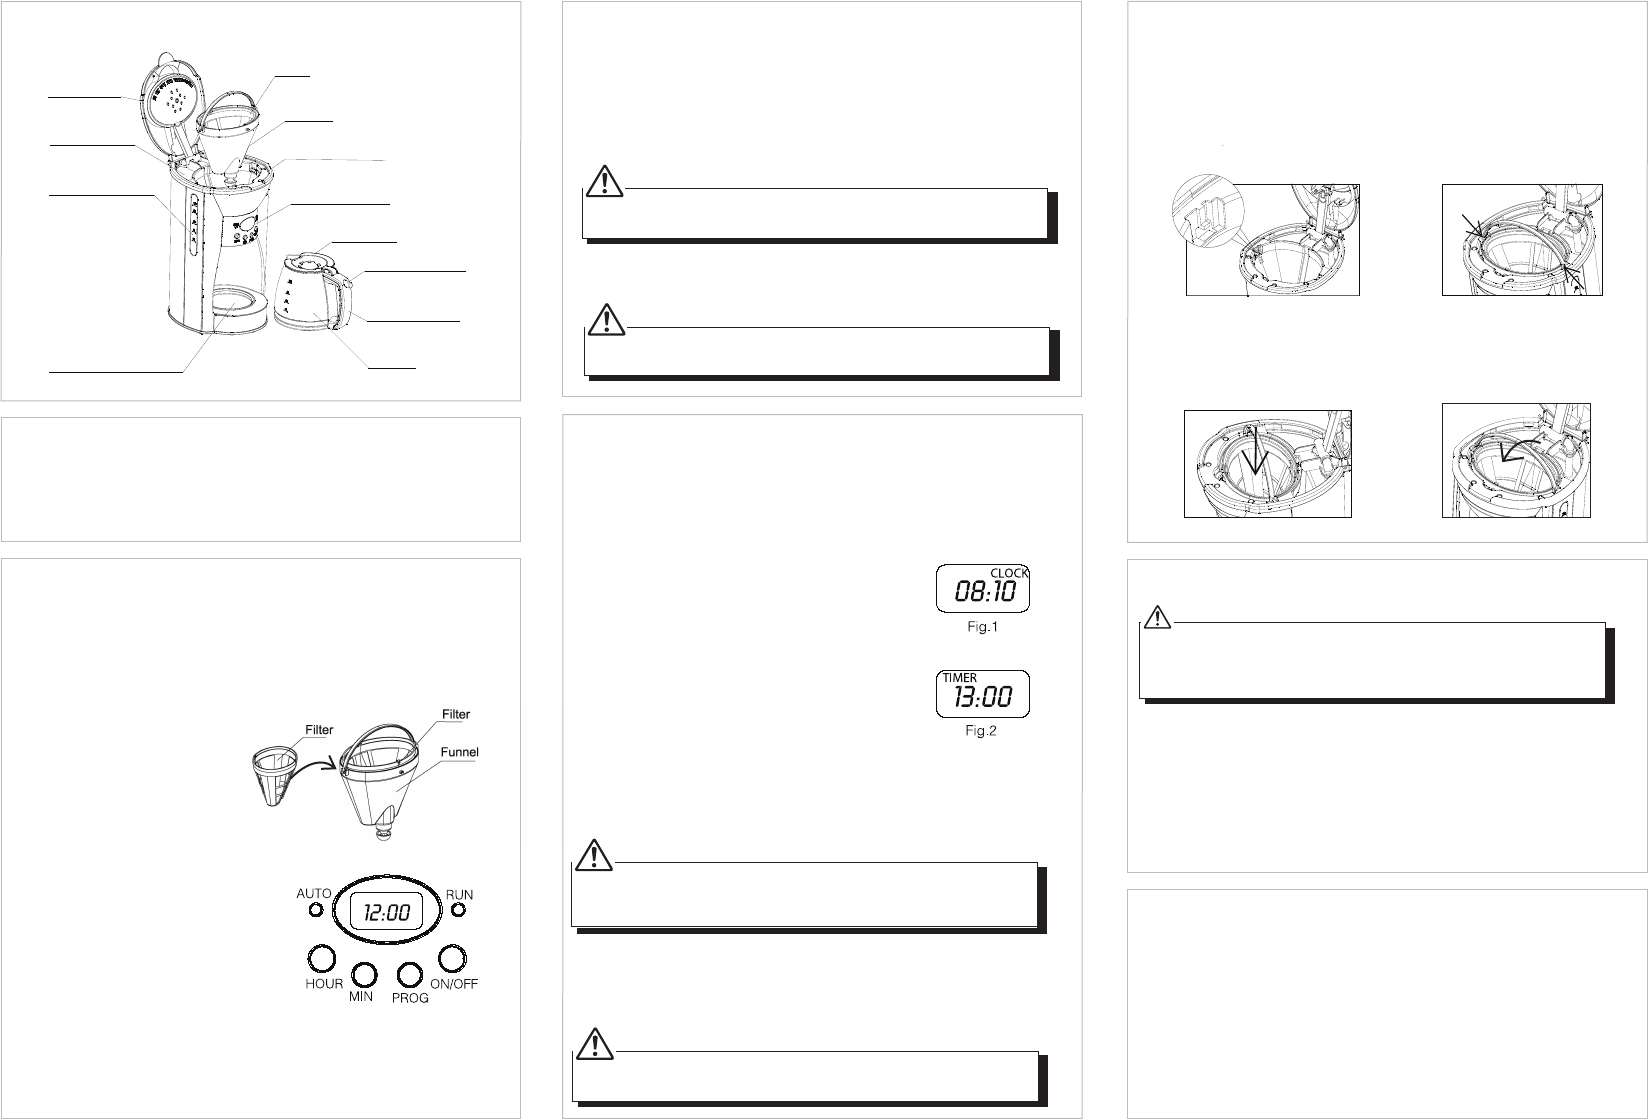
Knowing your Coffee Maker
GB - 2 GB - 3
GB - 4
Tank cover
Gauge
Warming plate
Funnel
Filter
Funnel support
Jug lid
Open lid button
Jug handle
Control panel
Jug
Water tank
Using for the first time
Fill the tank with clean water up to the maximum lever 10, follow the steps in
Making Coffee Immediately (without adding ground coffee) once or twice,
then pour out the hot water. Clean the jug, lid and funnel thoroughly with
warm water. You may now use your coffee maker making coffee.
As a safety concern, keep the lid of the jug closed when pouring. This
can also keep the coffee warm.
Making Coffee Immediately
1. Open the tank cover of the coffee maker and fill with the correct amount
of water into the tank. The water level should not exceed the maximum
lever 10.
2. Add ground coffee into the filter. Usually a cup of coffee needs a level
spoonful of ground coffee, but you may adjust according to your taste.
3. Place the filter with the ground
coffee in the funnel. Then place
them into the funnel support of
the coffee maker, making sure
it is assembled correctly, see
Funnel Assembly for details.
4. Place the jug on the warming plate horizontally.
5. Plug the mains cable into the mains
socket, the LCD will display 12:00
(see Control panel).
6. Press ON/OFF button, the RUN indicator will be illuminated in red.
The appliance will begin working.
Note: You can remove the jug, pour and serve at any time once the
coffee is made. The coffee maker will stop dripping automatically. The
jug must be replaced within 30 seconds.
Automatic Start Function
If you do not want the coffee maker to start immediately, for example it is
now 8:10 am, and you want the coffee maker to automatically start at
1:00 pm, first follow steps 1 to 5 in Making Coffee Immediately, then set the
automatic start function as follows:
1. Press PROG button, the LCD will display CLOCK.
Set the current time by pressing the HOUR and
MIN button (Fig.1).
Note: The time cycle is 24 hours. Select desired
time by pressing the HOUR and MIN button
continuously.
2. Press PROG button again, the LCD will display
TIMER, then set the automatic start time by
pressing the HOUR and MIN button (Fig.2).
3. Press ON/OFF button twice, the AUTO indicator will be illuminated in
green. The LCD will display the current clock after about 10 seconds, you
may see the automatic start time by pressing PROG button.
At 1:00 pm, the AUTO indicator will be extinguished, and the RUN
indicator will be illuminated in red. The appliance will then start automati-
cally. After brewing, you can replace the jug on the warming plate. Whilst
the coffee maker is connected to the mains, the coffee can be kept warm.
You may cancel the automatic start function by pressing ON/OFF
button. If you want to change the automatic start time, repeat the
above 1-3 steps again.
If the coffee maker is left unattended for 2 hours, the power will be cut
off automatically.
4
3
2
1
With the tank cover open,
locate the slot on both sides
of the coffee maker.
Locate the tabs on the funnel
and lower the funnel into the
coffee maker with the handle
upright.
Firmly press the funnel into the
coffee maker till the tabs lock
under the slots, while holding
the handle upright.
Lower the handle down.
Cleaning and Maintenance
Be sure to unplug this appliance before cleaning. To protect against
electrical shock, do not immerse the mains cable, mains plug or the
appliance in water or liquids. After each use, always make sure the
mains plug is first removed from mains socket.
1. Clean the filter, jug and jug lid after each use in hot, soapy water.
2. Wipe the appliance’s exterior surface with a soft, damp cloth to remove
stains. Do not use strong detergent or aggressive cleaners.
3. Water droplets may build up in the area above the filter and drip onto the
product base during brewing. To control the dripping, wipe off the area with
a clean, dry cloth after use.
4. Use a damp cloth to gently wipe the warming plate. Never use abrasive
cleaner to clean it.
Cleaning Mineral Deposits
To keep your coffee maker operating efficiently, you should clean away the
mineral deposits left by the water regularly depending on the water quality in
your area and the frequency of use.
Fill the jug with one part of white vinegar and three parts of cold water. Then
pour the water and vinegar mixture into the tank (do not place any coffee
ground in the appliance), heat the water-vinegar solution as per Instruction
Manual, repeat it until no yellow liquid comes out, then pour out the mixture,
rinsing with tap water until no vinegar odor is left.


Delta i konversationen om denna produkt
Här kan du dela vad du tycker om Carlton C12FCB09 Kaffebryggare. Om du har en fråga, läs först noggrant igenom manualen. Att begära en manual kan göras genom att använda vårt kontaktformulär.