
Register your product and get support at
HD9015
HD9016
www.philips.com/welcome
Specifications are subject to change without notice
© 2016 Koninklijke Philips N.V.
All rights reserved.
EN User manual
DA Brugervejledning
DE Benutzerhandbuch
EL Εγχειρίδιο χρήσης
FI Käyttöopas
FR Mode d’emploi
IT Manuale utente
NL Gebruiksaanwijzing
ES-AR Manual del usuario
NO Brukerhåndbok
SV Användarhandbok
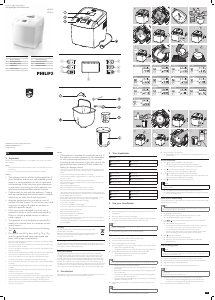
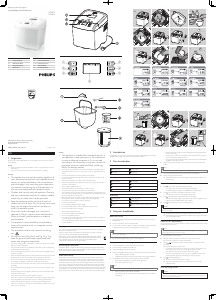
3 Your breadmaker
Main unit
Viewing window Control panel
Cover lid Mains plug
Control panel
Timer increase Loaf weight
Timer decrease Program menu
Crust color Start/stop/cancel button
LCD status display
Accessories
Kneading blade Measuring spoon
Bread pan Measuring cup
Hook
Yoghurt container with lid (HD9016 only)
4 Use your breadmaker
Before the rst use
1 Remove all packaging material from the appliance. Be careful not to throw away the
kneading blade.
2 Remove any labels from the body of the appliance.
3 To remove any dust that may have accumulated on the appliance, wipe the outside of
the appliance, the bread pan and the kneading blade with a damp cloth.
Note
• Never use scouring pads, abrasive cleaning agents or aggressive liquids such as petrol or
acetone to clean the appliance.
4 Dry all parts thoroughly before you start to use the appliance.
Prepare your breadmaker and ingredients
1 Put your breadmaker on a stable, horizontal and level surface.
2 Turn the bread pan anticlockwise and lift it out.
3 Push the kneading blade rmly onto the shaft.
4 Measure the ingredients for the recipe you want to prepare (see the recipes booklet).
• Always measure ingredients accurately.
• All ingredients should be at room temperature unless recipe suggests otherwise.
5 Put ingredients in the bread pan in the order they are listed in the recipe.
• Always add liquid ingredient rst, and then add dry ingredients.
• Do not let the yeast touch the salt.
Note
• Do not add more quantities than mentioned in the recipe as it may damage the breadmaker.
• Always use active dry yeast with this breadmaker.
• The yeast should be dry and separate from other ingredients when it is added to
the bread pan.
• Butter and other fats should be cut into small pieces before putting in the bread
pan to aid the mixing.
• If necessary, use a spatula to scrape down the sides of the bread pan to get the
mixture sticking to the wall back to the mix.
• During the mixing stage, there will be beep sounds to alert you to add additional
ingredients such as nuts if you wish.
6 Put the bread pan in the appliance. Turn the bread pan clockwise until it locks into
position.
Note
• If the bread pan is not assembled properly, the kneading blade does not turn.
7 Put down the handle of the bread pan and close the lid of the appliance.
8 Put the mains plug in the wall socket.
» The appliance beeps and ‘1’ and ‘3:55’ appear on the display, which refers to the
‘White’ program.
Set your breadmaker
1 Press (menu button) repeatedly to select the program.
• The select program number and processing time are displayed.
• For detailed program description, see the Breadmaker recipe supplied.
2 Press (crust color button) repeatedly to select the crust color.
• The selected crust color can be changed from light to dark.
3 Press (loaf weight button) repeatedly to select the loaf weight.
• Make sure the selected weight is appropriate for the amount of ingredients of the
selected recipe. See the Breadmaker recipe supplied.
4 Press (Start/stop button) to start bread making process.
Caution
• During the baking process, the breadmaker itself and the lid become extremely hot. Be careful
not to burn yourself.
» The display counts down the processing time until the bread is ready.
» When the baking process is nished, the breadmaker beeps and goes to the keep-
warm mode (for 60 minutes).
Preset time for delayed baking
You can use the timer if you want the bread to be ready at a later time. The maximum delay
time that can be set is 13 hours.
Note
• Do not use the timer function with recipes that require fresh ingredients that may go bad, for
instance eggs, fresh milk, sour cream or cheese.
1 Put all ingredients in the bread pan.
2 Select the appropriate program, loaf size and crust color for your recipe.
» The total processing time is shown on the display.
3 Press (timer increase and timer decrease button) to choose the desired
preset time.
» The breadmaker enters preset mode.
• For example, if the current time is 19:00 and you want your bread ready at 7:00
next morning (12 hours later), you can set the preset time to 12:00.
• If you keep the button pressed, the time increases more quickly.
• If the time on the display reaches 13 hours and you still keep the timer button
pressed, the display goes back to the baking time of the set program.
4 Press (start/stop/cancel button).
» The timer counts down the set time in minutes.
» The bread is ready when the timer has counted down to 0:00 and the
breadmaker beeps.
Finish the baking process
Caution
• The inside of the breadmaker, the bread pan, the kneading blade and the bread are very hot.
• Always use oven mitts when you remove the bread pan at the end of the baking cycle or at
any time during the keep-warm mode.
1 To power off the breadmaker, remove the mains plug from the wall socket.
2 Using pot holders or oven mitts, open the lid and turn the bread pan anticlockwise.
3 Grab the bread pan by its handle and lift it out.
4 Turn the pan upside down, hold the handle and shake the bread out.
Note
• Do not use metal utensils to remove the bread, as these may damage the non-stick coating of
the bread pan.
• Be careful, the bread pan and the bread are hot.
5 Use the hook supplied to remove the kneading blade from the shaft/bread.
• Always make sure that the kneading blade does not stay inside the bread,
otherwise you may damage the kneading blade when you slice the bread.
6 Let the breadmaker cool down before you clean it.
3140 035 33723
Caution
• This appliance is intended for household use only. If
the appliance is used improperly or for professional
or semi-professional purposes or if it is not used
according to the instructions in the user manual, the
guarantee becomes invalid and Philips refuses any
liability for damage caused.
• Never use any accessories or parts from other manufacturers or that Philips does not
specically recommend. If you use such accessories or parts, your guarantee becomes
invalid.
• Do not touch the bread pan with sharp utensils to avoid damage.
• Do not expose the appliance to high temperatures, nor place it on a working or still
hot stove or cooker.
• Always place the appliance on a stable, level and horizontal surface.
• Always put the bread pan in the appliance before you put the plug in the wall socket
and switch on the appliance.
• Always unplug the appliance after use.
• Always let the appliance cool down before you clean or move it.
• Do not place the bread pan in a conventional oven to bake bread.
• The accessible surfaces may become hot when the appliance is operating. Always use
oven mitts when you lift the bread pan by its handle or when you handle the hot bread
pan, the kneading blade or the hot bread.
• Beware of the hot steam that comes out of the steam vents during baking or out of
the breadmaker when you open the lid during or after the baking process.
• Do not lift and move the appliance while it is operating.
• Do not touch moving parts.
• Do not expose the appliance to direct sunlight.
• Do not insert metallic objects or alien substances into the steam vents.
• Do not use the bread pan if it is damaged.
• Always clean the appliance after use.
• Do not clean the appliance in the dishwasher.
• Do not use the appliance outdoors.
• Leave a free space of at least 10cm above, behind and on both sides of the appliance
to prevent damage due to radiated heat.
• To avoid damage to the appliance, do not place the bread pan or any other object on
top of the appliance.
Recycling
This symbol means that this product shall not be disposed of with normal
household waste (2012/19/EU).
Follow your country’s rules for the separate collection of electrical and electronic
products. Correct disposal helps prevent negative consequences for the
environment and human health.
Electromagnetic elds (EMF)
This Philips appliance complies with all standards regarding electromagnetic elds (EMF). If
handled properly and according to the instructions in this user manual, the appliance is safe
to use based on scientic evidence available today.
Power failure backup
This appliance has a backup function that remembers the status before a power failure,
provided the power supply resumes within 10 minutes. If the power failure occurs during
a cooking process, the countdown of the cooking time continues where it left off when
the power supply resumes. If the power failure lasts longer than 10 minutes and the failure
occurs during a cooking process, the breadmaker automatically resets to the preset setting
when the power supply resumes. Open the breadmaker, remove its contents and start all
over again. If you have set the timer and the preset cooking process has not yet started when
a power failure occurs, the breadmaker automatically resets to the preset setting when the
power supply resumes. Open the breadmaker, remove its contents and start all over again.
2 Introduction
Congratulations on your purchase and welcome to Philips! To fully benet from the support
that Philips offers, register your product at www.philips.com/welcome.
EN
1 Important
Read this user manual carefully before you use the appliance, and save the user manual for
future reference.
Danger
• Never immerse the body of the breadmaker in water or any other liquid, nor rinse it
under the tap.
• Do not cover the steam and air vents while the breadmaker is operating.
Warning
• This appliance can be used by children aged from 8
years and above and persons with reduced physical,
sensory or metal capabilities or lack of experience
and knowledge if they have been given supervision
or instruction concerning use of the appliance in a
safe way and understand the hazards involved.
• Children shall not play with the appliance. Cleaning
and user maintenance shall not be made by children
unless they are older than 8 and supervised.
• Keep the appliance and its cord out of reach of
children less than 8 years. Do not let the mains cord
hang over the edge of the table or worktop on
which the appliance stands.
• If the mains cord is damaged, you must have it
replaced by Philips, a service centre authorised by
Philips or similarly qualied persons in order to
avoid a hazard.
• The appliance is not intended to be operated by
means of an external timer or a separate remote
control system.
• The accessible surfaces may become hot during
use.
• Do not put over 560 g our, and 9 g, 12 g, 14 g
yeast for general bread, super rapid bread, and
easter cake programs respectively.
• Check if the voltage indicated on the appliance corresponds to the local mains voltage
before you connect the appliance.
• Only connect the appliance to an earthed wall socket. Always make sure that the plug
is inserted rmly into the wall socket.
• Do not use the appliance if the plug, the mains cord, the body of the appliance or the
bread pan is damaged.
• Make sure that the heating element, the rotating shaft of the bread pan and the outside
of the bread pan are clean and dry before you put the plug in the wall socket.
• Do not use the appliance for any other purpose than described in this manual.
• Do not plug in the appliance or operate the control panel with wet hands.
• Do not come near the steam and air vents with your face or hands when the appliance
is operating.
• Do not open the lid during the baking process, as this may cause the dough or bread
to collapse.
• During the baking process, the appliance itself and the lid become extremely hot. Be
careful not to burn yourself.
• Do not remove the bread pan from the appliance during use.
• Never use any utensils to mix the ingredients in the bread pan during a baking program.
• Only put ingredients in the bread pan. Do not put or spill any ingredients and/or
additives in the inside of the appliance to avoid damage to the heating element.
• When you remove jam from the bread pan, lift the bread pan with both hands in oven
mitts to pour out the hot jam.
a
b
c
e
f
g
d
X7
X8
X9
X10
X1
X2
X3
X4
X5 X6
X8
X11
Y
O
G
H
T
U
R
T
BEEP
(HD9015) (HD9016)
1/4

Delta i konversationen om denna produkt
Här kan du dela vad du tycker om Philips HD9016 Bakmaskin. Om du har en fråga, läs först noggrant igenom manualen. Att begära en manual kan göras genom att använda vårt kontaktformulär.