English
GREA
T BRIT
AIN • customer service
tel: 0845 300 9799
e-mail:
[email protected] internet: www
.clasohlson.com/uk
Ver. 20140916
Digital Timer
Art.no. 36-5837 Model EFP700ET
Please read theentire instruction manual before using theproduct
and then save it for future reference. Wereserve theright for any
errors in text or images and any necessary changes made to
technicaldata. Ifyou have any questions concerning technical
problems please contact our Customer Services.
Product description
Digital timer designed for flush mounting inside apattress. Perfect
for timer controlled lighting. Aperfect way to save energy and
scare away potential burglars. Canbe controlled manually or set to
random. Countdown function allows you to preset anofftime.
Up to 20 on/off commands can be programmed per day with
15day combinations available. Backup battery keeps you settings
intact during apowercut. Timeand programme are shown on
thedisplay, and buttons are protected to prevent buttons being
pressed unintentionally.
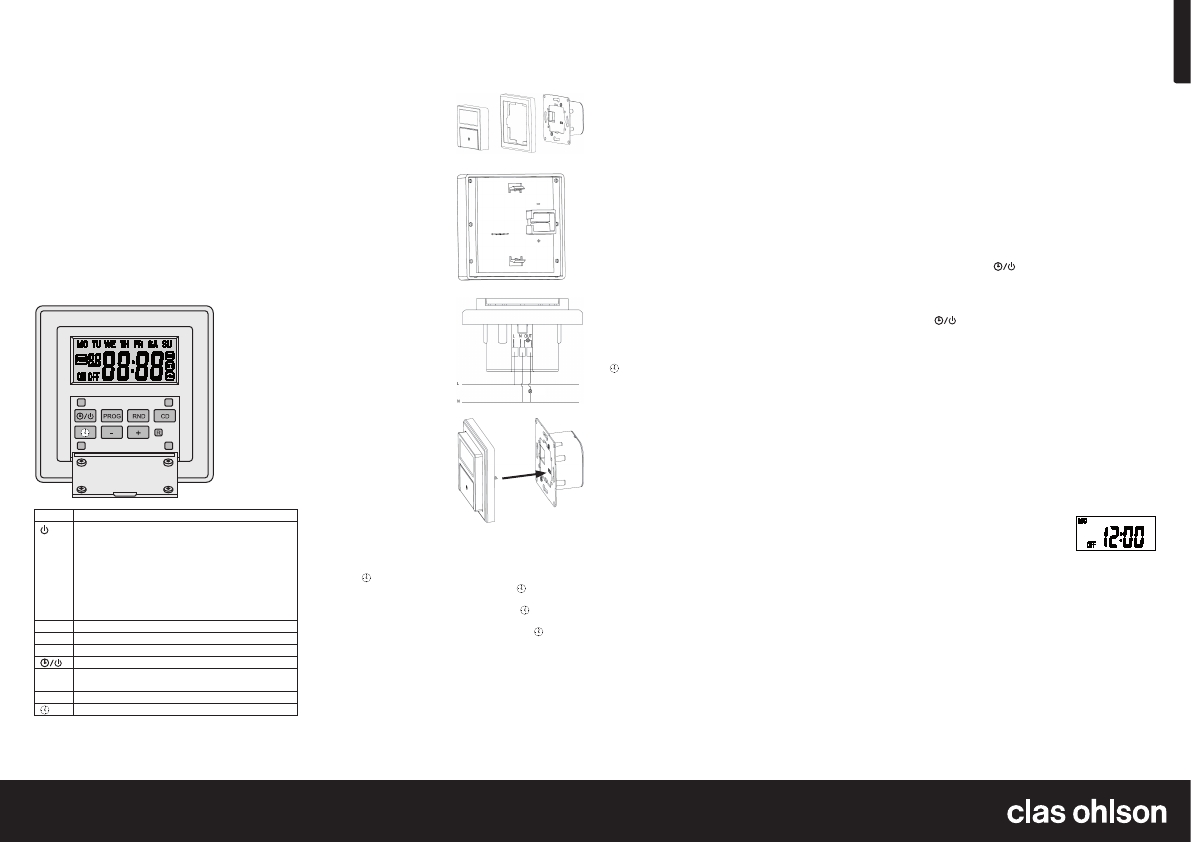
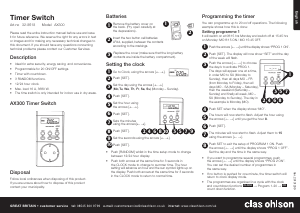
Buttons and functions
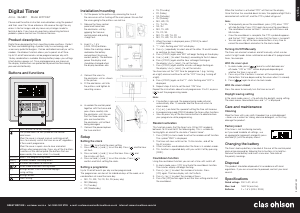
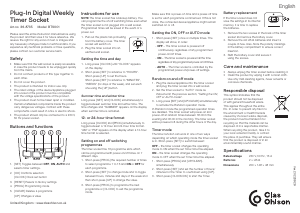
Installation/mounting
1. Cut thepower to thepattress by removing thefuse at
theconsumer unit or turning off themainpower. Ensure that
thewires going to thepattress are notlive.
• TH (Thursday)
• FR (Friday)
• SA (Saturday)
• SU (Sunday)
• MO, WE, FR,
• TU, TH, SA
• SA, SU
• MO, TU, WE
• TH, FR, SA
• MO, TU, WE, TH, FR
• MO, TU, WE, TH, FR, SA
1. When theclock is displayed, press [ PROG ] to select
asettingmode.
2. “1” starts flashing and “ON” will display.
3. Press [ + ] repeatedly to select one of theother 19 on/off modes
or continue to step 4below.
4. Press [ PROG ] again and “MO” will begin flashing on thedisplay.
5. Use [ + ] and [ - ] to select theday(s) according to thelistabove.
6. Press [ PROG ] again and thehour will begin flashing on
thedisplay. Use [ + ] and [ - ] to set thehour.
7. Press [ PROG ] again and theminutes will begin flashing on
thedisplay. Use [ + ] and [ - ] to set theminutes.
You have now set the “ON” time for programme 1 (e.g. turning
on alight) and can continue to set the “OFF” time (e.g. turning off
alight).
8. Press [ PROG ] again so that “1” starts flashing and “OFF” is
displayed.
9. Repeat steps 3 to 5 to set thenext “ON”time.
Repeat theinstructions above to set programmes 2 to 20, or press
[
] to exit theprogrammingmode.
Note:
• If no button is pressed, theprogramming mode will end
automatically after 10 seconds and thetimer will return to
clockmode.
• If [ + ] or [ - ] are held, thespeed of setting thetime will increase.
• In programming mode [ PROG ] disables thetimers other functions.
• You can press any of thefour corner buttons to delete/restore
your programme while programming.
Random activation
This function means that thetimer turns ON or OFF randomly
between 18:00 and 06:00 thefollowingday. Thisis suitable for
turning lights on and off to simulate a “lived-in home”.
1. Press [ RND ] in clock mode to active therandom on/off function.
Thesymbol “RND” is displayed.
2. Thetimer will now switch on for 10–26 minutes, and off for
26–42 minutes.
3. Other functions are disabled when thetimer is in randommode.
4. This function is repeated daily until you switch it off by pressing
[ RND ].
Countdown function
Using thecountdown function you can set atime until switchoff.
1. In clock mode, press [ CD ] to activate thecountdown function.
Theminutes display will begin flashing.
2. Press [ + ] or [ - ] to select thenumber of minutes. Press
[ CD ]again. Thehour display will start toflash.
3. Press [ + ] or [ - ] to select thenumber ofhours.
4. Press the [ CD ] button again to exit thetime setting and to start
thecountdown.
When thefunction is activated “CTD” will flash on thedisplay.
Oncethetimer has counted down to zero, theappliance/light that is
connected will switch off, and theCTD symbol will goout.
Note:
• To temporarily pause thecountdown, press [ CD ]once. “CTD”
will stop flashing. Press [ CD ] again to resume thecountdown.
• Thecountdown can be set from 1 minute up to 99 hours and
59minutes.
• Once thecountdown is complete, theCTD symbol disappears
and thetext “OFF” appears to show that thetimer is turnedoff.
• You can press any of thefour corner buttons at any time to
cancel thecountdown and return to theclockmode.
Turning On/Off Manually
Thetimer can also be turned on and off manually, which can be
useful if alight needs to be switched on outside of its programmed
times, for example.
With thecoveropen
1. In clock mode, press [ ] once to switch between on/
offmode. “ON” or “OFF” will be displayed depending on
whether thetimer is on oroff.
2. Press any of the4 buttons in corners of thecontrol panel
(thebuttons that are depressed by thecover when it is closed).
3. Press [
] again to return to clockmode.
With thecover closed
Press thecover to manually turn thetimer on oroff.
Daylight saving setting
In theclock mode, press [ + ] to activate thedaylight saving setting.
Theclock moves forward one hour and “+1” is displayed.
Care and maintenance
Cleaning
Wipe thetimer with adry cloth if needed. Useamild detergent
– never use asolvent or strong, abrasive detergent, as this may
damage theproduct.
Factoryreset
If thetimer is not functioning normally,
or if you need to delete all settings, use
anappropriate implement and gently press
and hold [ R ] until thedisplay shows:
Changing thebattery
Thetimer’s backup battery is located at therear of thecontrol panel
and can be removed by following theinstructions in Installation.
Remove theold battery and insert anewone. Takenote of
thepolarity markings.
Disposal
This product should be disposed of in accordance with local
regulations. Ifyou are unsure how to proceed, contact your local
council.
Specifications
Rated voltage 230V AC, 50 Hz
Max.load 1800W (resistive)
Batteries 2×1.5 V (LR44, SR44)
[ R ] Press to reset to factory settings.
[
]
Thesymbol refers to thesymbol on thecontrol
panelcover.
When thecover is closed: manual switching on/off.
Pressto manually switch thetimer on or off, regardless
of thecurrent programme.
When thecover isopen: also to clear and retain
settings when programming. Pressany of the4 buttons
in corners of thecontrol panel (thebuttons that are
depressed by thecover when it is closed).
[ PROG ] Selects theprogrammingmode.
[ RND ] Activates random switching on/off.
[ CD ] Activates countdown to switchoff.
[
]
On/off mode and clock settingmode.
[ + ] Settings button. Pressto activate daylight
savingsetting.
[ - ] Settings button.
[
]
Clock setting.
2. Release thetimer control
panel and frame from
theelectronics unit by
gripping theframe or
control panel and pulling
straightout.
3. Insert 2×1.5 V
(LR44,SR44) batteries.
Follow themarkings above
and below thebattery
compartment to ensure
correct polarity. Thebatteries
power thedisplay and
should be changed when
thedisplay becomesdim.
4. Connect thewires to
theelectronics unit as shown
in thepicture.
5. Fit theelectronics unit into
thepattress and tighten to
mounting screws.
6. Assemble thecontrol panel
together with theframe and
press them carefully into
theelectronicsunit. Ensure
that thethree connector
pins are inserted into
theelectronics unit without
being damaged.
7. Connect thepower/replace
thefuse andtest.
Setup
Setting theclock
1. Press [ ] to activate theclock setting.
2. Press or hold [ + ] and [ - ] to set theday. Press [ ] and thehour
willflash.
3. Press or hold [ + ] and [ - ] to set thehour. Press [ ] and
theminutes willflash.
4. Press or hold [ + ] and [ - ] to set theminutes. Press [ ] to
confirm and finish setting theclock.
Setting aprogramme
Up to 20 on/off events per day can be programmed.
Theprogrammes can be set for individual days of theweek, or in
combinations of more than oneday:
• MO, TU, WE, TH, FR, SA, SU (every day)
• MO (Monday)
• TU (Tuesday)
• WE (Wednesday)


Delta i konversationen om denna produkt
Här kan du dela vad du tycker om Clas Ohlson EFP700ET Kopplingsur. Om du har en fråga, läs först noggrant igenom manualen. Att begära en manual kan göras genom att använda vårt kontaktformulär.